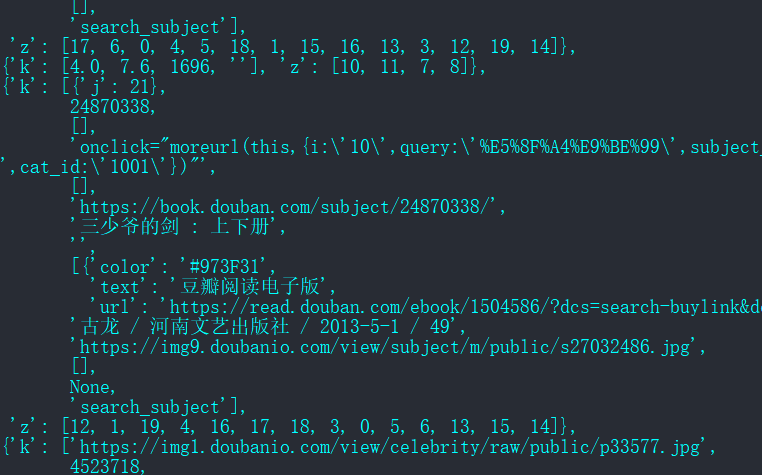
首先来看一下原始数据,可以看到 window.DATA 里面是一大串意义不明的乱码
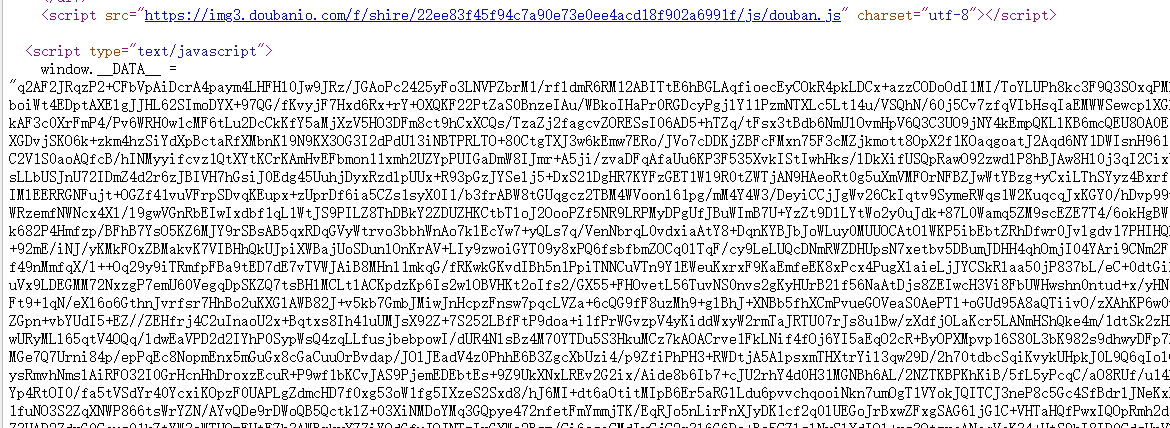
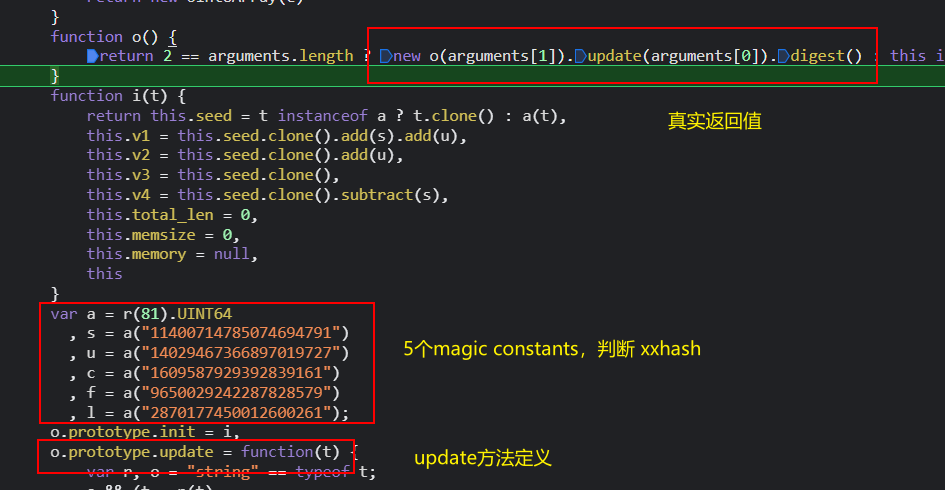
直接全局搜索 window.__DATA__ 然后下断点,刷新页面
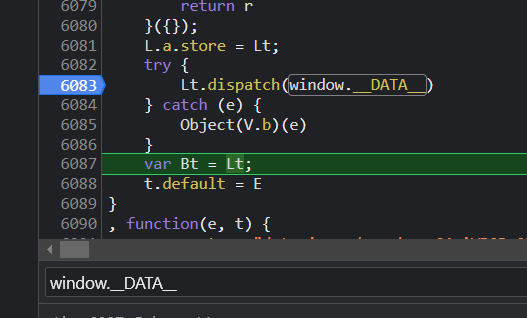
进入到 Lt.dispatch 函数内部
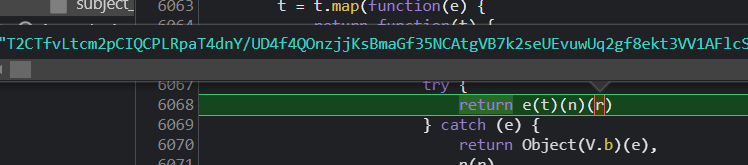
这里很明显,r 就是 window.__DATA__,即原始数据,e(t)(n) 意思是原始数据经过了若干个函数的处理
我们进入到函数内部,看看具体做了什么,以及怎么用python来实现相同的功能
第一个函数
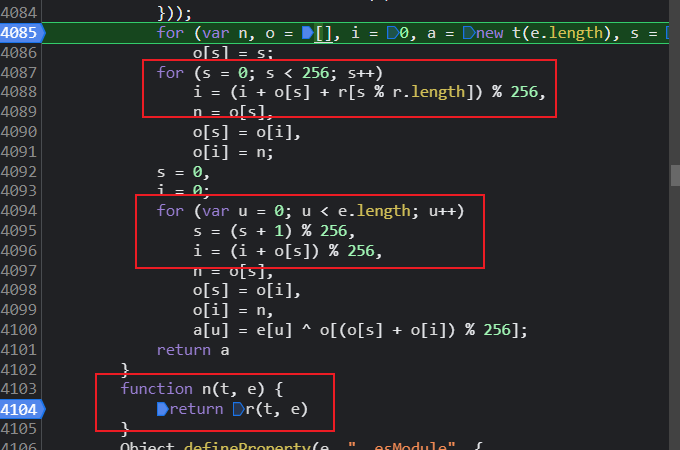
首先是 (n) 函数
函数.png)
可以看到里面有好几处处理,我们一个一个来复现
[ol]
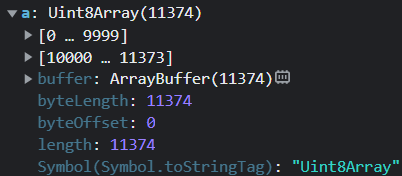
原始数据r经过e.from函数的处理后,变成了Unit8Array的数据类型,其实就是对原始数据进行 base64 解码
python主要使用base64标准库实现
[/ol]
a = list(base64.b64decode(data))

从上图可以看到两个的效果都是一样的
[/ol]
s = Math.max(Math.floor((a.length - 2 * i) / 3), 0)
u = a.slice(s, s + i)
这两个就不用多说了,s是地板除(后面的0可以忽视),u是切片操作,python实现:
s = floor((len(a) - 2 * i) / 3)
u = a[s : s + i]
concat是连接的意思,e.concat其实就是对两个数组进行合并操作
[/ol]
a = a[0:s] + a[s + i :]
这一步进行了较多操作,首先是 e.concat([u, e.from(t)]),几次打断点发现 e.from(t) 都是空数组,所以这里结果只有 u数组
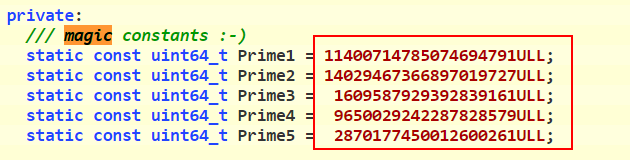
然后是 Object(o.hash) 很明显这里是一个hash函数来处理 u,进入到内部看一下

继续进入 h.default 内部
这里就得凭经验来判断了,如果熟悉 xxhash算法(传送门),下方红框处的五个magic constants应该就会很眼熟,对照五个常数,确认是64位的xxhash算法
[/ol]
python的话,直接使用第三方的 xxhash库,seed 则是固定的 41405,两者的结果对比:
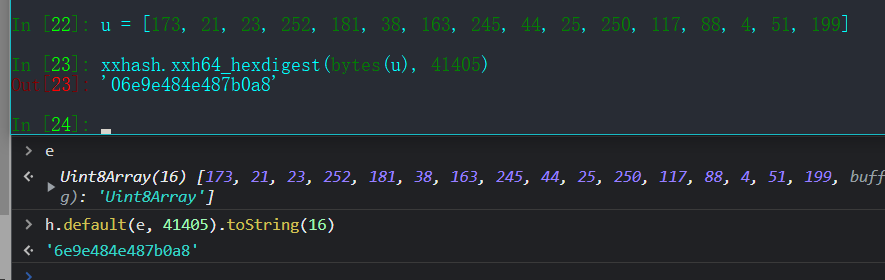
这里涉及到 bytes 和 list 的相互转换,直接使用对应的内置函数就行
xxh64_hexdigest 只能处理字节
第二个函数
第一个函数处理就到此结束,主要是为了得到 a 和 c 两个参数,下面进入第二个函数(需要经过三次 step in & out):
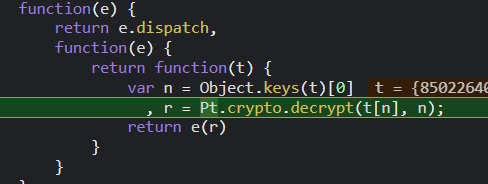
这里注意到 r = Pt.crypto.decrypt(t[n], n), t[n] 对应上一步的a,n则对应c,所以我们需要进入 decrypt内部看看做了什么
这里有几处很明显的特征,如果熟悉rc4算法的朋友,应该能很快地认出来,下面是rc4的wiki
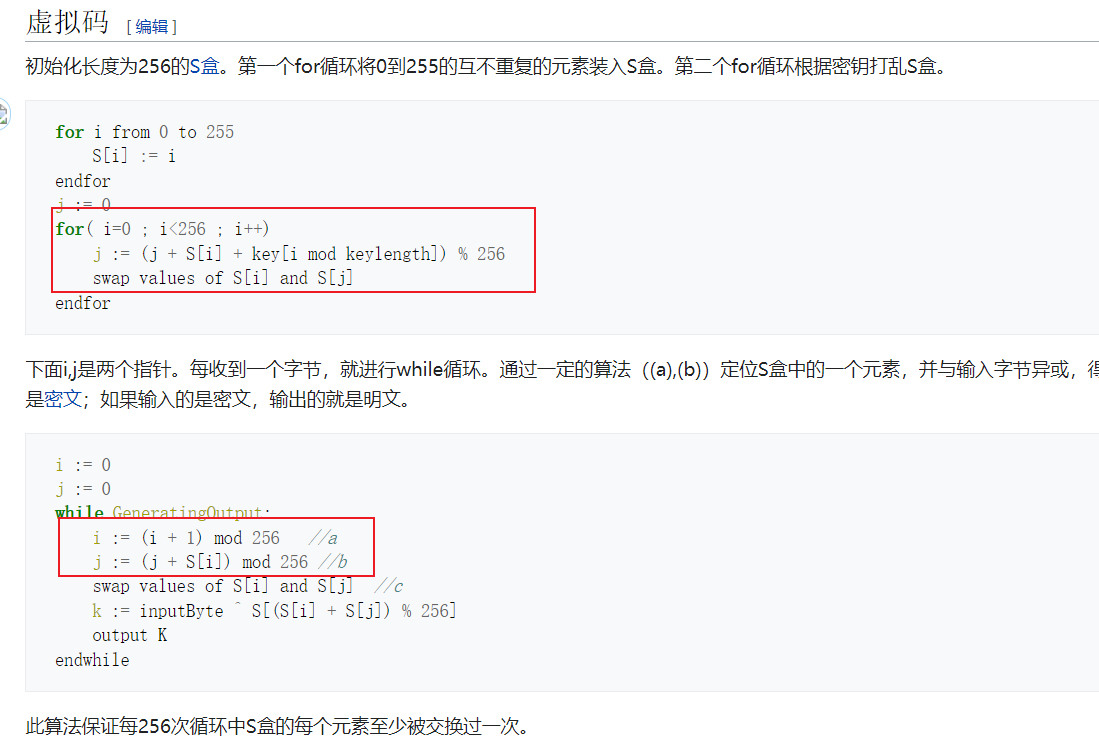
当然,如果认不出是rc4也没关系,就几十行代码,完全可以照着写实现整个过程,就是重复造轮子比较花时间
我们直接使用 Crypto 库 ARC4 模块
def crypto_rc4(text: bytes, sec_key: str):
cipher = ARC4.new(sec_key.encode())
cipher_text = cipher.encrypt(text)
return cipher_text
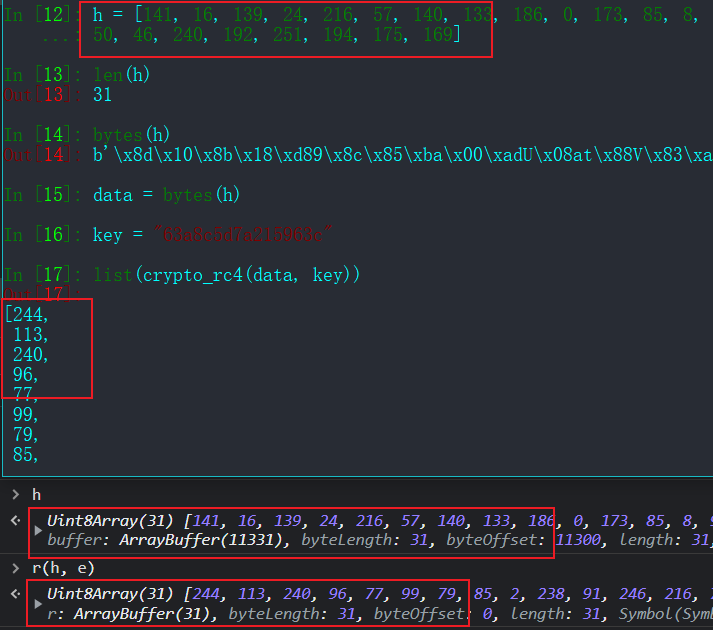
拿一小段字节,分别进行加密测试,对比结果,成功复现原功能:
第三个函数
第二步一样,3次 step into & out 后,我们进入第三个函数内部,可以看到参数t就是经过rc4加密后的数组
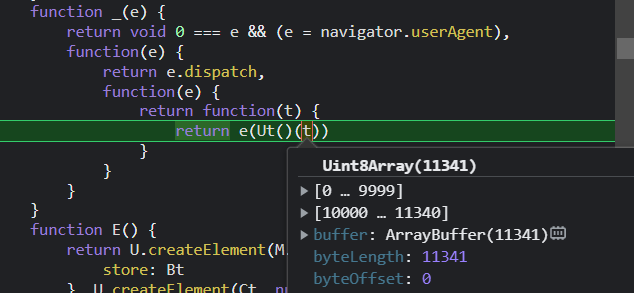
再次进入函数内部
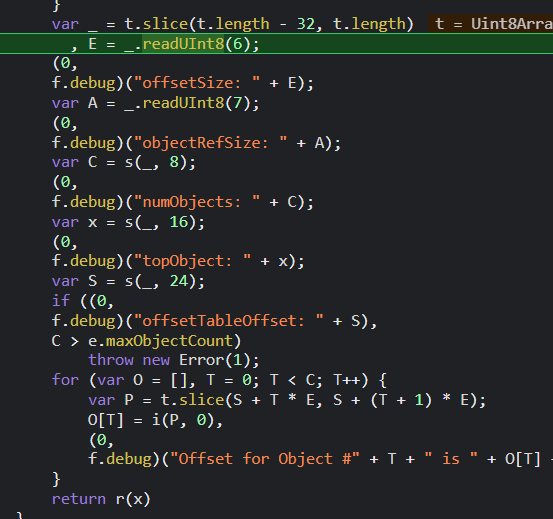
进入最后的 r函数内部
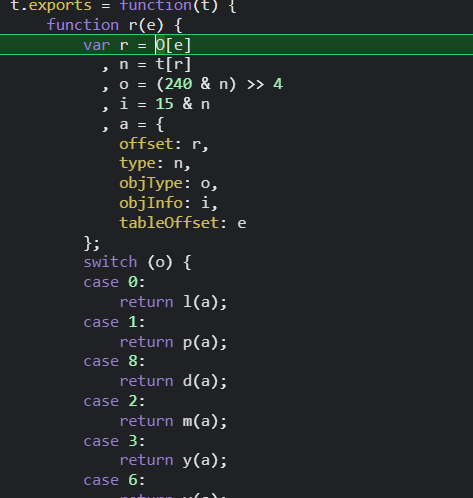
这里我们无法确定用的是哪种解析,直接拿出全部的关键词去google一下吧,出现最多的关键词是 bplist,看一下它的实现过程,是不是和豆瓣的很相似?
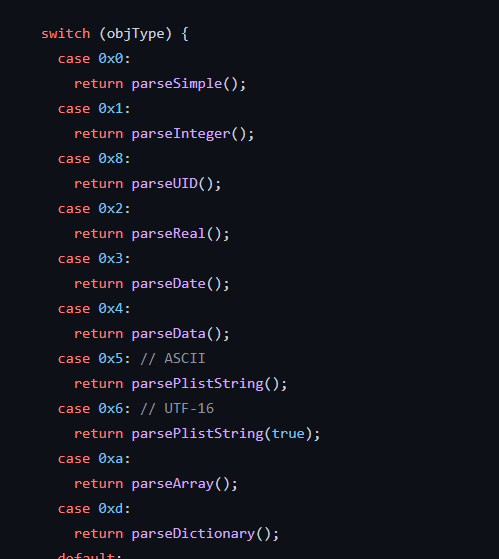
bplist的全称是 Binary Property List,plist 属性列表是一种ios系统中用来存储少量数据的文件格式,可以和 json、xml、binary等格式互相转换,这里有介绍
最终将 binary数组 转成 json数据
python的内置标准库已经有plistlib专门来处理plist文件,直接使用 loads 方法来加载 binary 就行
import plistlib
import struct
'''
需要引入 struct 模块,不然会报 undefined error
'''
pb_results = plistlib.loads(rc4_bytes, fmt=plistlib.FMT_BINARY)
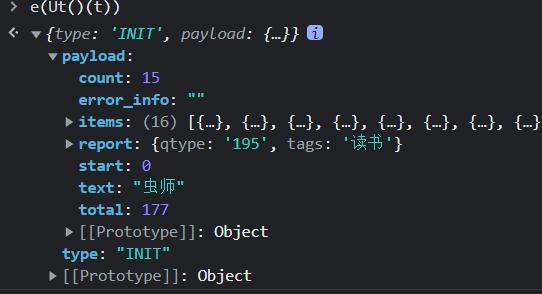
最终的解析结果是一个数组:
代码整理
import requests
import base64
import re
import xxhash
import plistlib
import struct
from pprint import pprint
from Crypto.Cipher import ARC4
from math import floor
from plistlib import FMT_BINARY, _BinaryPlistParser, _undefined
def crypto_rc4(raw_data: bytes, sec_key: str):
cipher = ARC4.new(sec_key.encode())
rc4_bytes = cipher.encrypt(raw_data)
return rc4_bytes
def judge_title(a):
if "onclick" not in a and a != "search_subject" and a != "" and "doubanio" not in a:
return True
return False
def main():
url = f"https://search.douban.com/book/subject_search?search_text=虫师&cat=1001"
res = requests.get(url)
data = re.search(r'window.__DATA__ = "(.+?)"', res.text, flags=re.DOTALL).group(1)
i = 16
a = base64.b64decode(data)
s = floor((len(a) - 2 * i) / 3)
u = a[s : s + i]
raw_bytes = a[0:s] + a[s + i :]
sec_key = xxhash.xxh64_hexdigest(u, 41405)
# print(sec_key)
# print(raw_text)
rc4_bytes = crypto_rc4(raw_bytes, sec_key)
# print(rc4_bytes)
pb_results = plistlib.loads(rc4_bytes, fmt=FMT_BINARY)
print("最终结果为:")
pprint(pb_results)
results = list(
filter(
lambda d: isinstance(d, dict)
and len(d["k"]) > 10
and len(d.keys()) == 2,
pb_results,
)
)
for d in results:
for a in d["k"]:
if bool(a) and isinstance(a, int) or isinstance(a, str):
a = str(a)
if "img" in a:
print(f"封面:{a}")
elif "book.douban.com" in a:
print(f"豆瓣链接:{a}")
elif a.isdigit():
print(f"豆瓣id:{a}")
elif " / " in a:
print(f"出版信息:{a}")
elif judge_title(a):
print(f"书名:{a}")
print("cxs".center(50, "-"))
if __name__ == "__main__":
main()
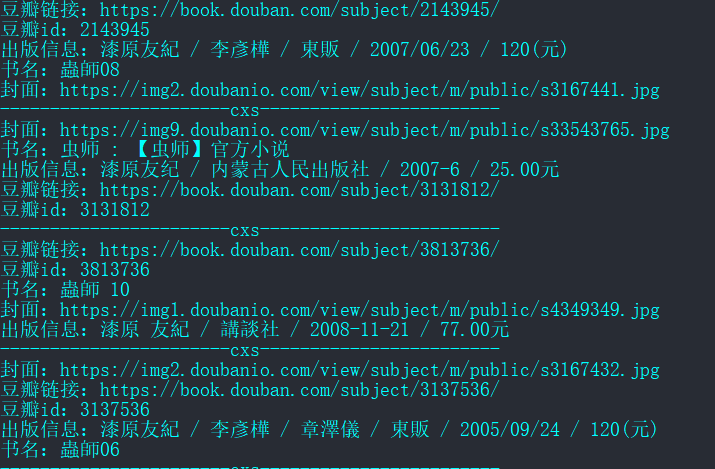
运行结果如下,我做了一下筛选和格式化输出
最后,其实m端的豆瓣接口没有加密,可以直接用 xpath提取数据,不用去逆向这么麻烦 藍藍藍