正值某比赛出题,一道困难题不知道要怎么出才好,突然想起了il2cpp在安卓平台的加密,但是本人又不太会这方面,只好从学习一下il2cpp的原理并且尝试进行加固,本文记录我的出题过程。
整体启动与 libil2cpp.so 被载入的流程
要直到如何保护libil2cpp.so首先需要知道这个so文件是在什么时候被载入的,根据il2cpp安卓端的启动流程,我们可以发现载入位置,其流程图如下:
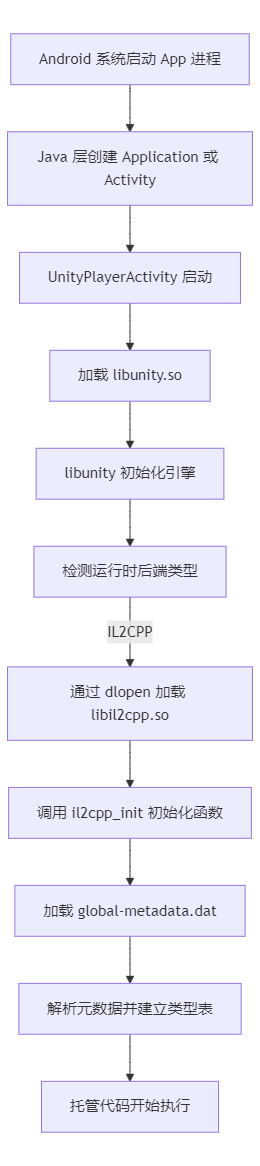
在此处我们可以看到libunity.so通过dlopen加载libil2cpp.so
global-metadata.dat 的加载时机与分支流程
光保护il2cpp.so大抵是不够的,很多加固方案肯定都会选择加密global-metadata.dat,接下来我们看看il2cpp.so中负责加载global-metadata.dat的代码位置吧,如下是加载metadata的流程图

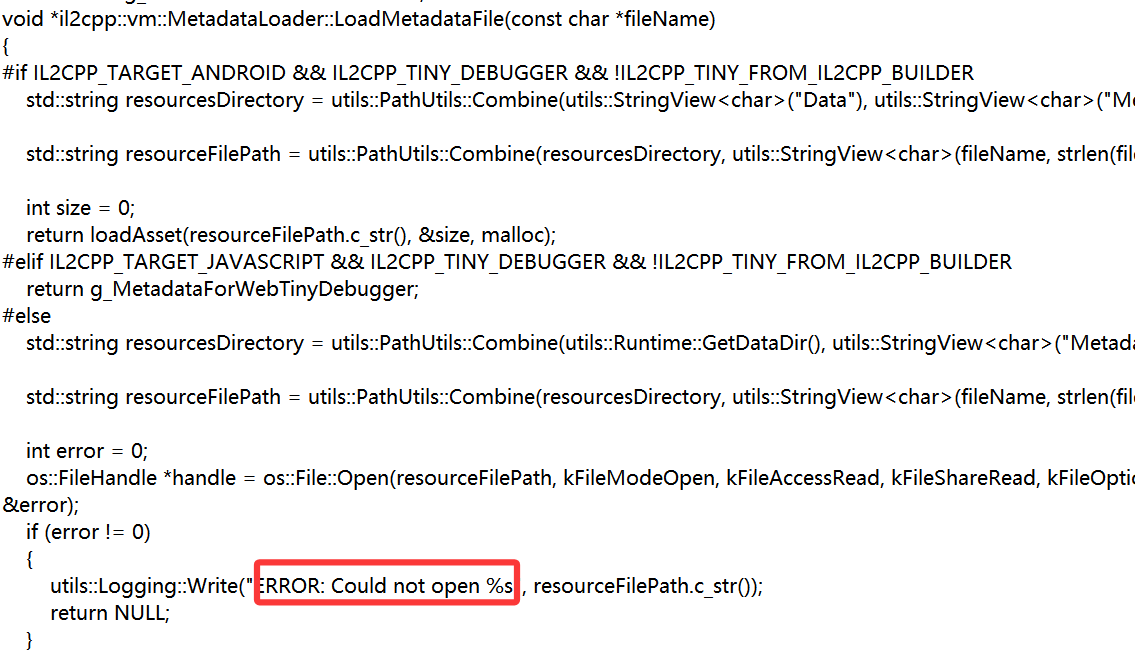
源码分析可知加载global-metadata.dat的代码位置在
E:\Unity Edit\2020.3.48f1c1\Editor\Data\il2cpp\libil2cpp\vm\MetadataLoader.cpp
具体代码如下:
os::FileHandle* handle = os::File::Open(resourceFilePath, kFileModeOpen, kFileAccessRead, kFileShareRead, kFileOptionsNone, &error);
if (error != 0)
{
utils::Logging::Write("ERROR: Could not open %s", resourceFilePath.c_str());
return NULL;
}
void* fileBuffer = utils::MemoryMappedFile::Map(handle);
加固global-metadata.dat
一些小问题
正如上文所提到的,加固global-metadata.dat主要是在
E:\Unity Edit\2020.3.48f1c1\Editor\Data\il2cpp\libil2cpp\vm\MetadataLoader.cpp
,理论上修改了此处的代码之后,再写一个脚本去加密metadata再打包回去,就可以运行了,但是如果直接修改MetadataLoader.cpp会导致后面如果不需要加固的项目每一次编译都需要加密global-metadata.dat才能运行,这样的话岂不是非常的不方便
项目构建时自动加固global-metadata.dat
自然,这里先说一下一个可能的解决方案,也是我在NSSCTF 4th中出过的一个pyinstaller打包项目加固的原理,我们可以通过设置一个标记,比如MHY0,我们再魔改MetadataLoader的时候通过识别是否存在MHY0这个标识符来确定是否需要解密,这样就不会影响后续打包的项目直接运行。
当然,还有更加优秀的办法,我们看到如下GitHub项目:
https://github.com/badApple001/Il2cppEncrtypt
我们在Unity Hub编写完主体代码之后就可以开始考虑加固了,接下来讲述一下Il2cppEncrtypt 这个项目构建时加固的原理。
Unity有一个很有意思的机制叫做Editor Scripting (Unity 编辑器扩展系统)暨所有放在 Assets/Editor/ 或任何以 Editor 命名的文件夹里的脚本,都会被编译进一个 编辑器专用的程序集(Editor Assembly),不会进入打包的游戏。
与此同时,Unity还存在IPostprocessBuildWithReport这个接口有什么用呢,来看一下介绍
IPostprocessBuildWithReport:Unity 的构建管线接口,OnPostprocessBuild 会在构建完成后自动被调用,参数是 BuildReport,包含构建结果、输出路径、平台等信息。
(上面的字那么多看的怪枯燥的吧,让GPT生成了一张图,润色一下,看个乐呵

同时在这个接口的上下文中,我们可以获取到打包的路径,从而进行对global-metadata.dat的加固
那么其实我们就可以扩展这个接口,并且重写OnPostprocessBuild,就可以实现在构建项目的时候一并完成对global-metadata.dat加固了。
以下代码摘自Il2cppEncrtypt:
void IPostprocessBuildWithReport.OnPostprocessBuild( BuildReport report )
{
SetDisplayLog( LogMessageFromCpp );
if ( report.summary.platform == UnityEditor.BuildTarget.Android )
{
Debug.Log(report.summary.outputPath);
EncryptionCode( Marshal.StringToHGlobalAnsi( report.summary.outputPath ) );
OverrideLoader( Marshal.StringToHGlobalAnsi( report.summary.outputPath ) );
}
else if ( report.summary.platform == UnityEditor.BuildTarget.iOS )
{
}
Debug.Log( "执行扩展程序完成" );
}
导出项目并覆盖项目内global-metadata.dat,编译魔改的il2cpp.so
诚然,如果我们直接使用Unity Hub编译一个可以直接运行的unity app的话默认使用的是Unity Editor中的代码,这个十分坑爹,也许是我不知道如何修改,反正最后试了很久也是没招了。
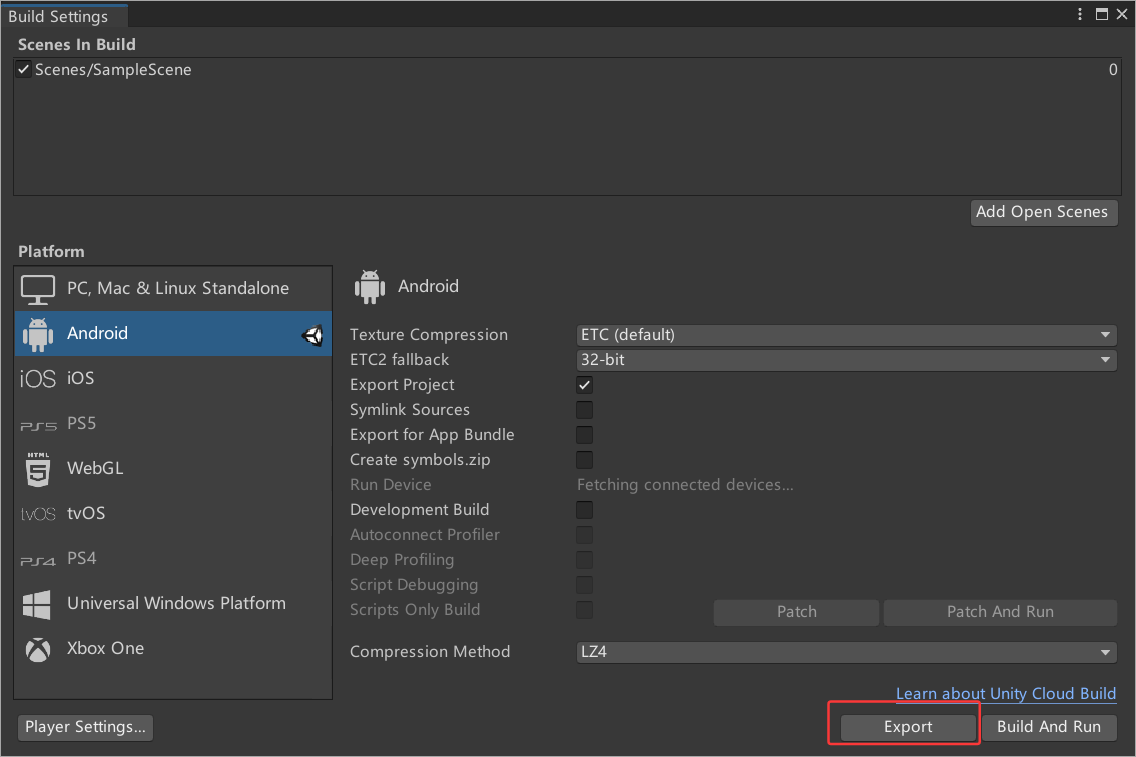
导出Unity 项目之后通过Android Studio直接编译:
导出项目在装好安卓的SDK之后,Build Setting界面,直接就可以看到导出了。
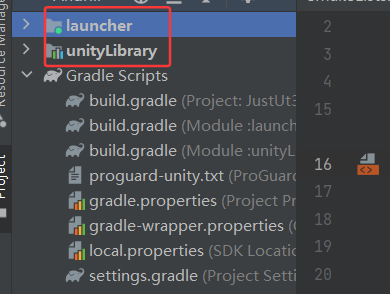
导出之后在导出目录下可以看到两个包launcher和unityLibrary,其中unityLibrary主要加载il2cpp的内容
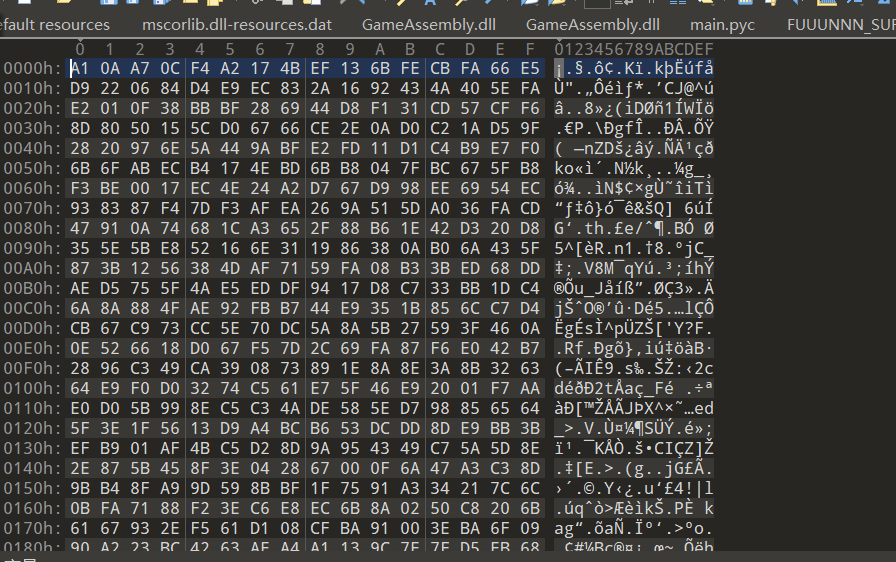
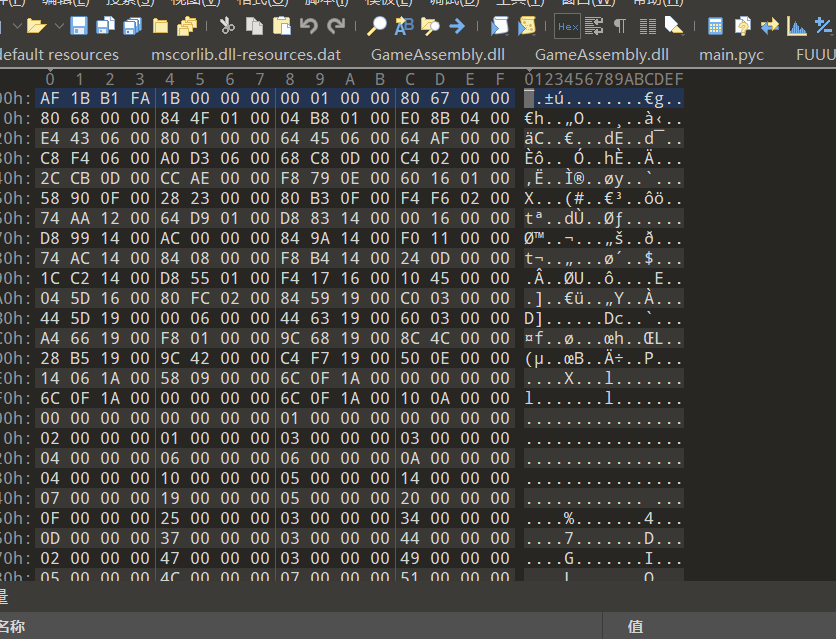
同时我们检查一下Metadata是否加密
其位置在于
unityLibrary\src\main\assets\bin\Data\Managed\Metadata
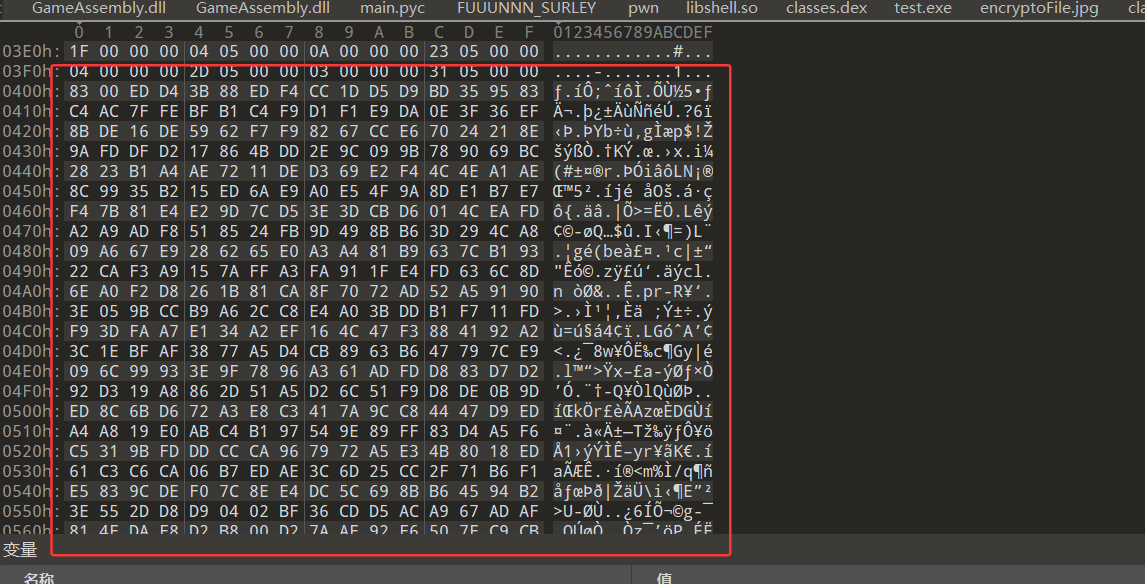
可以看到这里原本应该是有意义的symbol,但此刻变成了乱码,即Metadata成功被加密
接下来我们需要在项目中的loader写入解密代码,但你会发现Android studio 好像无法完美识别到关于il2cpp.so的代码,我们需要手动在
unityLibrary\src\main\Il2CppOutputProject\IL2CPP\libil2cpp\vm\MetadataLoader.cpp
中修改,这里需要注意的是确保和我们加密代码一致,不然会导致崩溃。
如下代码中所示,主要的点也就是在拿到fileBuffer 之后做解密即可。
void *il2cpp::vm::MetadataLoader::LoadMetadataFile(const char *fileName)
{
#if IL2CPP_TARGET_ANDROID && IL2CPP_TINY_DEBUGGER && !IL2CPP_TINY_FROM_IL2CPP_BUILDER
std::string resourcesDirectory = utils::PathUtils::Combine(utils::StringView("Data"), utils::StringView("Metadata"));
std::string resourceFilePath = utils::PathUtils::Combine(resourcesDirectory, utils::StringView(fileName, strlen(fileName)));
int size = 0;
return loadAsset(resourceFilePath.c_str(), &size, malloc);
#elif IL2CPP_TARGET_JAVASCRIPT && IL2CPP_TINY_DEBUGGER && !IL2CPP_TINY_FROM_IL2CPP_BUILDER
return g_MetadataForWebTinyDebugger;
#else
std::string resourcesDirectory = utils::PathUtils::Combine(utils::Runtime::GetDataDir(), utils::StringView("Metadata"));
std::string resourceFilePath = utils::PathUtils::Combine(resourcesDirectory, utils::StringView(fileName, strlen(fileName)));
int error = 0;
os::FileHandle *handle = os::File::Open(resourceFilePath, kFileModeOpen, kFileAccessRead, kFileShareRead, kFileOptionsNone, &error);
if (error != 0)
{
utils::Logging::Write("ERROR: Could not open %s", resourceFilePath.c_str());
return NULL;
}
void *fileBuffer = g_cacheFileHeader = utils::MemoryMappedFile::Map(handle);
int ero;
int64_t length = os::File::GetLength(handle, &ero);
void *decBuffer = g_cacheDecodeHeader = PromiseAntiencryption(fileBuffer, length);
os::File::Close(handle, &error);
if (error != 0)
{
utils::MemoryMappedFile::Unmap(fileBuffer);
fileBuffer = NULL;
return NULL;
}
return decBuffer;
#endif
}
至此成功的完成了Metadata的加密,但是这够吗,显然远远不够,我们准备开始下一步探索,加密libil2cpp.so
加固il2cpp.so
一些小小问题
在上文中提到了,libil2cpp.so 是被libunity.so加载的,但是我们在libUnity的编译脚本中可以看见似乎build.gradle是没有编译libunity.so的逻辑的,代码如下
def BuildIl2Cpp(String workingDir, String targetDirectory, String architecture, String abi, String configuration) {
exec {
commandLine(workingDir + "/src/main/Il2CppOutputProject/IL2CPP/build/deploy/netcoreapp3.1/il2cpp.exe",
"--compile-cpp",
"--incremental-g-c-time-slice=3",
"--avoid-dynamic-library-copy",
"--profiler-report",
"--libil2cpp-static",
"--platform=Android",
"--architecture=" + architecture,
"--configuration=" + configuration,
"--outputpath=" + workingDir + targetDirectory + abi + "/libil2cpp.so",
"--cachedirectory=" + workingDir + "/build/il2cpp_"+ abi + "_" + configuration + "/il2cpp_cache",
"--additional-include-directories=" + workingDir + "/src/main/Il2CppOutputProject/IL2CPP/external/bdwgc/include",
"--additional-include-directories=" + workingDir + "/src/main/Il2CppOutputProject/IL2CPP/libil2cpp/include",
"--tool-chain-path=" + android.ndkDirectory,
"--map-file-parser=" + workingDir + "/src/main/Il2CppOutputProject/IL2CPP/MapFileParser/MapFileParser.exe",
"--generatedcppdir=" + workingDir + "/src/main/Il2CppOutputProject/Source/il2cppOutput",
"--baselib-directory=" + workingDir + "/src/main/jniStaticLibs/" + abi,
"--dotnetprofile=unityaot")
environment "ANDROID_SDK_ROOT", getSdkDir()
}
delete workingDir + targetDirectory + abi + "/libil2cpp.sym.so"
ant.move(file: workingDir + targetDirectory + abi + "/libil2cpp.dbg.so", tofile: workingDir + "/symbols/" + abi + "/libil2cpp.so")
}
同时我们编译一次项目也会发现JniLibs的目录出现了时间差

种种迹象也说明了libunity.so似乎不再我们可控范围内,经过搜索得知这个unity.so是核心引擎,属于Unity的闭源部分,因此我们没有办法通过修改unity.so来拦截il2cpp的加载从而实现动态解密。
通过Hook拦截il2cpp.so加载流程
既然无法从代码层面进行修改ilbunity.so,那么根据上文提到的il2cpp.so被加载流程,最后加载libunity.so肯定是要走dlopen的,那么是不是说我们只需要在这之前注册一个hook,但dlopen打开的是libil2cpp的时候我们进行加密呢,接下来我们开始尝试
这里的Hook有很多方法,Github已经开源了很多好用的Hook框架,我这里使用dobby hook
https://github.com/jmpews/Dobby?tab=readme-ov-file
dobby hook编译好后使用非常的简单啊
我的建议是编译成静态链接库
libdobby.a,dobby.h
静态链接库编译之后会直接融入到编译出来的so中,这样不容易被看出来用了hook框架。
如何在项目中使用dobby hook呢?
首先将libdobby.a放到Jnilibs中,然后把dobby.h放到include中
接下来给一份我的Cmakelist.txt 自行理解一下,其中加入了对静态链接库符号的去除
cmake_minimum_required(VERSION 3.10.2)
project("just")
# ========================
# 源文件
# ========================
add_library(${CMAKE_PROJECT_NAME} SHARED
just.cpp
detectFrida.cpp
)
# ========================
# 包含路径
# ========================
include_directories(
dobby
)
# ========================
# 导入静态库 libdobby.a
# ========================
add_library(local_dobby STATIC IMPORTED)
set_target_properties(local_dobby PROPERTIES
IMPORTED_LOCATION ${CMAKE_CURRENT_SOURCE_DIR}/../jniLibs/arm64-v8a/libdobby.a
)
# ========================
# 编译优化与符号隐藏
# ========================
target_compile_options(${CMAKE_PROJECT_NAME} PRIVATE
-fvisibility=hidden
-fvisibility-inlines-hidden
-fdata-sections
-ffunction-sections
-O3
)
# 宏:可用于标记显式导出的函数
target_compile_definitions(${CMAKE_PROJECT_NAME} PRIVATE EXPORT_SYMBOLS)
# 控制符号可见性
set_target_properties(${CMAKE_PROJECT_NAME} PROPERTIES
CXX_VISIBILITY_PRESET hidden
VISIBILITY_INLINES_HIDDEN ON
POSITION_INDEPENDENT_CODE ON
)
# ========================
# 生成 version script (控制导出符号)
# ========================
set(EXPORTS_FILE "${CMAKE_CURRENT_BINARY_DIR}/exports.map")
file(WRITE ${EXPORTS_FILE} "{
global:
Java_*;
JNI_OnLoad;
JNI_OnUnload;
local:
*;
};
")
# ========================
# 修正后的链接参数(去掉分号问题)
# ========================
set(MY_EXTRA_LINKER_FLAGS
"-Wl,--version-script=${EXPORTS_FILE}"
"-Wl,--exclude-libs,ALL"
"-Wl,--gc-sections"
"-s"
)
# 把列表转换为空格分隔字符串(防止 CMake 用 ;)
string(REPLACE ";" " " MY_EXTRA_LINKER_FLAGS_STR "${MY_EXTRA_LINKER_FLAGS}")
# 追加到共享库链接参数
set(CMAKE_SHARED_LINKER_FLAGS "${CMAKE_SHARED_LINKER_FLAGS} ${MY_EXTRA_LINKER_FLAGS_STR}")
message(STATUS "CMAKE_SHARED_LINKER_FLAGS = ${CMAKE_SHARED_LINKER_FLAGS}")
# ========================
# 链接阶段
# ========================
target_link_libraries(${CMAKE_PROJECT_NAME}
android
local_dobby
log
)
编译完dobby hook之后我们会发现导出来的项目是没有自己的cpp代码的,我们需要自己添加
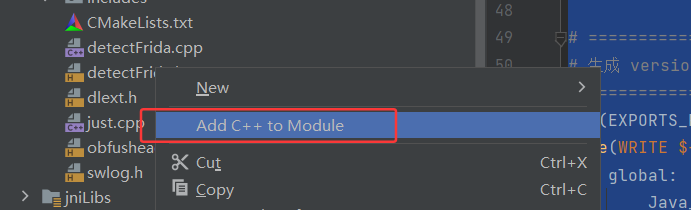
这一步Android Studio 会帮我们完成
但是 到了这一步 ,如果用Unity Editor目录里的NDK的话,编译的时候会各种报错,这个就非常离谱了,应为路径中带空格,并且Java 版本 以及ndk版本种种问题,导致在这一步卡了很久,但最后还是成功的编译出来了,(也许你不会出现这个BUG)
另外Cmake的版本也会影响,我在用高版本的Cmake的时候一直在报错,奇奇怪怪的,这里把launcher的build.gradle分享出来,大家遇到奇奇怪怪的报错也可以参考参考
// GENERATED BY UNITY. REMOVE THIS COMMENT TO PREVENT OVERWRITING WHEN EXPORTING AGAIN
apply plugin: 'com.android.application'
dependencies {
implementation project(':unityLibrary')
}
android {
compileSdkVersion 33
buildToolsVersion '30.0.2'
compileOptions {
sourceCompatibility JavaVersion.VERSION_1_8
targetCompatibility JavaVersion.VERSION_1_8
}
defaultConfig {
minSdkVersion 28
targetSdkVersion 33
applicationId 'com.DefaultCompany.just'
ndk {
abiFilters 'arm64-v8a'
}
versionCode 1
versionName '1.0'
}
externalNativeBuild {
cmake {
version "3.10.2"
path = "src/main/cpp/CMakeLists.txt"
}
}
aaptOptions {
noCompress = ['.ress', '.resource', '.obb'] + unityStreamingAssets.tokenize(', ')
ignoreAssetsPattern = "!.svn:!.git:!.ds_store:!*.scc:.*:!CVS:!thumbs.db:!picasa.ini:!*~"
}
lintOptions {
abortOnError false
}
buildTypes {
debug {
minifyEnabled false
proguardFiles getDefaultProguardFile('proguard-android.txt')
signingConfig signingConfigs.debug
jniDebuggable true
}
release {
minifyEnabled false
proguardFiles getDefaultProguardFile('proguard-android.txt')
signingConfig signingConfigs.debug
}
}
packagingOptions {
doNotStrip '*/arm64-v8a/*.so'
}
bundle {
language {
enableSplit = false
}
density {
enableSplit = false
}
abi {
enableSplit = true
}
}
}
接下来就是正式开始写Hook 代码了
我们在Unity palyer中需要加载我们用于加固的lib库,后通过JNI_Onload 或者 init_array 都可以,但JNI_Onload只有System.loadLibary才有效,如果是so中dlopen 比如自定义linker的话是需要自己给JNI_Onload传递JVM并且自己调用的,其实最推荐的还是卸载init_array,给我们的加载函数修饰成构造函数即可。
UnityPlayerActivity 中载入加固SO文件:
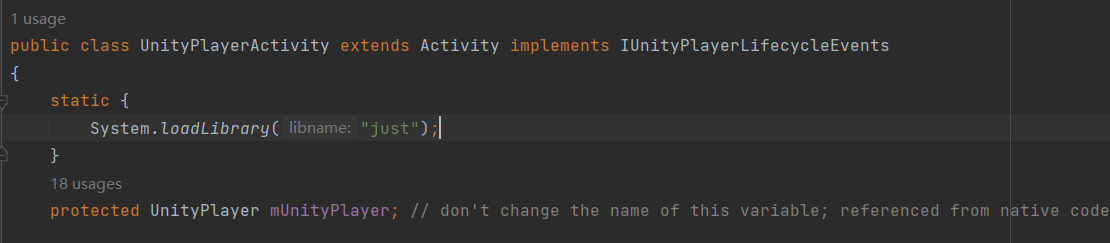
通过构造函数来调用Init_Hook:
__attribute__((constructor))
static void OnLoad() {
LOGI("libjust.so loaded — initializing hook...");
InitHook();
}
使用 dobby hook 来 hook lib库的导出符号我们首先可以通过dlopen 这个lib库,然后通过dlsym来通过符号获取我们需要hook的导入函数的地址,随后初始化hook即可,这里展示一下我们hook libdl.so 获取dlopen 地址的办法。
Init_Hook 实现代码:
void* libdl = dlopen("libdl.so", RTLD_NOW);
if (!libdl) {
LOGE("InitHook: dlopen(libdl.so) failed");
return;
}
void* sym_dlopen = dlsym(libdl, "dlopen");
if (sym_dlopen) {
if (DobbyHook(sym_dlopen, (void*)my_dlopen, (void**)&orig_dlopen) == 0) {
LOGI("InitHook: Hooked dlopen");
} else {
LOGE("InitHook: DobbyHook dlopen failed");
}
} else {
LOGE("InitHook: dlsym dlopen failed");
}
这里我们知道dlopen的参数格式:dlopen("path/to/libX.so", flags),似乎我们这样Hook只能够获取到加载so的路径,如果我们读取路径动态解密的话,解密的so就落地了,这并不是一种好方法,接下来我们思考解决这个问题的办法。
另外提一嘴,大多数加固厂商在此处可能就替换成自己的linker了,要写一个稳定的linker对于我目前的实力来说还是差点意思,所以这次时间我采用整体加密的方案,而不是用难度更高的linker。
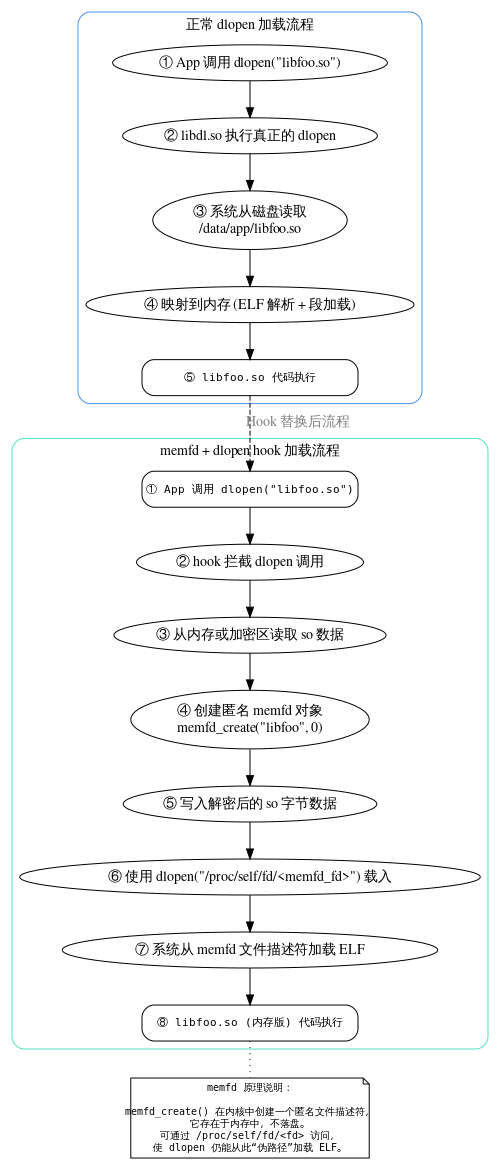
言归正传我们要采用的技术为memfd(memfd 是内核提供的一种特殊文件描述符机制,它创建的文件不在磁盘上,而是在内存中。)
换句话说,这个文件是“存在于内存里的临时文件”,但是对系统来说它依然是一个合法的文件对象,可以被 dlopen 或 android_dlopen_ext 识别并加载。
memfd_create 返回的是一个文件描述符(fd),你可以对它 write 写数据、lseek、甚至 mmap。
当我们把解密后的 ELF 数据写进这个 memfd 之后,就等价于往一个真实文件里写入了一份 so。
而内核又在 /proc/self/fd/ 下提供了一个伪路径映射,比如 /proc/self/fd/37,指向这个 fd。
所以当我们在 dlopen 中传入这个路径时,loader 实际上是去读我们内存中的 ELF 数据,这样整个加载过程完全脱离了磁盘。
因此我们能在 Hook 的时候“偷梁换柱”——先拦截住目标 so 的加载,再把它替换成从 memfd 中加载。
在这个过程中,动态链接器完全不会察觉到区别,因为对它来说,只要能读到符合 ELF 格式的内容,它就能照常加载。
(老规矩,GPT来一张,方便理解
接下来是我的完整代码实现
// 用于表示我们是否把解密数据写进了 memfd
struct PreparedMem {
int fd;
bool used_memfd;
PreparedMem(): fd(-1), used_memfd(false) {}
};
// 当且仅当 filename 可直接 open(包含 '/' 或 access 可读)时,读取文件、RC4 解密并写入 memfd(不落地)
static PreparedMem prepare_memfd_if_local_path(const char* filename) {
PreparedMem ret;
if (!filename) return ret;
bool has_slash = strchr(filename, '/') != nullptr;
if (!has_slash) {
if (access(filename, R_OK) != 0) {
// basename 且不可直接访问 — 放过 loader 去寻找实际路径
return ret;
}
}
int fd = open(filename, O_RDONLY);
if (fd = 0) {
handle = load_from_memfd(filename, flag, pm);
// loader 返回后才 close fd
close(pm.fd);
pm.fd = -1;
pm.used_memfd = false;
if (handle) return handle;
}
if (orig_dlopen) {
handle = orig_dlopen(filename, flag);
} else {
LOGE("my_dlopen: orig_dlopen is null");
}
return handle;
}
至此,我们实现了一个简单的加密lib2cpp.so的功能,正如我如上代码,我们还加入了ELF头校验,这样我们在debug的时候一样可以运行。
对Unity IL转出来的CPP代码做混淆
这一步的话完全可以使用ollvm来编译,但是有没有更简单的呢,显然是有的
我们可以利用现成的项目
https://github.com/ac3ss0r/obfusheader.h
通过头文件来对项目代码进行混淆
项目生成的源代码的位置在
unityLibrary\src\main\Il2CppOutputProject\Source\il2cppOutput\Assembly-CSharp.cpp
我们直接导入obfusheader.h即可,但是这里可能obfusheader.h的部分写法会与你的编译版本冲突,需要人为修改的情况,这里你结合AI和报错看看哪些语法需要修改即可,多尝试几次。
结尾(附逆向过程
至此也就完成了一个简单的Unity加固,从萌生这个想法到实现前前后后花了几天,上班连续时间比较短,但现在AI发展趋势感觉学习的成本越来越低了,中途也各种编译报错给我整的犯恶心过,但好在都解决了。
最后附上这道题的逆向过程吧
逆向过程
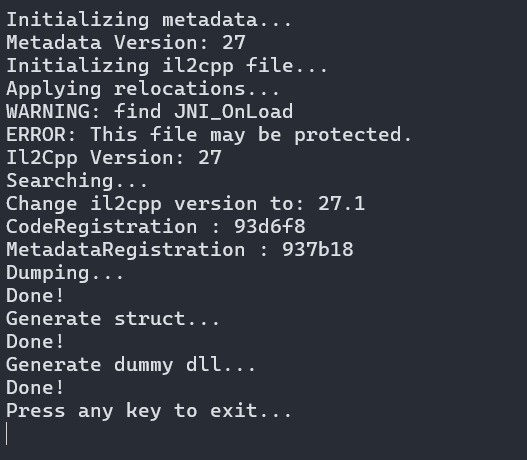
il2cpp的app尝试il2cpp dumper

直接报错
发现libil2cpp.so是被加密的
在just.so 中发现了是hook了dlpen
找到dobbyhook真实函数并给他命名
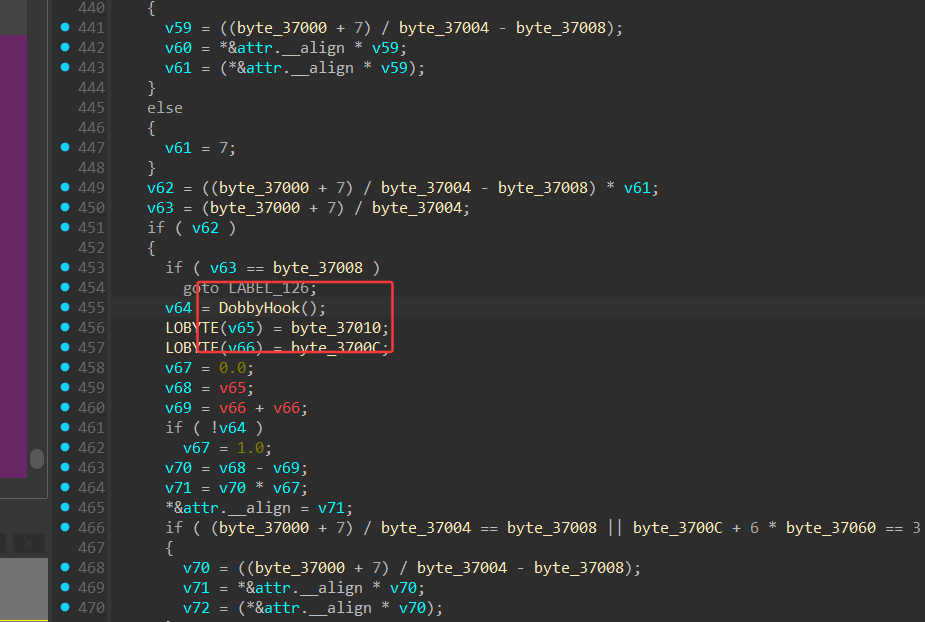
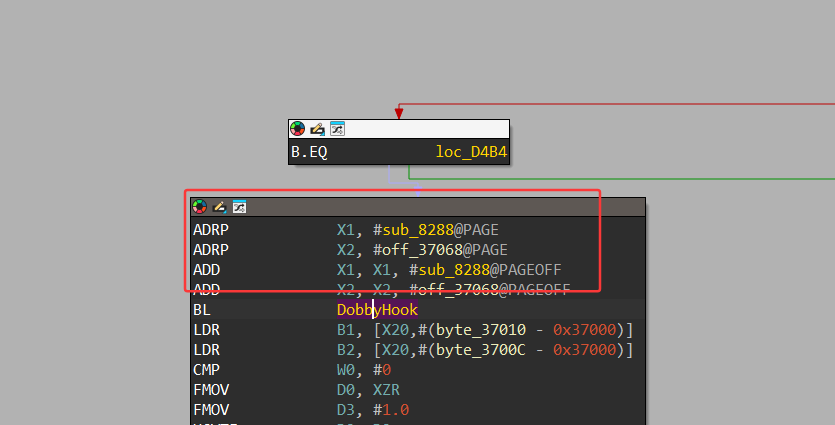
注册的hook在这里
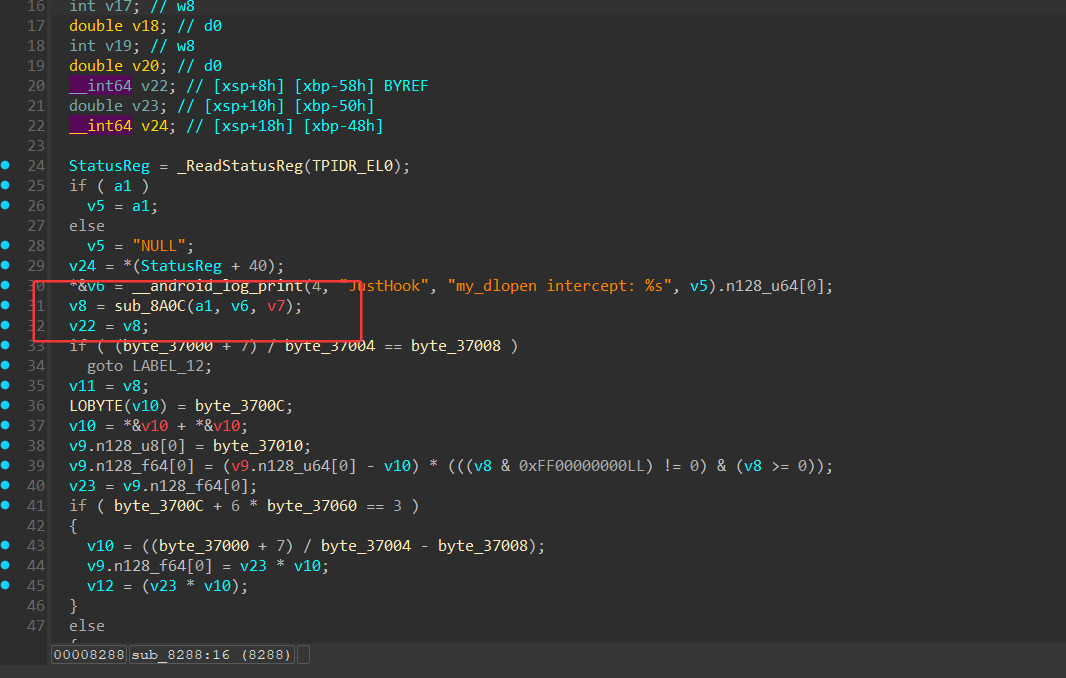
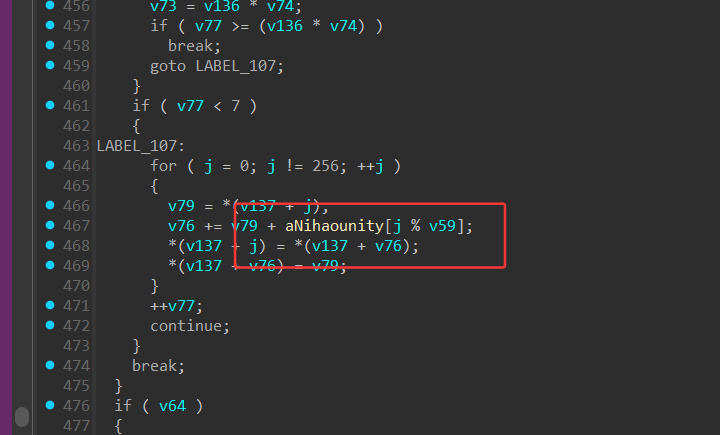
逆向发现是rc4^0x33
密钥是这个

解密Libil2cpp.so
#!/usr/bin/env python3
"""
rc4_encrypt.py
Usage:
python rc4_encrypt.py encrypt input.so output.so.enc
python rc4_encrypt.py decrypt input.so.enc output.so.dec
This script performs RC4 encryption/decryption (same operation).
Key: "nihaounity" by default (you can change or pass your own key).
"""
import sys
import os
DEFAULT_KEY = b"nihaounity"
def rc4(data: bytes, key: bytes) -> bytes:
"""Simple RC4 implementation (KSA + PRGA)."""
# Key-scheduling algorithm (KSA)
S = list(range(256))
j = 0
key_len = len(key)
if key_len == 0:
raise ValueError("Key must not be empty")
for i in range(256):
j = (j + S + key[i % key_len]) & 0xFF
S, S[j] = S[j], S
# Pseudo-random generation algorithm (PRGA)
i = 0
j = 0
out = bytearray(len(data))
for n in range(len(data)):
i = (i + 1) & 0xFF
j = (j + S) & 0xFF
S, S[j] = S[j], S
K = S[(S + S[j]) & 0xFF]^ 0x33
out[n] = data[n] ^ K
return bytes(out)
def process_file(mode: str, in_path: str, out_path: str, key: bytes):
if not os.path.isfile(in_path):
print(f"Input file not found: {in_path}")
sys.exit(2)
# Read input file
with open(in_path, "rb") as f:
data = f.read()
# RC4 transform
transformed = rc4(data, key)
# Write output file (mode preserved with 0o644)
tmp_out = out_path + ".tmp"
with open(tmp_out, "wb") as f:
f.write(transformed)
os.replace(tmp_out, out_path)
os.chmod(out_path, 0o644)
print(f"{mode.title()} finished: {in_path} -> {out_path}")
def print_usage_and_exit():
print("Usage:")
print(" python rc4_encrypt.py encrypt input.so output.so.enc")
print(" python rc4_encrypt.py decrypt input.so.enc output.so.dec")
print("Optional: set RC4 key via environment variable RC4_KEY (bytes), or edit DEFAULT_KEY in script.")
sys.exit(1)
def main():
if len(sys.argv) != 4:
print_usage_and_exit()
mode = sys.argv[1].lower()
input_path = sys.argv[2]
output_path = sys.argv[3]
if mode not in ("encrypt", "decrypt"):
print_usage_and_exit()
# Allow overriding key via env var (as hex or raw). If RC4_KEY_HEX set, use hex decode.
env_key_hex = os.environ.get("RC4_KEY_HEX")
env_key_raw = os.environ.get("RC4_KEY")
if env_key_hex:
try:
key = bytes.fromhex(env_key_hex)
except Exception as e:
print("Invalid RC4_KEY_HEX:", e)
sys.exit(3)
elif env_key_raw:
key = env_key_raw.encode("utf-8")
else:
key = DEFAULT_KEY
process_file(mode, input_path, output_path, key)
if __name__ == "__main__":
main()
检查metadata可以发现是加密的
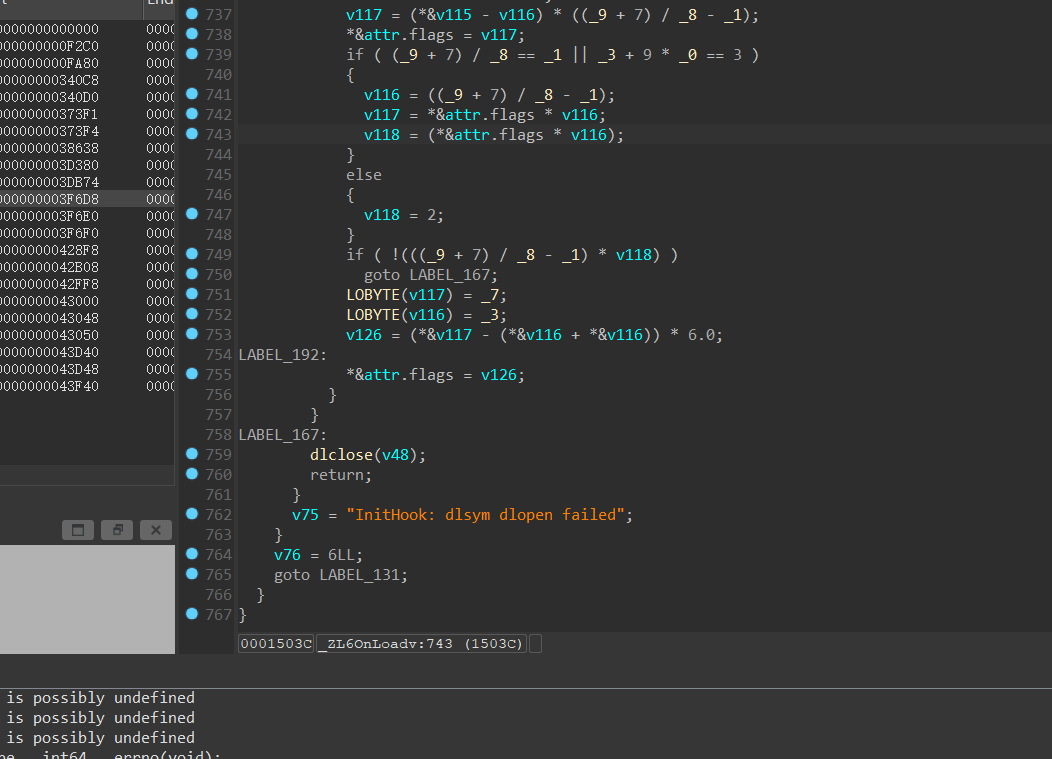
那么只能去il2cpp里面看了,那么metadata-loader(il2cpp官方源代码)中有一个字符串可以帮助我们定位逻辑
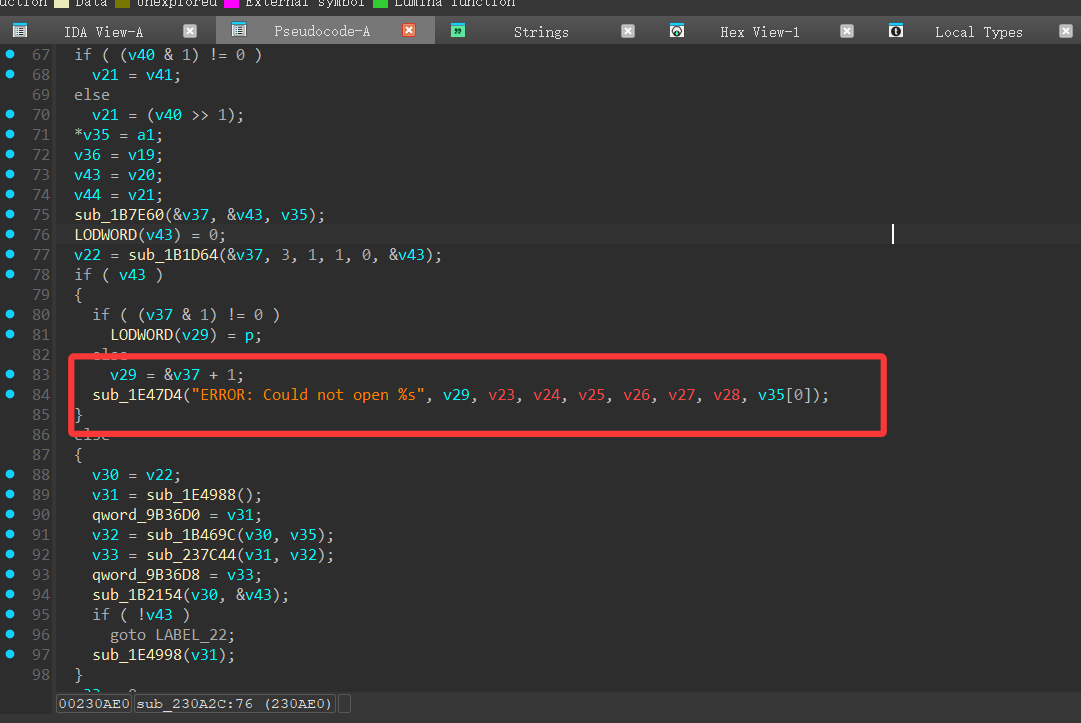
所以直接可以看到else后面的逻辑就是开始载入metadata了
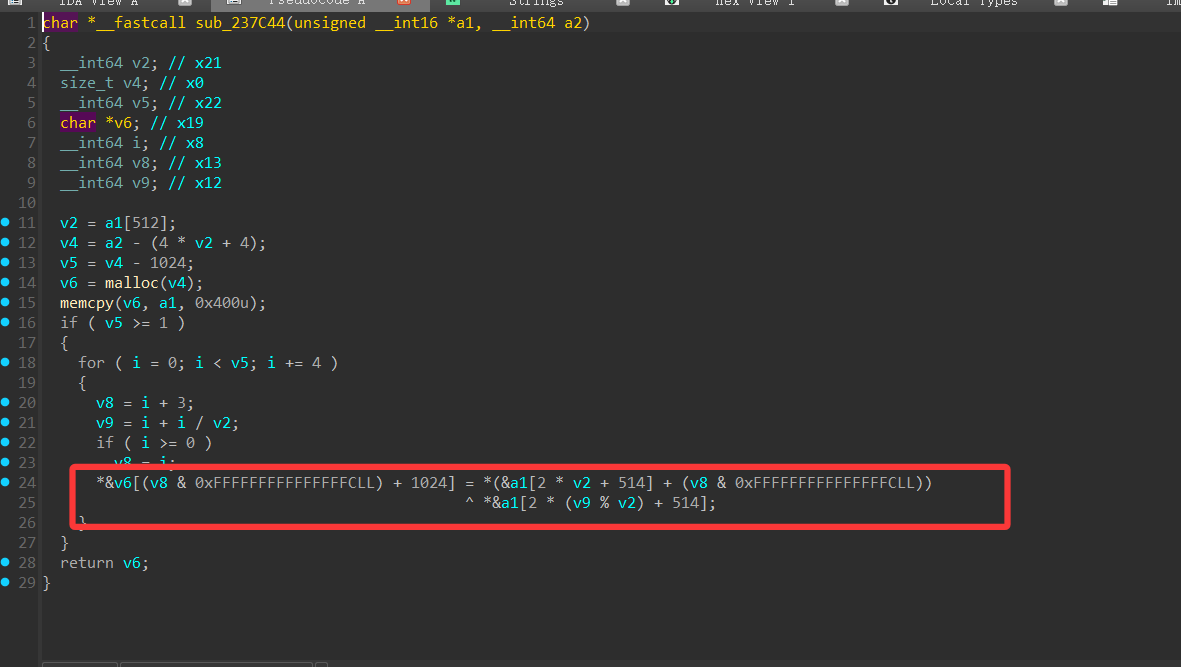
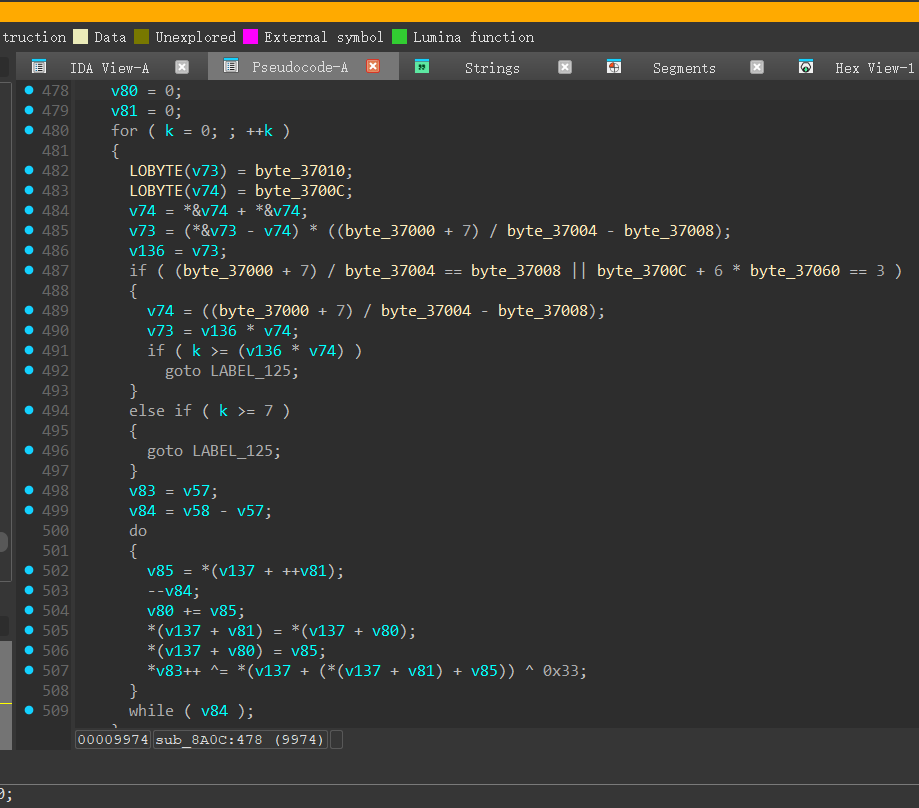
看到解密逻辑,直接写解密脚本
#!/usr/bin/env python3
"""
il2cpp-style file "decryption" script that mirrors PromiseAntiencryption in C.
Usage:
python il2cpp_decrypt.py input_encrypted_file output_decrypted_file
"""
import sys
import struct
from pathlib import Path
SAFE_SIZE = 1024 # 与 C 里一致
def decrypt_file(in_path: str, out_path: str, little_endian: bool = True):
data = Path(in_path).read_bytes()
total_len = len(data)
if total_len "
u32 = endian + "I"
# 在 safe_size 偏移处读取 header uint32,低 16 位为 kl
header_val = struct.unpack_from(u32, data, SAFE_SIZE)[0]
kl = header_val & 0xffff
if kl 如果不是 4 的倍数,按可用长度处理(与 C 代码一致性依赖于源文件)
enc_len_trunc = enc_len - (enc_len % 4)
# 构造输出:先写 safe 区(原样 copy),然后写解密后的数据
out_bytes = bytearray()
out_bytes += data[0:SAFE_SIZE]
# 解密循环(每 4 字节)
# i 表示相对于 enc_data_offset 的字节偏移(0,4,8,...)
for i in range(0, enc_len_trunc, 4):
# index = (i + (i // kl)) % kl (注意 C 中 i/kl 为整除)
idx = (i + (i // kl)) % kl
mask_word = mask[idx]
enc_word = struct.unpack_from(u32, data, enc_data_offset + i)[0]
plain_word = mask_word ^ enc_word
out_bytes += struct.pack(u32, plain_word)
# 如果 enc_len 不是 4 的倍数,C 版本实际上不会处理末尾不足 4 字节的部分(因为它步长为4)
# 为了安全,这里把原始残余字节忽略(与 C 行为一致)。如需保留未处理尾部,可取消下面注释。
# if enc_len % 4 != 0:
# out_bytes += data[enc_data_offset + enc_len_trunc : enc_data_offset + enc_len]
# 输出到文件
Path(out_path).write_bytes(bytes(out_bytes))
print(f"已写出解密结果: {out_path} (输出大小 {len(out_bytes)} 字节)")
def main():
if len(sys.argv) != 3:
print("用法: python il2cpp_decrypt.py input_encrypted_file output_decrypted_file")
sys.exit(2)
in_f = sys.argv[1]
out_f = sys.argv[2]
try:
decrypt_file(in_f, out_f, little_endian=True)
except Exception as e:
print("解密失败:", e)
sys.exit(1)
if __name__ == "__main__":
main()

解密后的改名回global-metadata.dat
然后使用il2cppdumper
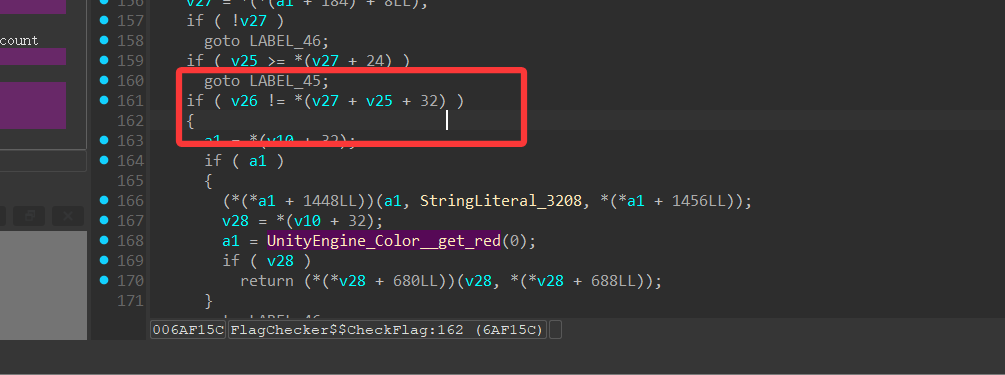
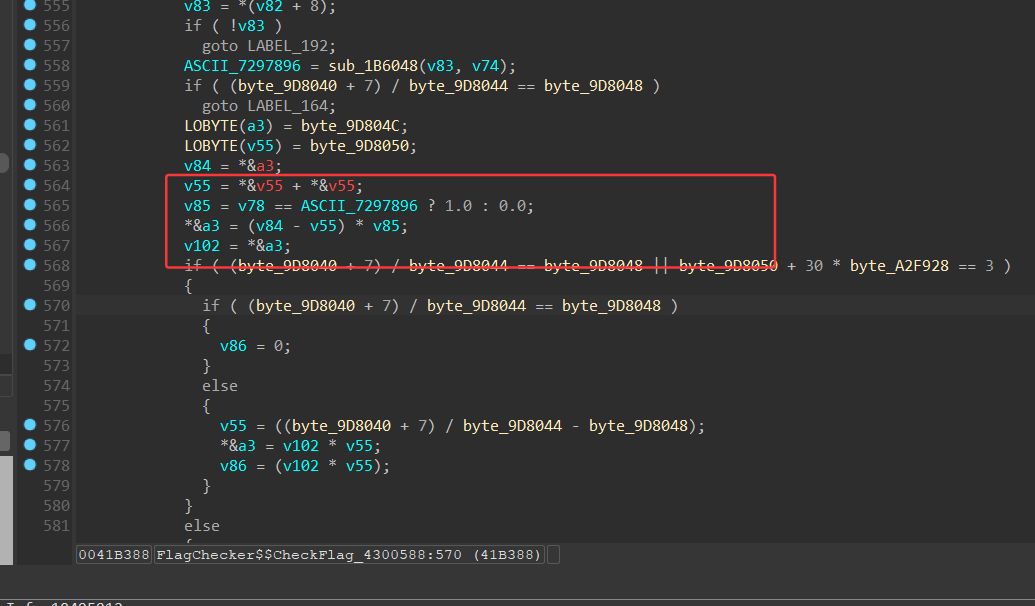
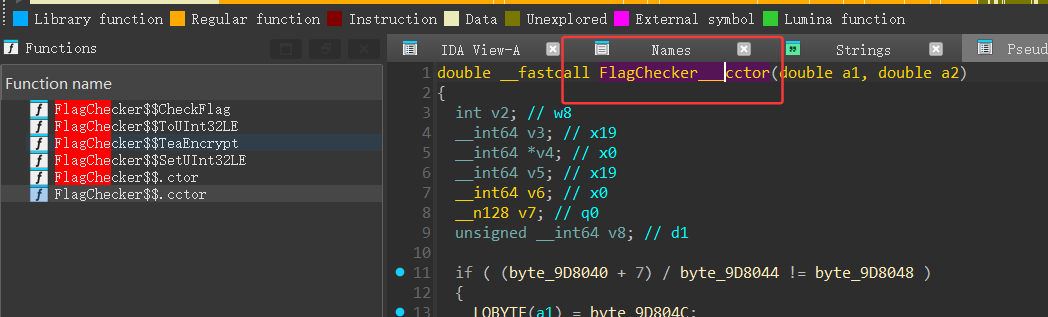
dump成功载入符号,然后找到flagcheck,直接看逻辑
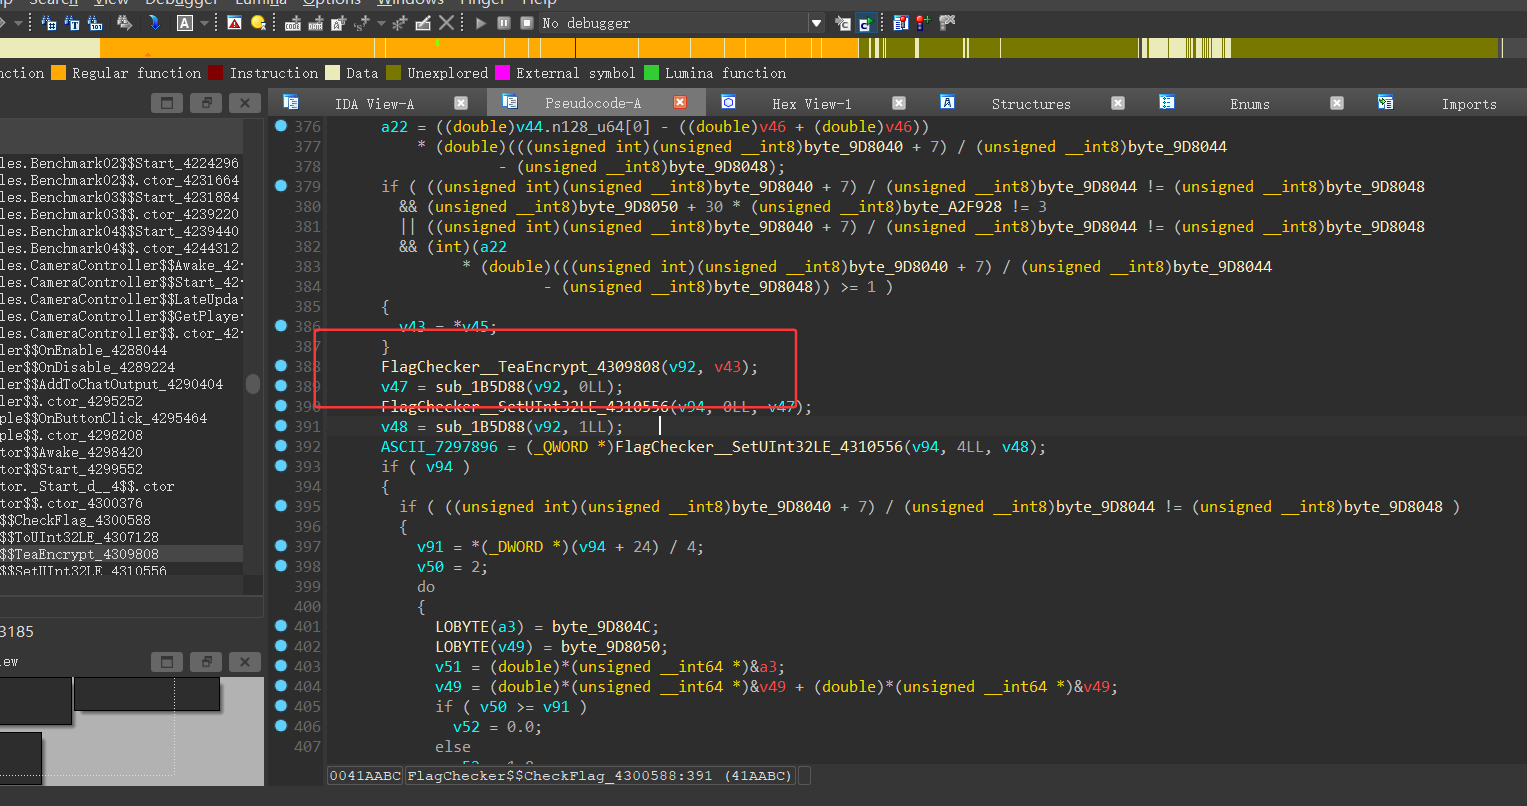
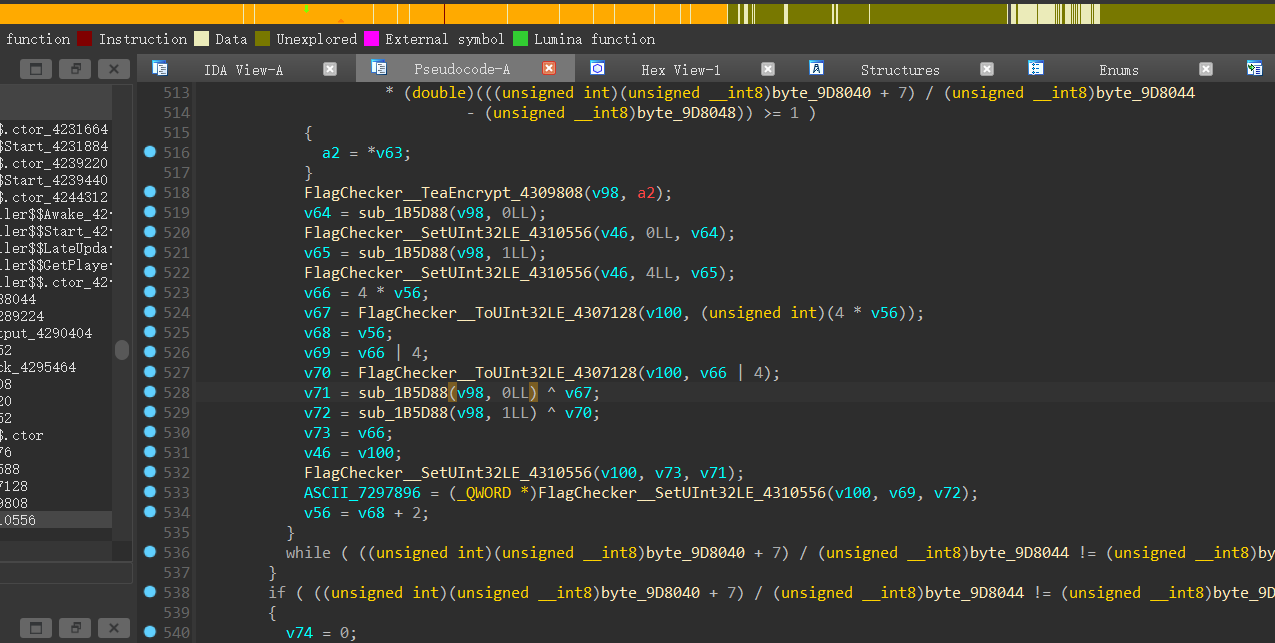
密文在这里下断点获取
自然Tea的key也需要调试获取或者frida Hook

但需要过Frida check
或者根据il2cpp特性
数据在这里初始化
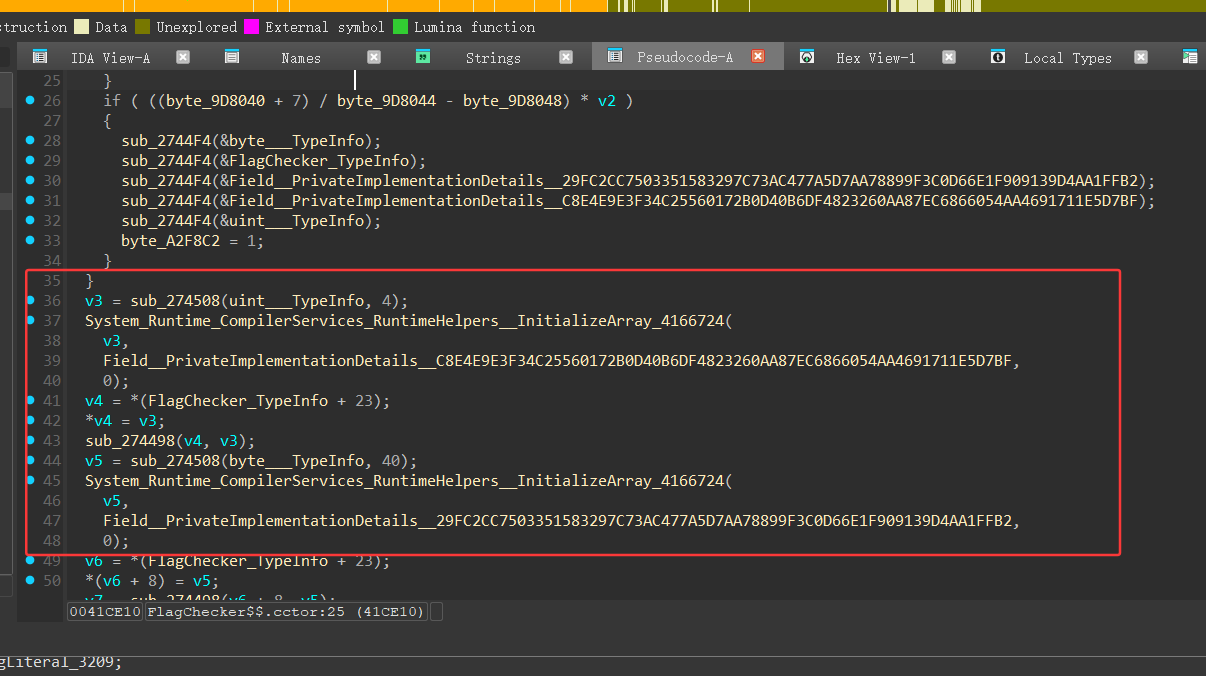
4个int是tea key
40个byte是密文
C8E4E9E3F34C25560172B0D40B6DF4823260AA87EC6866054AA4691711E5D7BF
找到哈希
在il2cppdumper生成的dump.cs中查找

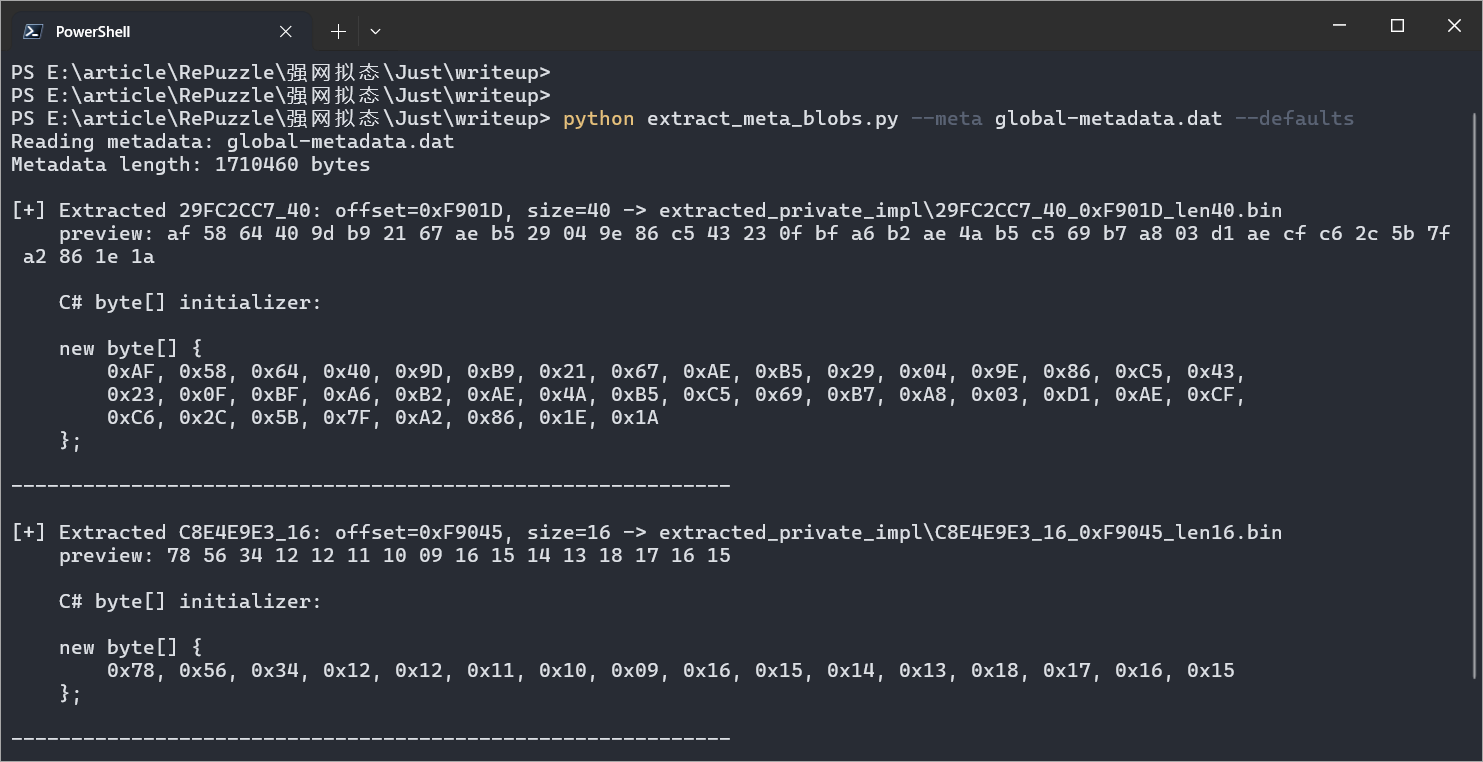
找到offset,然后直接静态dump
#!/usr/bin/env python3
import argparse
import os
import sys
from pathlib import Path
import textwrap
import binascii
DEFAULTS = [
# (offset, size, shortname)
(0xF901D, 40, "29FC2CC7_40"), # your __StaticArrayInitTypeSize=40 29FC2...
(0xF9045, 16, "C8E4E9E3_16"), # your __StaticArrayInitTypeSize=16 C8E4...
]
def parse_extra(s):
# format: offset:size:name (offset can be hex with 0x)
parts = s.split(":")
if len(parts) = 3 else f"blob_{off:X}"
return (off, size, name)
def to_csharp_byte_array(b: bytes, per_line=16):
hexs = [f"0x{c:02X}" for c in b]
lines = []
for i in range(0, len(hexs), per_line):
lines.append(", ".join(hexs[i:i+per_line]))
joined = (",\n ").join(lines)
return "new byte[] {\n " + joined + "\n};"
def main():
p = argparse.ArgumentParser(description="Extract raw blobs from global-metadata.dat by offset+size.")
p.add_argument("--meta", "-m", required=True, help="Path to global-metadata.dat")
p.add_argument("--outdir", "-o", default="extracted_private_impl", help="Output directory")
p.add_argument("--extra", "-e", action="append", help="Extra offset:size[:name] (hex allowed), repeatable")
p.add_argument("--defaults", action="store_true", help="Also extract script's built-in defaults")
args = p.parse_args()
meta_path = Path(args.meta)
if not meta_path.is_file():
print("Error: metadata file not found:", meta_path)
sys.exit(2)
outdir = Path(args.outdir)
outdir.mkdir(parents=True, exist_ok=True)
targets = []
if args.defaults or not args.extra:
# Add defaults if requested or if no extras provided
targets.extend(DEFAULTS)
if args.extra:
for s in args.extra:
try:
t = parse_extra(s)
except Exception as ex:
print("Failed to parse extra:", s, ex)
sys.exit(2)
targets.append(t)
print(f"Reading metadata: {meta_path}")
with open(meta_path, "rb") as f:
metadata = f.read()
meta_len = len(metadata)
print(f"Metadata length: {meta_len} bytes\n")
for off, size, name in targets:
if off = meta_len:
print(f"[!] Offset 0x{off:X} out of range (file size {meta_len}): skipping {name}")
continue
# defensive: don't read past EOF
read_size = min(size, meta_len - off)
if read_size {binfname}")
# print hex preview (first 256 bytes)
preview = binascii.hexlify(blob[:256]).decode()
spaced = " ".join(preview[i:i+2] for i in range(0, len(preview), 2))
print(" preview:", spaced if spaced else "(empty)")
# print as C# initializer
cs = to_csharp_byte_array(blob)
print("\n C# byte[] initializer:\n")
print(textwrap.indent(cs, " "))
print("\n" + ("-"*60) + "\n")
print("Done. Files saved under:", outdir.resolve())
if __name__ == "__main__":
main()
还原出来的加密逻辑就如下
#include
#include
#include
#include
#include
#include
#include
#include
#include
#include
#include
using namespace std;
typedef int status;
typedef int selemtype;
unsigned int Key[7] = {0x12345678, 0x09101112, 0x13141516, 0x15161718};
void tea_encrypt(uint32_t *v, uint32_t *k) {
printf("%X %X\n",v[0],v[1]);
uint32_t v0 = v[0], v1 = v[1], sum = 0, i;
uint32_t delta = 0x61C88647;
for (i = 0; i > 5) + k[1]);
v1 += ((v0 > 5) + k[3]);
sum -= delta;
}
v[0] = v0;
v[1] = v1;
}
unsigned char Cipher[256] = "flag{unitygame_I5S0ooFunny_Isnotit?????}";
unsigned int Tmp[4] = {0};
int main() {
unsigned int *p1 = (unsigned int *)(Cipher);
unsigned int *p2 = (unsigned int *)(Cipher + 4);
printf("%s\n", Cipher);
Tmp[0] = *p1, Tmp[1] = *p2;
tea_encrypt(Tmp, Key);
printf("%X %X\n", *p1, *p2);
*p1 = Tmp[0];
*p2 = Tmp[1];
for (int i = 2 ; i
写解密逻辑如下:
#include
#include
#include
#include
using namespace std;
unsigned int Key[6] = {0x12345678, 0x09101112, 0x13141516, 0x15161718};
void tea_decrypt(uint32_t *v, uint32_t *k) {
// printf("%X %X\n",v[0],v[1]);
uint32_t v0 = v[0], v1 = v[1], sum = 0, i;
uint32_t delta = 0x61C88647;
for (int i = 0 ; i > 5) + k[3]);
v0 -= ((v1 > 5) + k[1]);
}
v[0] = v0;
v[1] = v1;
}
unsigned int Tmp[4] = {0};
int main() {
unsigned char EncryptedCipher[45] = {
0xAF,0x58,0x64,0x40,0x9D,0xB9,0x21,0x67,0xAE,0xB5,0x29,0x4,0x9E,0x86,0xC5,0x43,0x23,0xF,0xBF,0xA6,0xB2,0xAE,0x4A,0xB5,0xC5,0x69,0xB7,0xA8,0x3,0xD1,0xAE,0xCF,0xC6,0x2C,0x5B,0x7F,0xA2,0x86,0x1E,0x1A, };
unsigned int *p1 = (unsigned int *)(EncryptedCipher);
unsigned int *p2 = (unsigned int *)(EncryptedCipher + 4);
for (int i = 8 ; i >= 2 ; i -= 2) {
unsigned int *p3 = (unsigned int *)(EncryptedCipher + i * 4);
unsigned int *p4 = (unsigned int *)(EncryptedCipher + i * 4 + 4);
*p3 ^= *p1;
*p4 ^= *p2;
puts((char*)EncryptedCipher);
Tmp[0] = *p1, Tmp[1] = *p2;
tea_decrypt(Tmp, Key);
*p1 = Tmp[0], *p2 = Tmp[1];
}
Tmp[0] = *p1, Tmp[1] = *p2;
tea_decrypt(Tmp, Key);
*p1 = Tmp[0], *p2 = Tmp[1];
puts((char*)EncryptedCipher);
}
拿到flag:flag{unitygame_I5S0ooFunny_Isnotit?????}
至此全文完。