本篇文章主要精力在于分析第五天的题。
第二天
直接拿 ida 动调,输入对应长度的字符串观察变化,发现主要和一个 data 段上等待数据比较。
就直接照着它的式子去写就ok了。
#include
#include
using namespace std;
unsigned char s[] =
{
0x98, 0x01, 0x00, 0x00, 0xB0, 0x01, 0x00, 0x00, 0x84, 0x01,
0x00, 0x00, 0x9C, 0x01, 0x00, 0x00, 0xEC, 0x01, 0x00, 0x00,
0xD4, 0x00, 0x00, 0x00, 0xC8, 0x00, 0x00, 0x00, 0x40, 0x01,
0x00, 0x00, 0xBC, 0x01, 0x00, 0x00, 0x28, 0x01, 0x00, 0x00,
0xA4, 0x01, 0x00, 0x00, 0x94, 0x01, 0x00, 0x00, 0xC8, 0x00,
0x00, 0x00, 0xC0, 0x00, 0x00, 0x00, 0xC8, 0x00, 0x00, 0x00,
0xCC, 0x00, 0x00, 0x00, 0x20, 0x01, 0x00, 0x00, 0x84, 0x01,
0x00, 0x00, 0xC0, 0x01, 0x00, 0x00, 0xC0, 0x01, 0x00, 0x00,
0xE4, 0x01, 0x00, 0x00, 0x38, 0x01, 0x00, 0x00, 0x94, 0x01,
0x00, 0x00, 0xDC, 0x01, 0x00, 0x00, 0x64, 0x01, 0x00, 0x00,
0x94, 0x01, 0x00, 0x00, 0x84, 0x01, 0x00, 0x00, 0xC8, 0x01,
0x00, 0x00, 0xF4, 0x01, 0x00, 0x00, 0x00, 0x00, 0x00, 0x00,
0x00, 0x00, 0x00, 0x00, 0x00, 0x00, 0x00, 0x00, 0x00, 0x00,
0x00, 0x00, 0xFF, 0xFF, 0xFF, 0xFF
};
int main() {
int* p = (int*)s;
for (int i = 0; i >= 2;
putchar(*p);
p++;
}
}
第三天
apk拖入 JEB 分析,找到关键代码
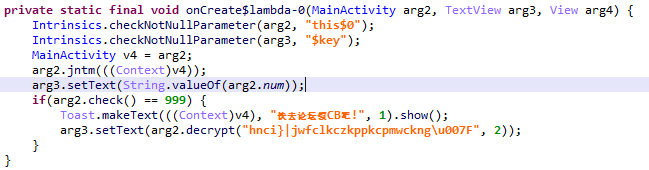
再追踪一下 decrypt 函数,直接跑脚本
#include
#include
char s[] = "hnci}|jwfclkczkppkcpmwckng\x7f";
int main() {
int len = strlen(s);
for (int i = 0; i
第四天
根据逻辑直接写注册机:
// Base64Utils
import java.util.Base64;
import java.util.Scanner;
// MD5Utils
import java.security.MessageDigest;
// UTF_8
import java.nio.charset.StandardCharsets;
public class solution {
public static void main(String[] args) {
System.out.println("input uid:");
Scanner scanner = new Scanner(System.in);
String uid = scanner.nextLine();
String str = encode(uid + "Wuaipojie2023");
str = Base64.getEncoder().encodeToString(str.getBytes(StandardCharsets.UTF_8));
// md5
try {
MessageDigest md = MessageDigest.getInstance("MD5");
md.update(str.getBytes());
byte[] digest = md.digest();
StringBuilder sb = new StringBuilder();
for (byte b : digest) {
sb.append(String.format("%02x", b & 0xff));
}
str = sb.toString();
} catch (Exception e) {
e.printStackTrace();
}
str = cipher(str, 5);
System.out.println("flag{" + str + "}");
scanner.close();
return;
}
public static String encode(String str) {
int length = str.length();
char[] cArr = new char[length];
int i = length - 1;
while (i >= 0) {
int i2 = i - 1;
cArr = (char) (str.charAt(i) ^ '5');
if (i2 = 0 && str.charAt(i2) - 90 0) {
sb.append(str.charAt(i2));
} else {
sb.append(cipher(str.charAt(i2), i));
}
}
String sb2 = sb.toString();
return sb2;
}
}
第五天
脱壳
拿到文件先 ida 看,加壳了,且是 64 位的程序,这里就先按照坛友提供的思路脱壳(因为不会,所以现学)。
参考帖子:https://www.52pojie.cn/thread-1534675-1-1.html
x64dbg载入,选项这么设置
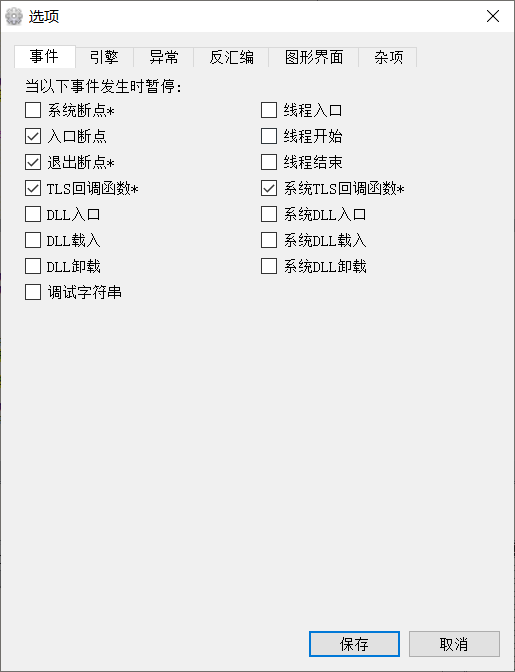
就可以发现它直接断在了一个比较明显的特征处。
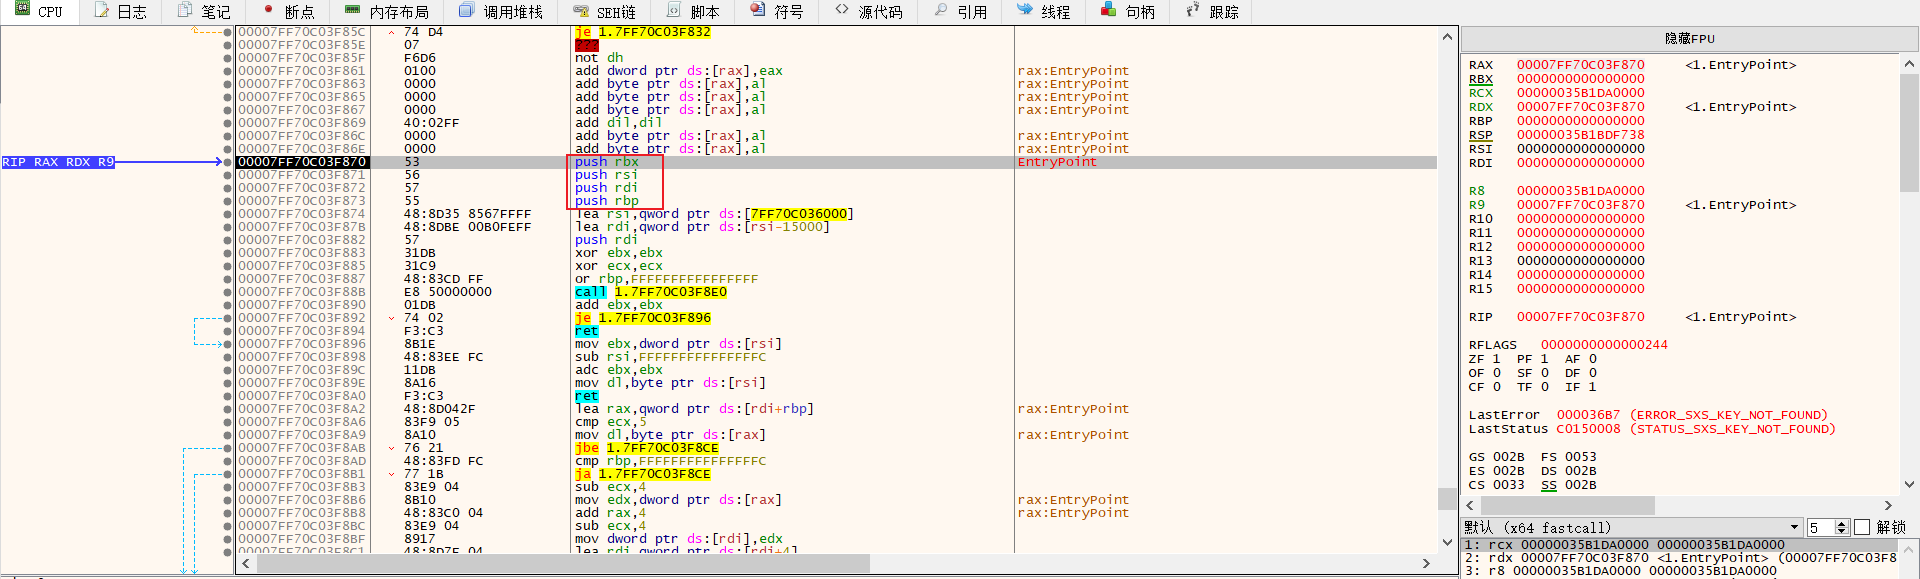
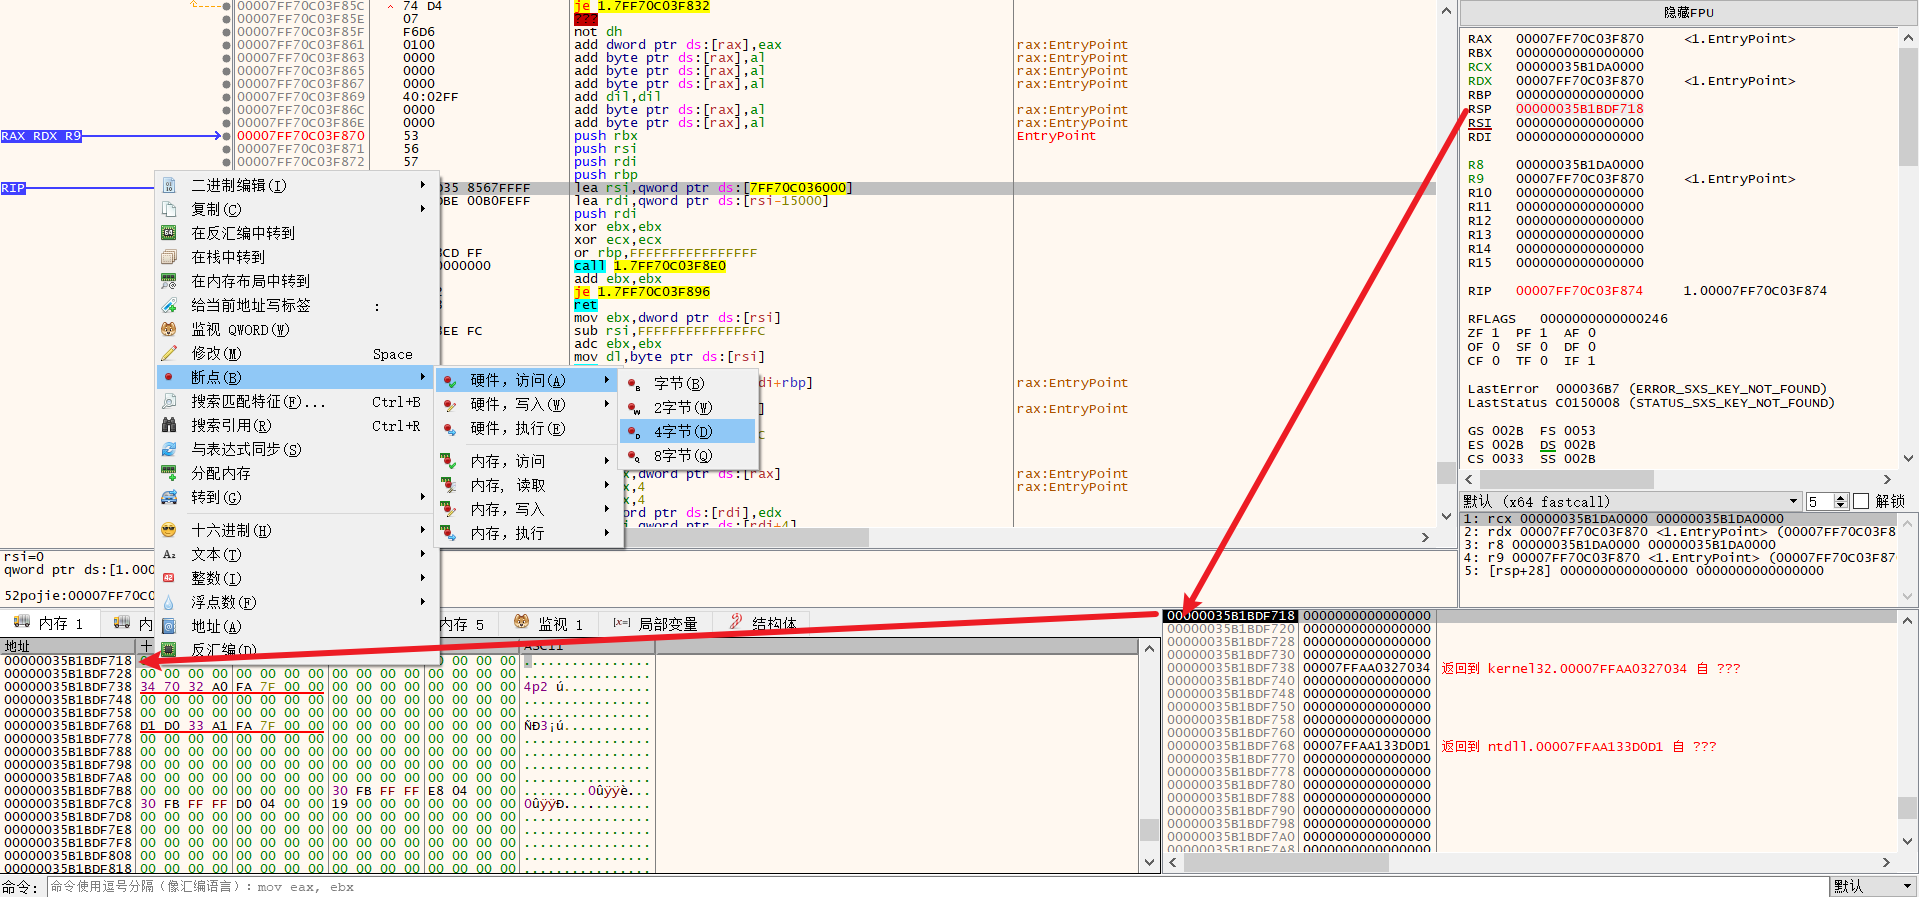
先步进跑过这四条 push 指令,然后找到此时 RSP 的值,跳转过去下一个四字节的硬件访问断点。
之后直接 F9 运行,断在一个解压结束恢复现场的地方
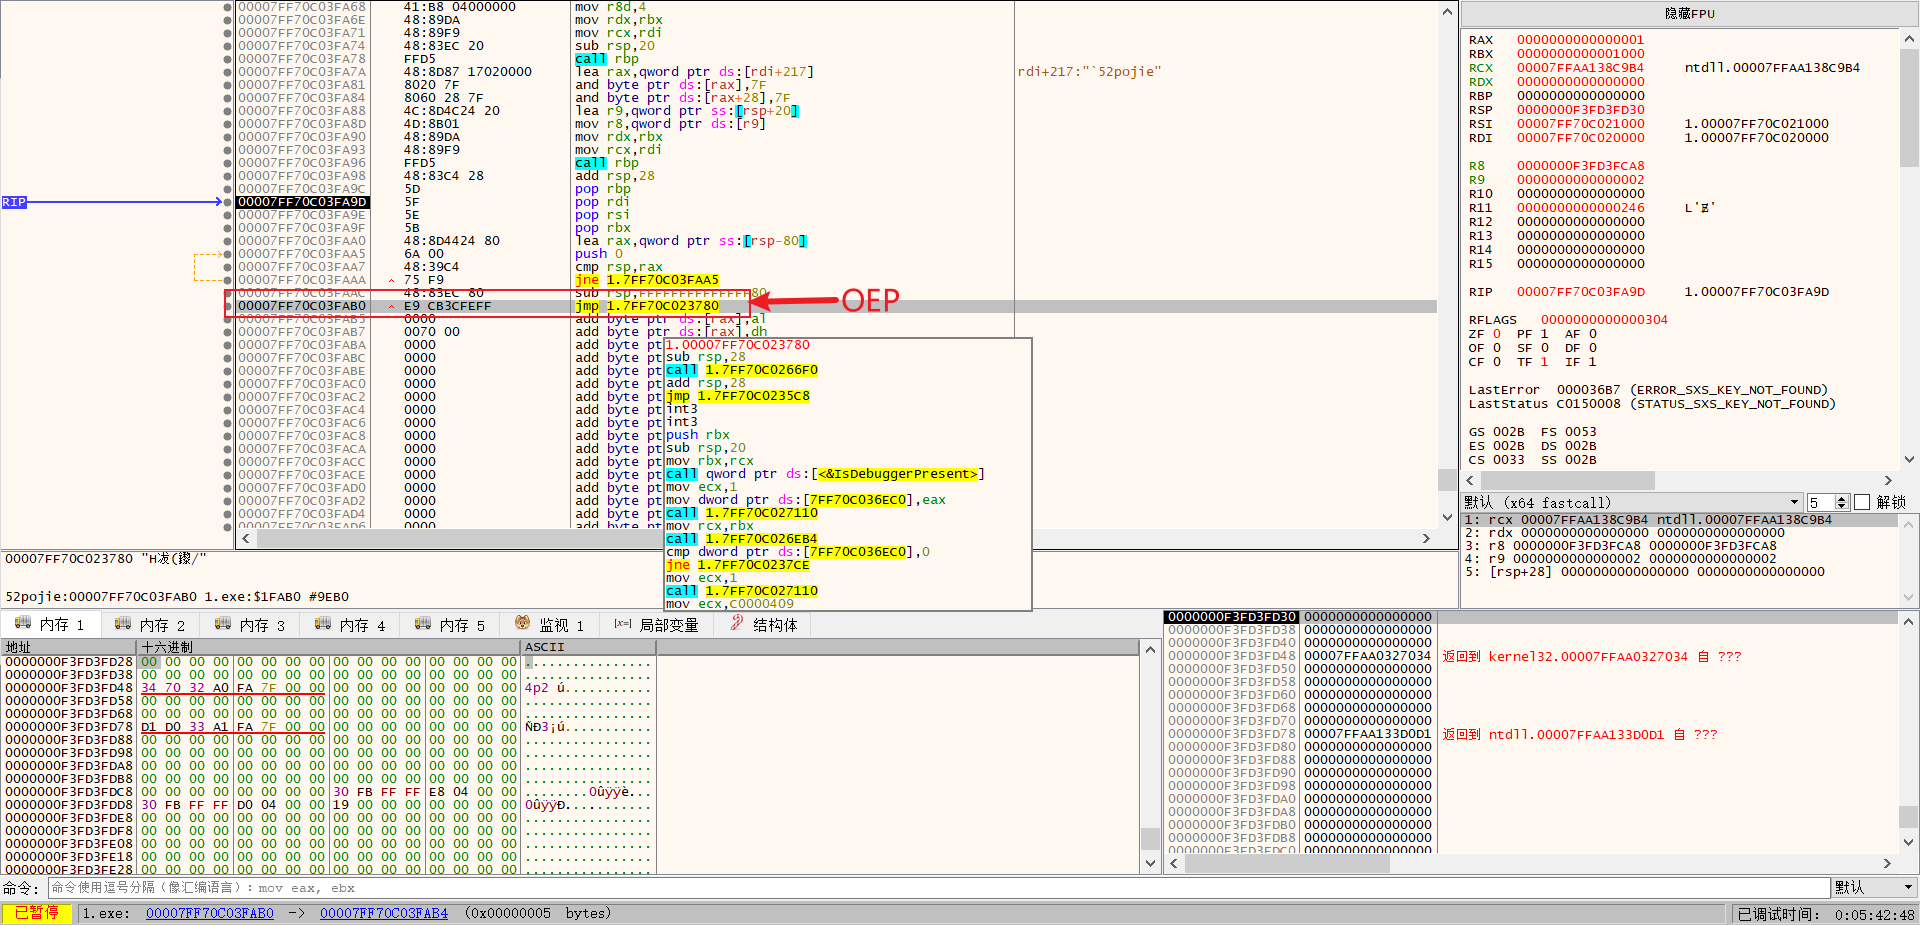
后面的大跳转就是 OEP。
进入大跳转,来到 OEP的位置。

之后直接使用 x64 的插件
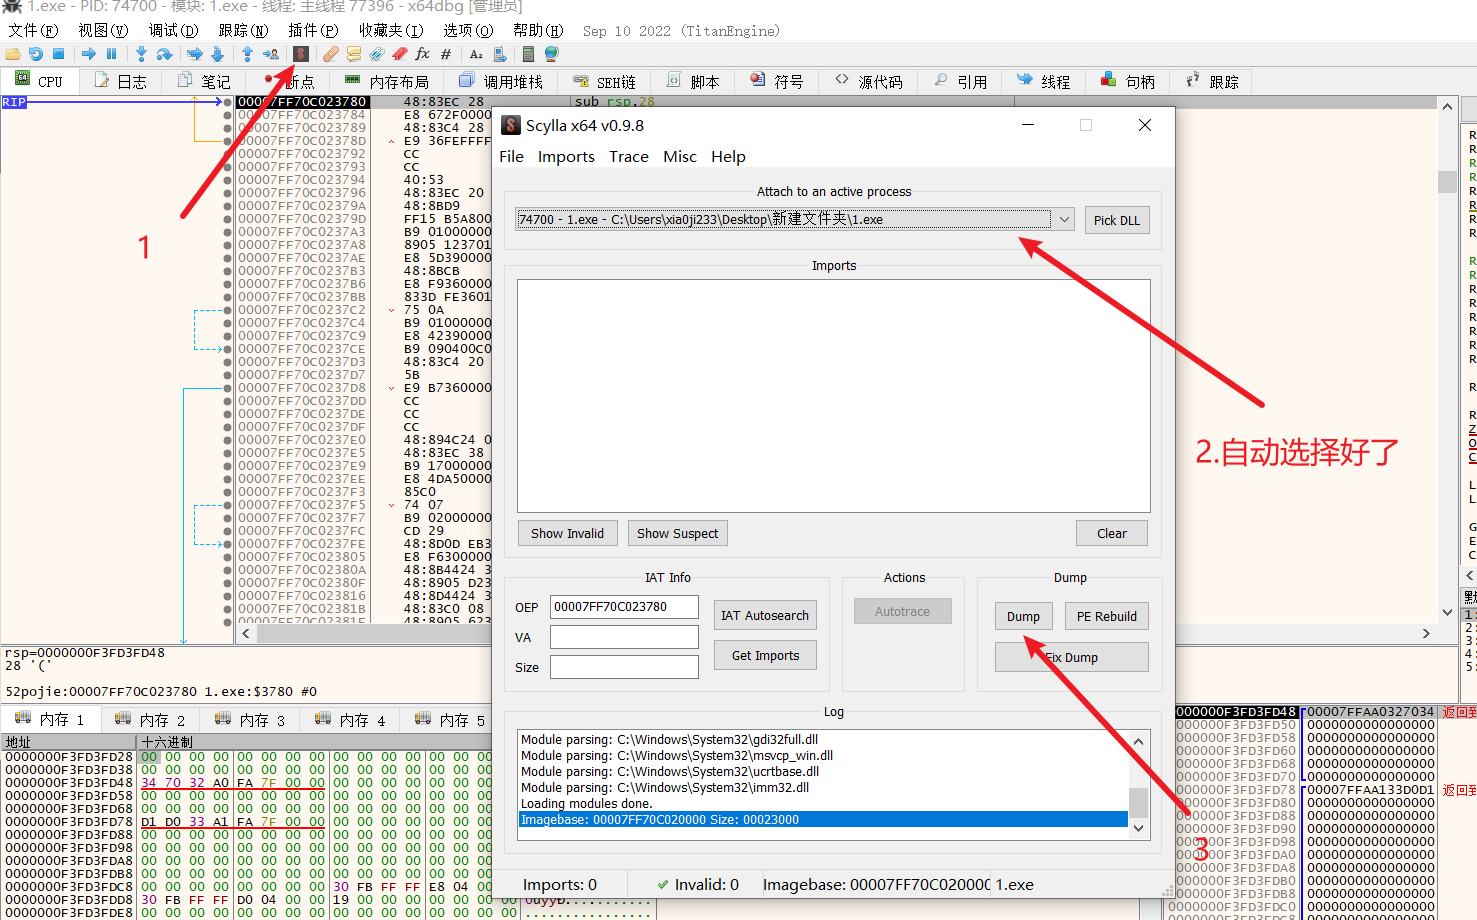
dump 完成之后去找 IAT
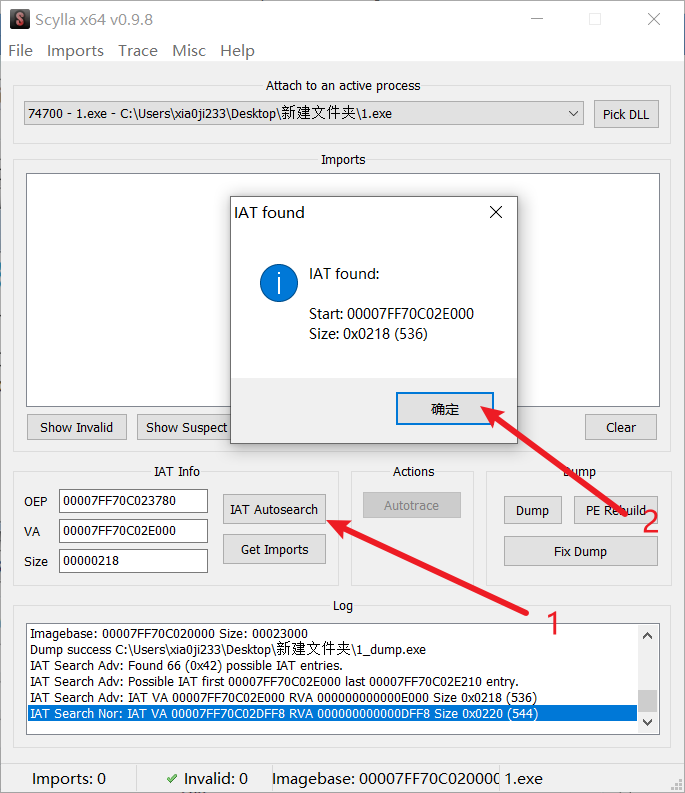
之后选择修复dump文件
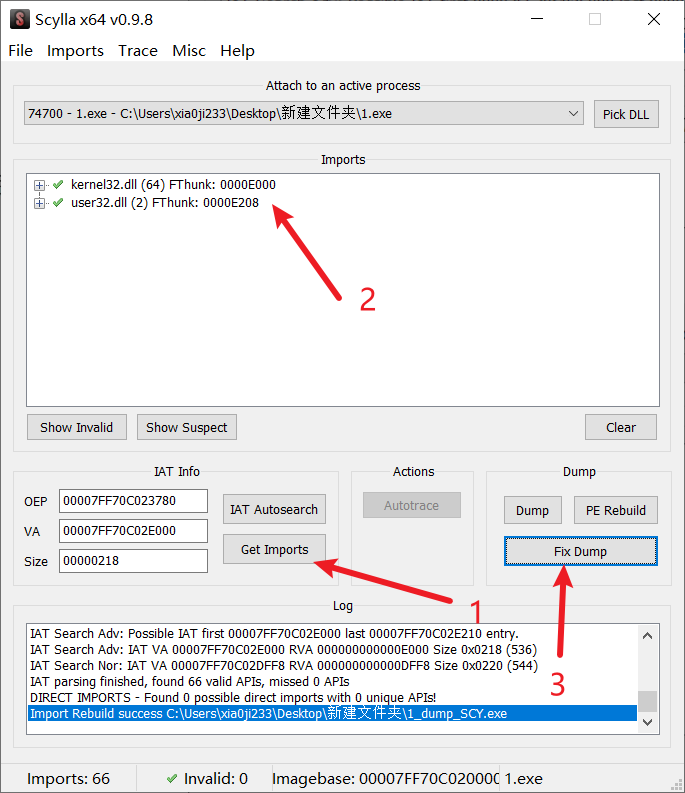
但是这么脱壳还不能运行,因为有 ASLR 的存在,使用 StudyPE+ 工具固定 PE 基址。
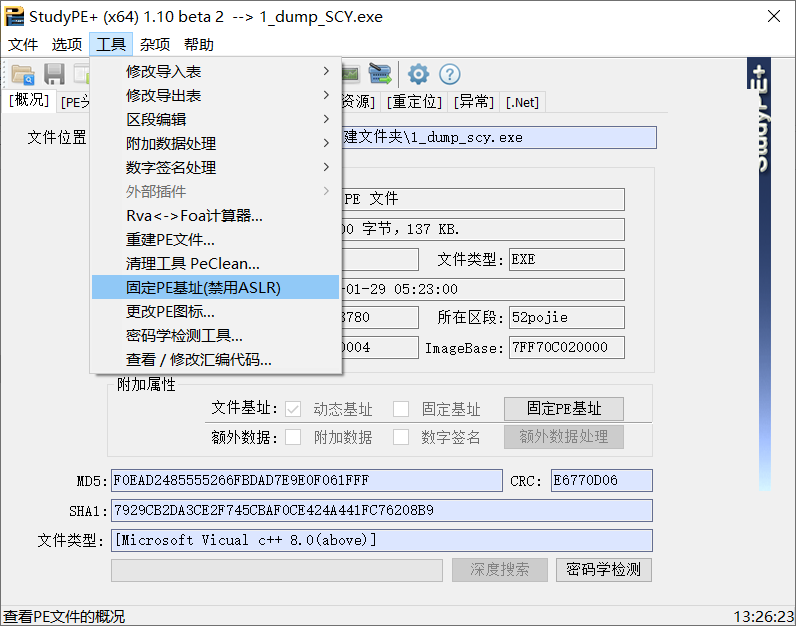
保存之后我们就得到了无壳的程序。
以上步骤皆是按照坛友原文操作的,如果觉得讲的不好推荐看看原文。
静态分析
寻找窗口过程函数
是一个窗口程序,windows 的窗口程序是通过消息机制去实现的。在入口函数 wWinMain 中会注册窗口主类,注册类的过程中会绑定一个消息处理主函数。这个消息处理主函数的函数原型是这样的:
LRESULT CALLBACK WndProc(HWND hWnd, UINT message, WPARAM wParam, LPARAM lParam)
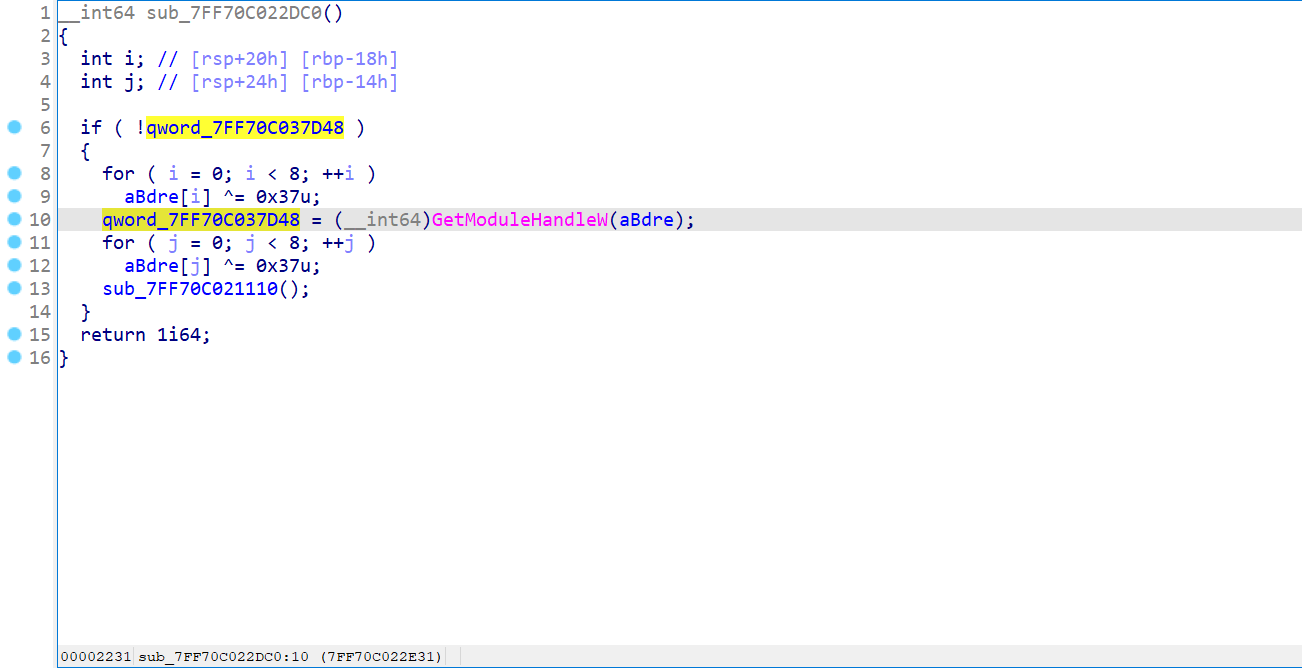
话是这么说但是 wWinMain 函数中一通找没找到什么函数,但是有一个 RaiseException,猜测应该是使用异常去调用的一个主逻辑。
翻到主函数下面有一个 TopLevelExceptionFilter 函数,感觉像是异常处理函数,点开看看发现有惊喜。
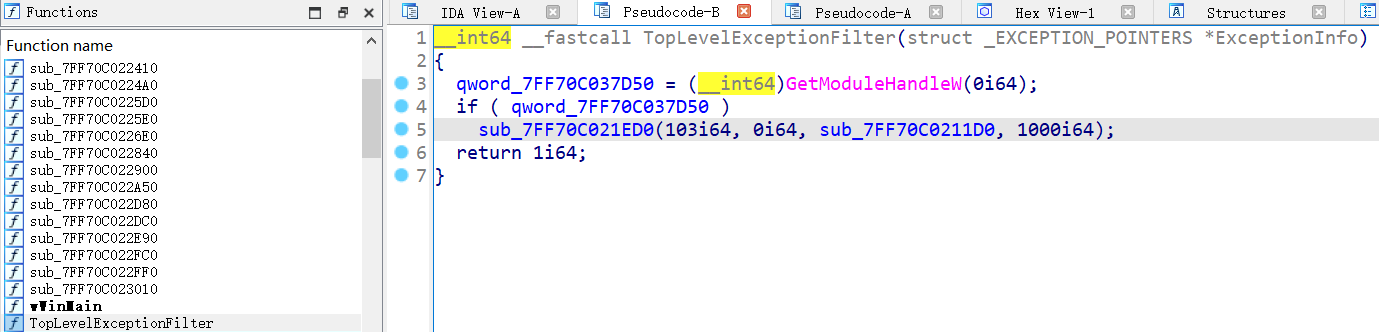
这里去获取了一个模块句柄,然后调用了这个函数,我们先分析外面的函数。
__int64 __fastcall sub_7FF70C021ED0(__int64 a1, __int64 a2, __int64 a3, __int64 a4)
{
int i; // [rsp+30h] [rbp-18h]
int j; // [rsp+34h] [rbp-14h]
__int64 (__fastcall *v7)(__int64, __int64, __int64, __int64, __int64); // [rsp+38h] [rbp-10h]
for ( i = 0; i
这里很明显,对字符串有一个简单的加密和解密的过程,应该是为了防止我们可以直接运行看到内存中的符号,做的一个混淆,我们取出来恢复一下这个符号
char s[] =
{
0x73, 0x5E, 0x56, 0x5B, 0x58, 0x50, 0x75, 0x58, 0x4F, 0x67,
0x56, 0x45, 0x56, 0x5A, 0x60, 0x37
};
for (int i = 0; i
这里教一下 ida 快速 dump 数据的方法:
[ol]
[/ol]
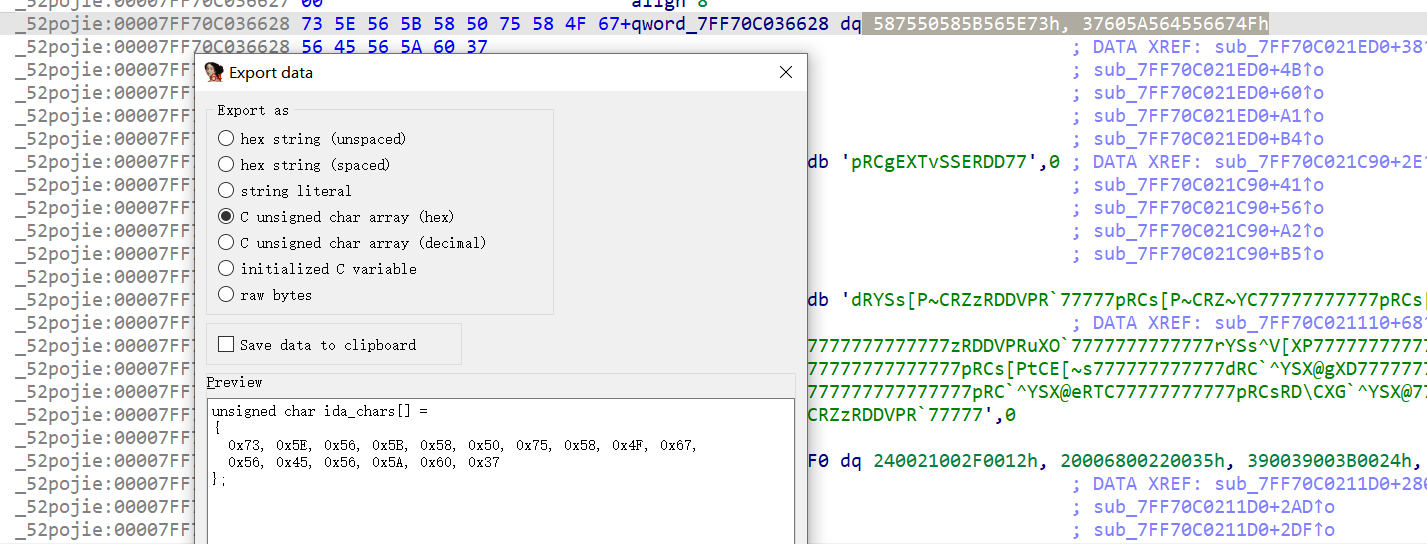
选择 C unsigned char array(hex) 直接在下面复制即可,如果太多可以文件导出。
言归正传我们回到流程里分析,中间还有一个对字符串的操作,我们深入一步看看。
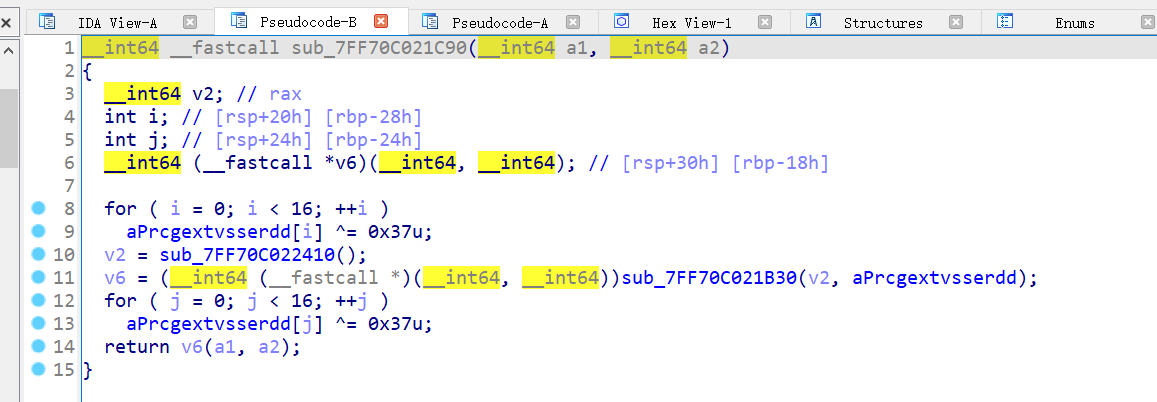
发现又故技重施,于是我们还是先把这个符号跑一下看看是什么。
char s[] = "pRCgEXTvSSERDD77";
for (int i = 0; i
发现是 GetProcAddress,这里其实差不多能明白了,应该是根据字符串去寻找函数地址的,返回的大概率也是一个函数地址。
如果不放心这么大胆猜测的话,我们可以看第一个参数:

对他交叉引用,引用的不多,但是有个函数很明显
同样还是恢复一下符号,这里需要注意一下,这里的类型是宽字节,所以我们需要稍微改一下脚本,这里 char 拿过去还是一样的,我们选择用一个 wchar_t * 类型的变量指向那边然后一个一个改了输出。
unsigned char s[] =
{
0x62, 0x00, 0x44, 0x00, 0x52, 0x00, 0x45, 0x00, 0x04, 0x00,
0x05, 0x00, 0x37, 0x00, 0x37, 0x00
};
wchar_t* p = (wchar_t*)s;
for (int i = 0; i
那就很好解释了,这里的变量就是一个模块句柄,那更加坚定了我们的猜想,因为 GetProcAddress API 的原型中,第一个参数就是模块句柄。
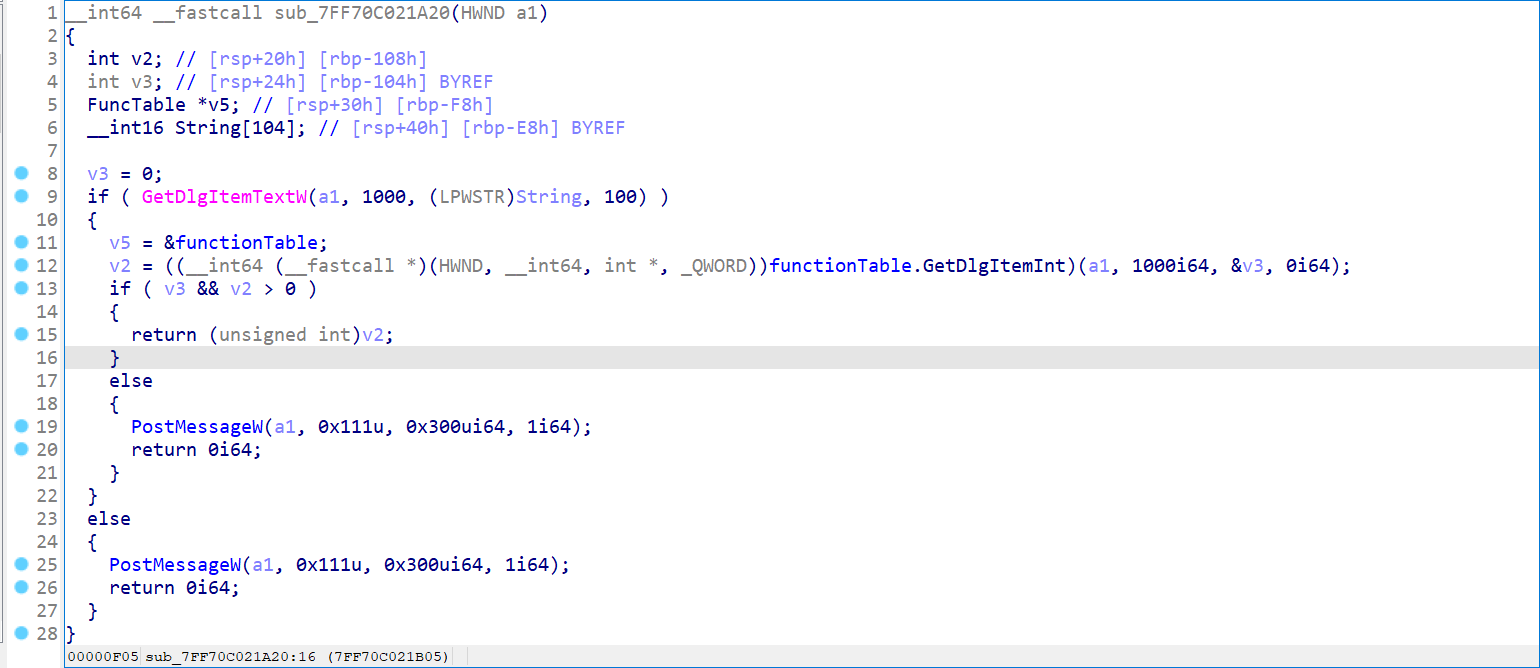
那么分析到这里我们就退到一开始那个地方,我们先搞清楚 DialogBoxParamW 这个函数是干嘛的,查 API 最好还是上 MSDN 去。
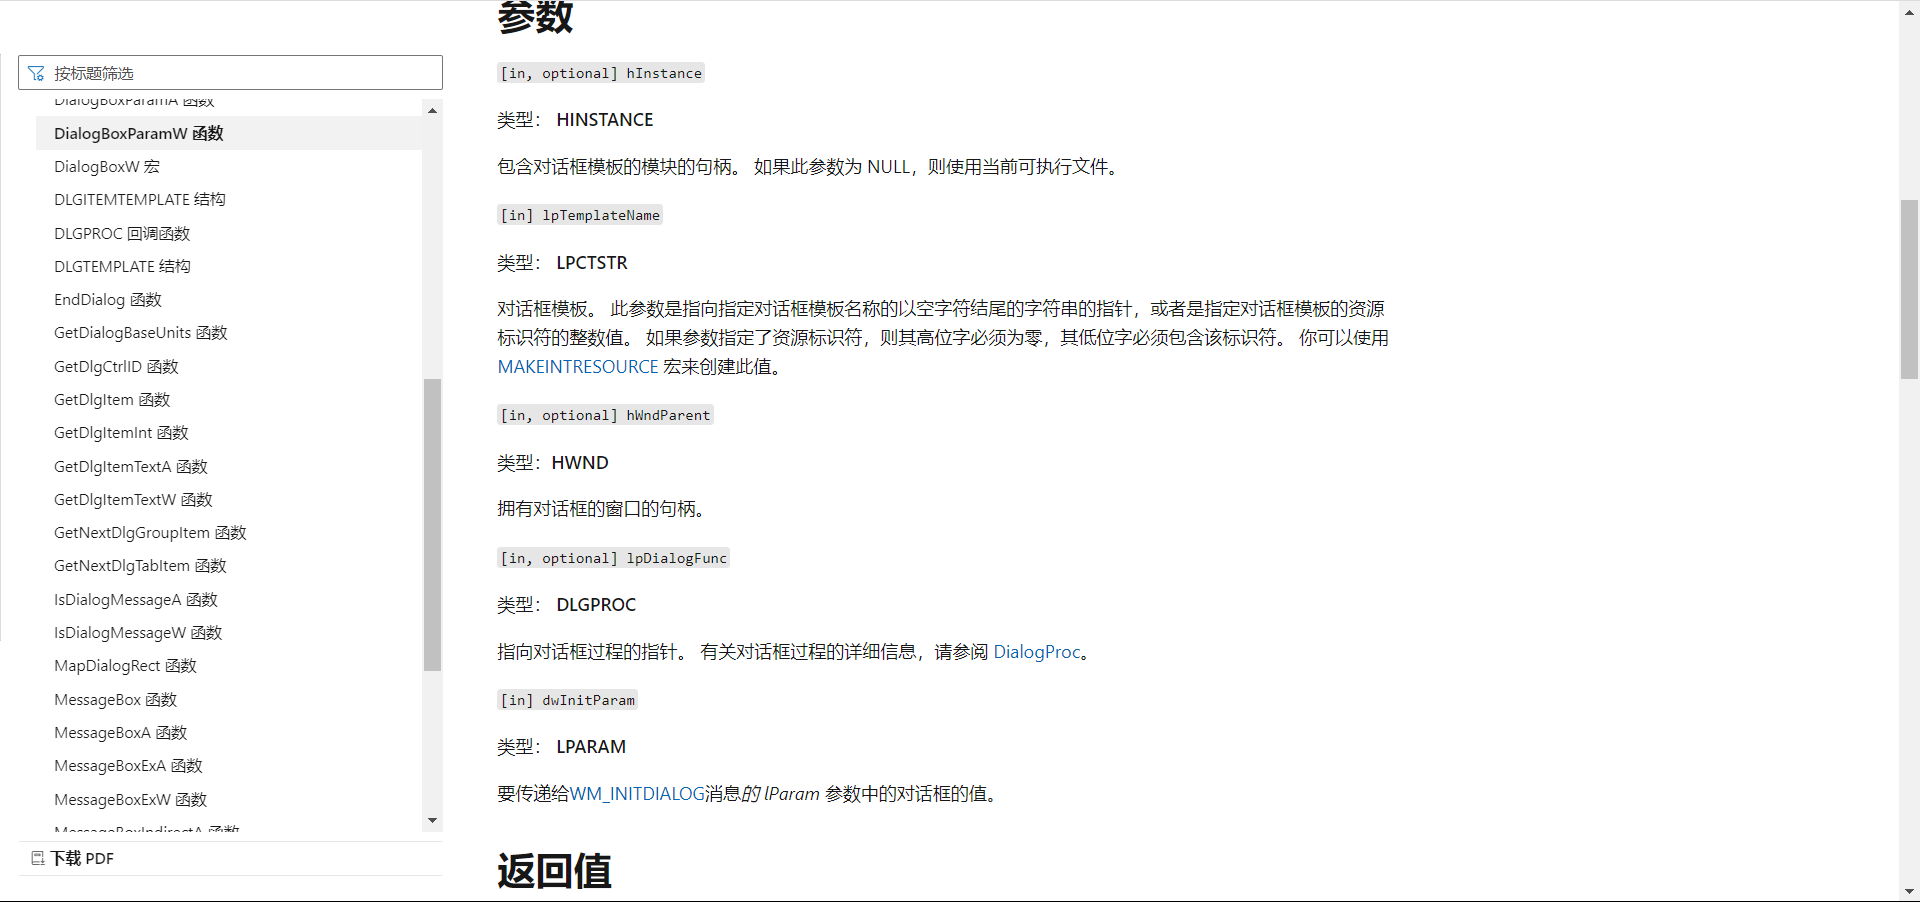
这里我们注意一下这个函数调用的第四个参数是指向对话框过程函数的,而上面调用的这个函数是当前函数的第三个参数,我们再往上退到 TopLevelExceptionFilter 就不难发现这个第三个参数 sub_7FF70C0211D0 一定就是我们的窗口过程函数了。
至此,我们就找到了窗口过程函数。
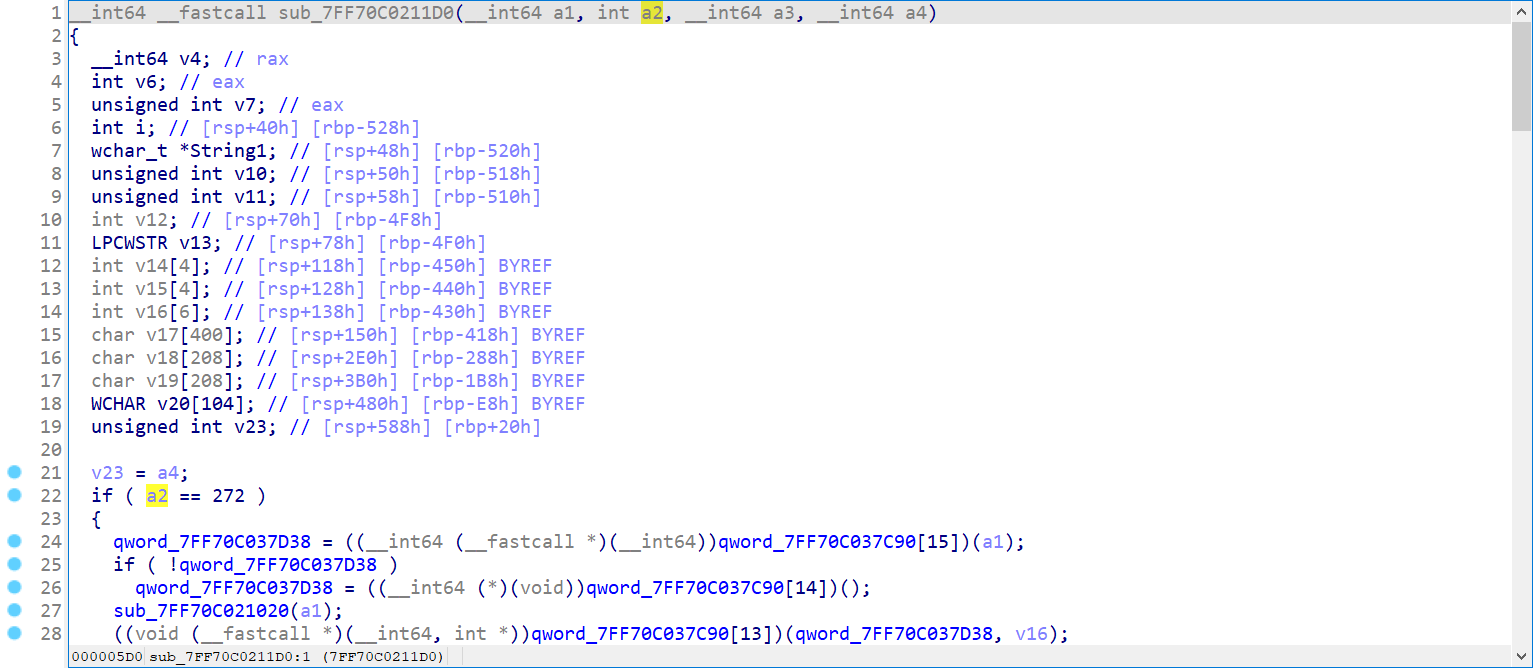
分析窗口过程函数
前面说过,窗口过程函数的原型是
LRESULT CALLBACK WndProc(HWND hWnd, UINT message, WPARAM wParam, LPARAM lParam)
第一个参数时窗口句柄,第二个参数是消息类型,后面几个参数就是普通参数,用于消息传递时携带额外的信息。
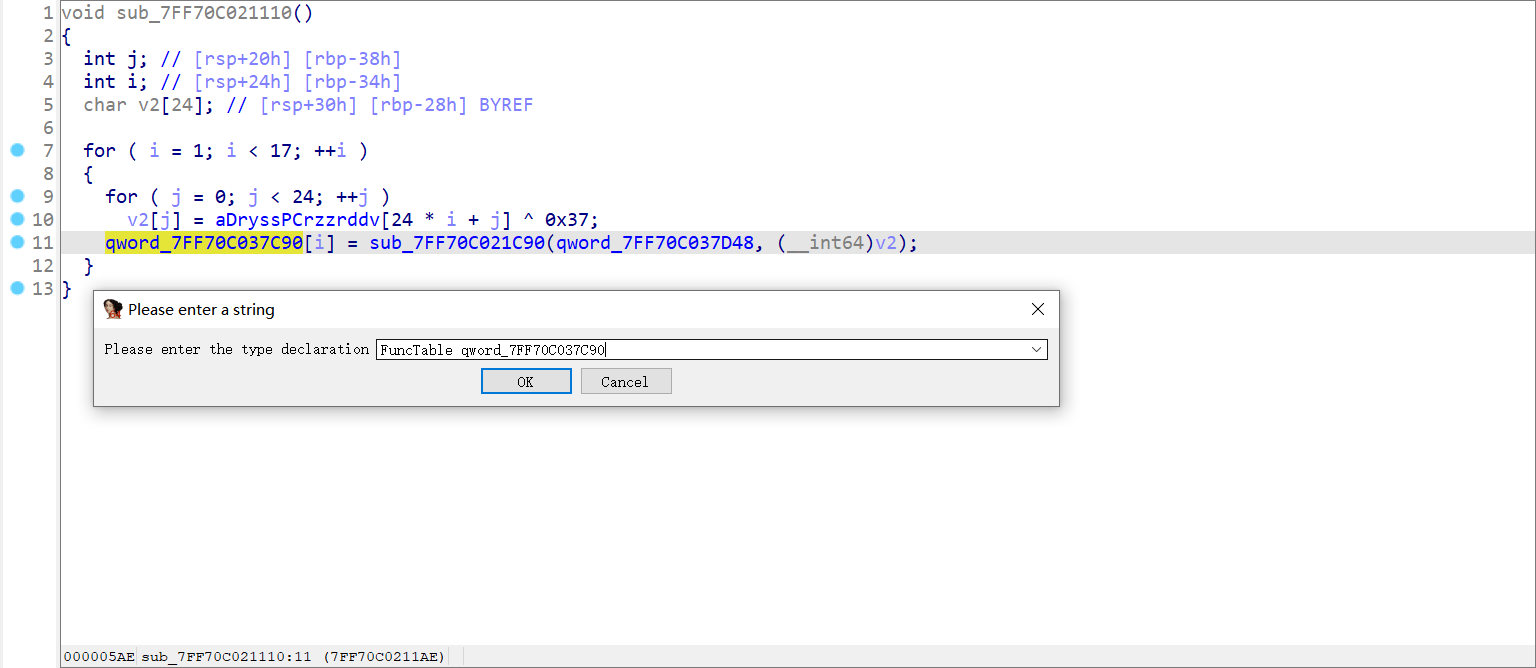
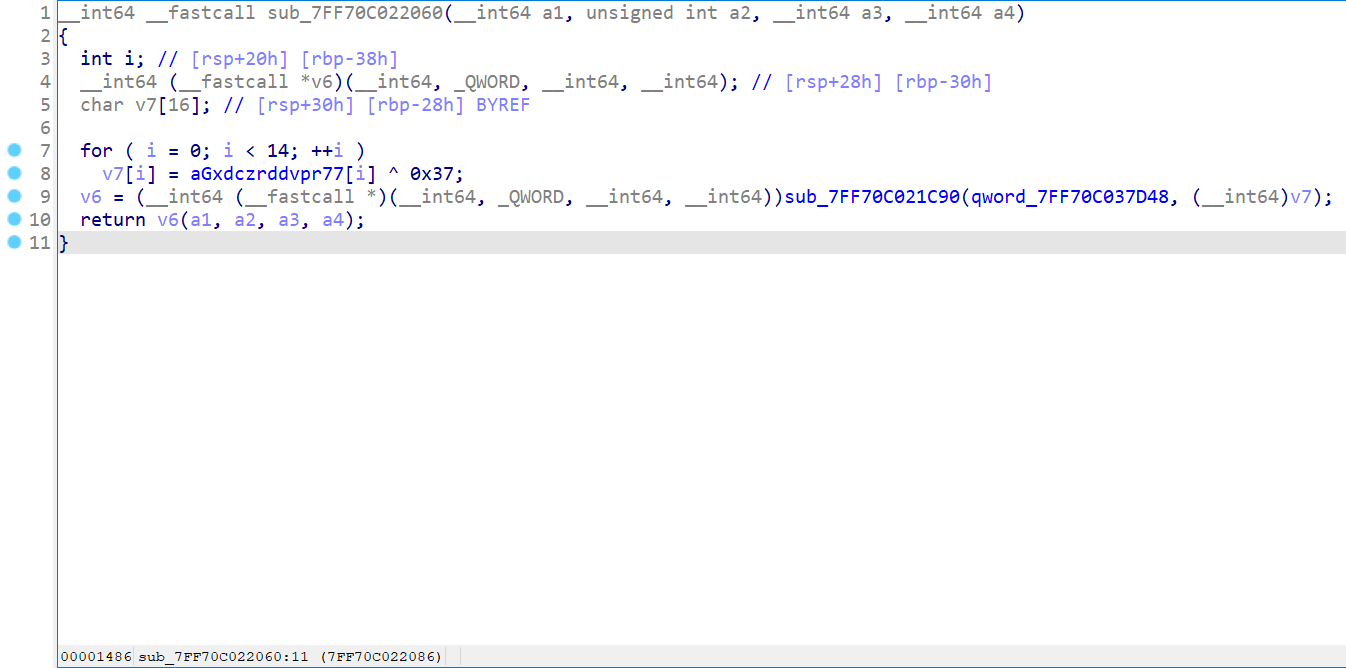
往下一看发现很多都是用变量做得参数,我们得先知道这些变量都是哪些函数,对 qword_7FF70C037C90 交叉引用。
找到这个地方:
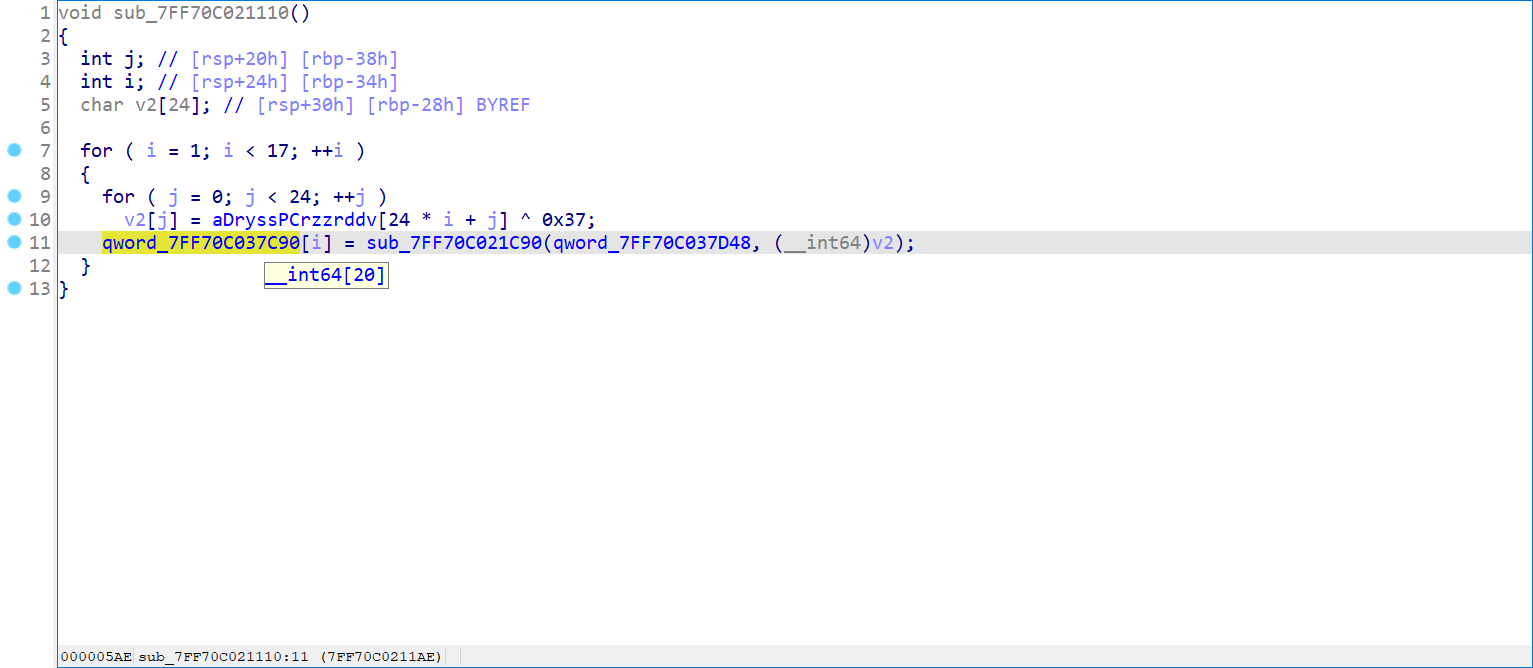
这里用下面的脚本跑一下符号表
#include
#include
unsigned char s[] =
{
0x64, 0x52, 0x59, 0x53, 0x73, 0x5B, 0x50, 0x7E, 0x43, 0x52,
0x5A, 0x7A, 0x52, 0x44, 0x44, 0x56, 0x50, 0x52, 0x60, 0x37,
0x37, 0x37, 0x37, 0x37, 0x70, 0x52, 0x43, 0x73, 0x5B, 0x50,
0x7E, 0x43, 0x52, 0x5A, 0x7E, 0x59, 0x43, 0x37, 0x37, 0x37,
0x37, 0x37, 0x37, 0x37, 0x37, 0x37, 0x37, 0x37, 0x70, 0x52,
0x43, 0x73, 0x5B, 0x50, 0x7E, 0x43, 0x52, 0x5A, 0x63, 0x52,
0x4F, 0x43, 0x60, 0x37, 0x37, 0x37, 0x37, 0x37, 0x37, 0x37,
0x37, 0x37, 0x64, 0x52, 0x59, 0x53, 0x7A, 0x52, 0x44, 0x44,
0x56, 0x50, 0x52, 0x60, 0x37, 0x37, 0x37, 0x37, 0x37, 0x37,
0x37, 0x37, 0x37, 0x37, 0x37, 0x37, 0x7B, 0x58, 0x56, 0x53,
0x7E, 0x54, 0x58, 0x59, 0x60, 0x37, 0x37, 0x37, 0x37, 0x37,
0x37, 0x37, 0x37, 0x37, 0x37, 0x37, 0x37, 0x37, 0x37, 0x37,
0x7A, 0x52, 0x44, 0x44, 0x56, 0x50, 0x52, 0x75, 0x58, 0x4F,
0x60, 0x37, 0x37, 0x37, 0x37, 0x37, 0x37, 0x37, 0x37, 0x37,
0x37, 0x37, 0x37, 0x37, 0x72, 0x59, 0x53, 0x73, 0x5E, 0x56,
0x5B, 0x58, 0x50, 0x37, 0x37, 0x37, 0x37, 0x37, 0x37, 0x37,
0x37, 0x37, 0x37, 0x37, 0x37, 0x37, 0x37, 0x37, 0x70, 0x52,
0x43, 0x73, 0x5B, 0x50, 0x7E, 0x43, 0x52, 0x5A, 0x37, 0x37,
0x37, 0x37, 0x37, 0x37, 0x37, 0x37, 0x37, 0x37, 0x37, 0x37,
0x37, 0x37, 0x64, 0x52, 0x43, 0x71, 0x58, 0x54, 0x42, 0x44,
0x37, 0x37, 0x37, 0x37, 0x37, 0x37, 0x37, 0x37, 0x37, 0x37,
0x37, 0x37, 0x37, 0x37, 0x37, 0x37, 0x70, 0x52, 0x43, 0x73,
0x5B, 0x50, 0x74, 0x43, 0x45, 0x5B, 0x7E, 0x73, 0x37, 0x37,
0x37, 0x37, 0x37, 0x37, 0x37, 0x37, 0x37, 0x37, 0x37, 0x37,
0x64, 0x52, 0x43, 0x60, 0x5E, 0x59, 0x53, 0x58, 0x40, 0x67,
0x58, 0x44, 0x37, 0x37, 0x37, 0x37, 0x37, 0x37, 0x37, 0x37,
0x37, 0x37, 0x37, 0x37, 0x78, 0x51, 0x51, 0x44, 0x52, 0x43,
0x65, 0x52, 0x54, 0x43, 0x37, 0x37, 0x37, 0x37, 0x37, 0x37,
0x37, 0x37, 0x37, 0x37, 0x37, 0x37, 0x37, 0x37, 0x74, 0x58,
0x47, 0x4E, 0x65, 0x52, 0x54, 0x43, 0x37, 0x37, 0x37, 0x37,
0x37, 0x37, 0x37, 0x37, 0x37, 0x37, 0x37, 0x37, 0x37, 0x37,
0x37, 0x37, 0x70, 0x52, 0x43, 0x60, 0x5E, 0x59, 0x53, 0x58,
0x40, 0x65, 0x52, 0x54, 0x43, 0x37, 0x37, 0x37, 0x37, 0x37,
0x37, 0x37, 0x37, 0x37, 0x37, 0x37, 0x70, 0x52, 0x43, 0x73,
0x52, 0x44, 0x5C, 0x43, 0x58, 0x47, 0x60, 0x5E, 0x59, 0x53,
0x58, 0x40, 0x37, 0x37, 0x37, 0x37, 0x37, 0x37, 0x37, 0x37,
0x70, 0x52, 0x43, 0x67, 0x56, 0x45, 0x52, 0x59, 0x43, 0x37,
0x37, 0x37, 0x37, 0x37, 0x37, 0x37, 0x37, 0x37, 0x37, 0x37,
0x37, 0x37, 0x37, 0x37, 0x64, 0x52, 0x59, 0x53, 0x73, 0x5B,
0x50, 0x7E, 0x43, 0x52, 0x5A, 0x7A, 0x52, 0x44, 0x44, 0x56,
0x50, 0x52, 0x60, 0x37, 0x37, 0x37, 0x37, 0x37, 0x00
};
int main() {
char v2[25];
for (int i = 1; i
这里我建议,新建一个结构体,给这个数组。
Shift+F1 然后 ins 插入以下结构体:
struct FuncTable{
void * reserved;//因为下标从 1 开始,所以0位置为保留字段
void * GetDlgItemInt;
void * GetDlgItemTextW;
void * SendMessageW;
void * LoadIconW;
void * MessageBoxW;
void * EndDialog;
void * GetDlgItem;
void * SetFocus;
void * GetDlgCtrlID;
void * SetWindowPos;
void * OffsetRect;
void * CopyRect;
void * GetWindowRect;
void * GetDesktopWindow;
void * GetParent;
void * SendDlgItemMessageW;
}
对着变量按个 y 把定义改一下
然后回到消息处理主函数代码就变得可读多了
可以观察到,消息类型只有 272 和 273 的处理,但是我们发现还有里面还有很多函数又 272 273 的参数,于是猜测这些函数可能是用来发消息的。
拿到其中一个分析一下
还是一样的脚本套路:
char s[] = "gXDCzRDDVPR`77";
for (int i = 0; i
找 MSDN 看看这个 API 是干嘛的。
那没错,就是发消息的,所以我们根据这里的消息处理函数以及中间的发消息跳转可以合理地得到流程。
272 消息流程看下来像是窗体初始化的一部分,那我们看看 273 消息流程。
很惊喜,就是 GetDlgItemInt,应该是获取 uid 输入的一部分。
那么第二步应该就是获取 Key 了,进行一顿分析就差不多能看清楚这一部分的流程了。
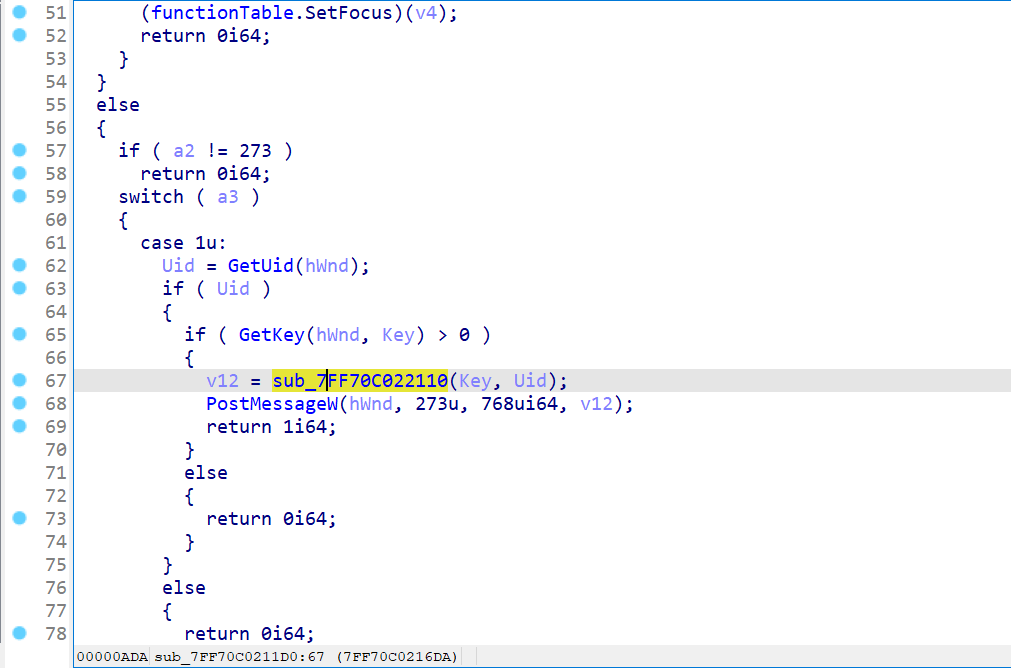
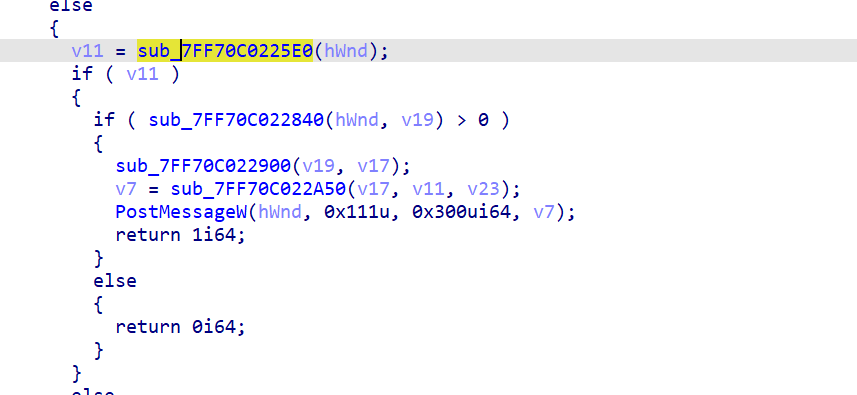
下面这一个函数的出来一个返回值,然后 Post 一个 Message 上去了,我们就往下看,有一个 case 0x300,也就是这里之后的流程。
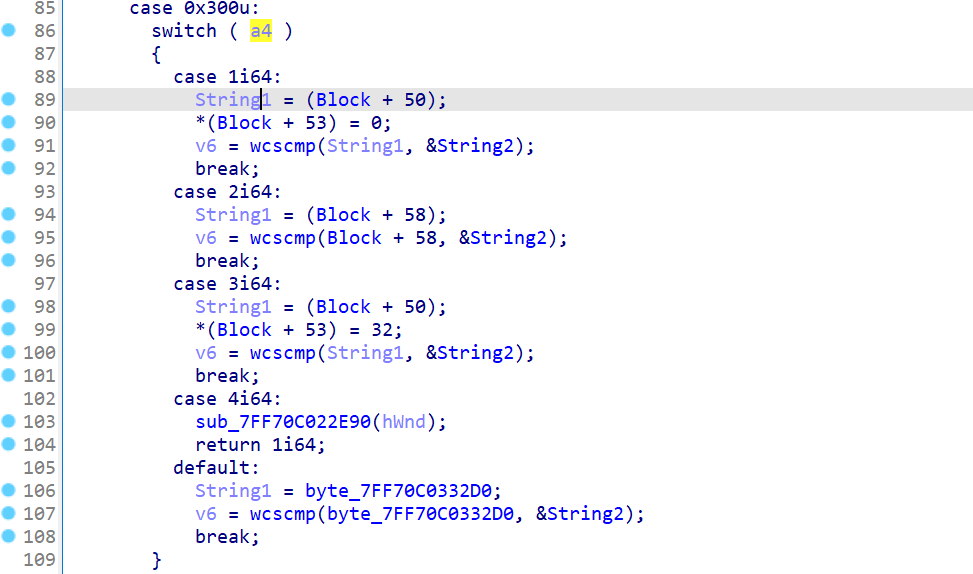
那这里就是根据上面的返回值来确定,这里选哪个选项了。
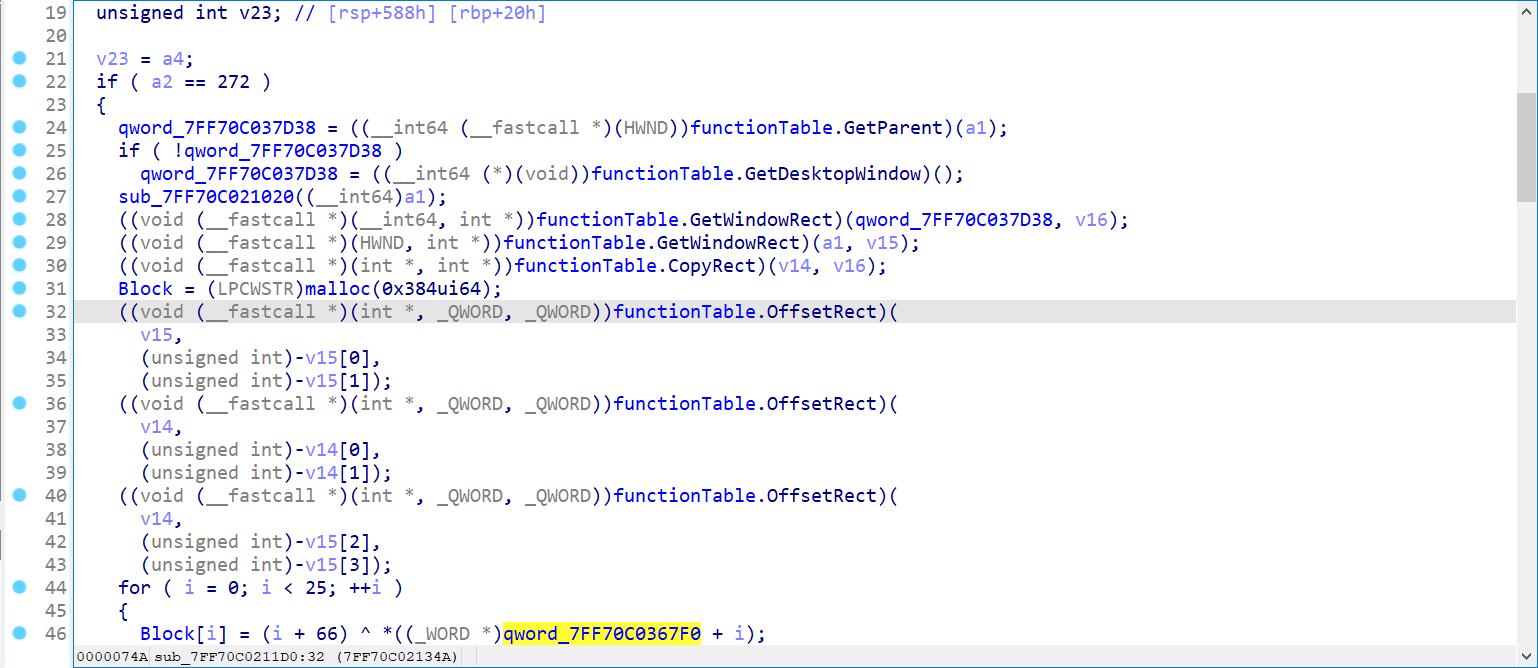
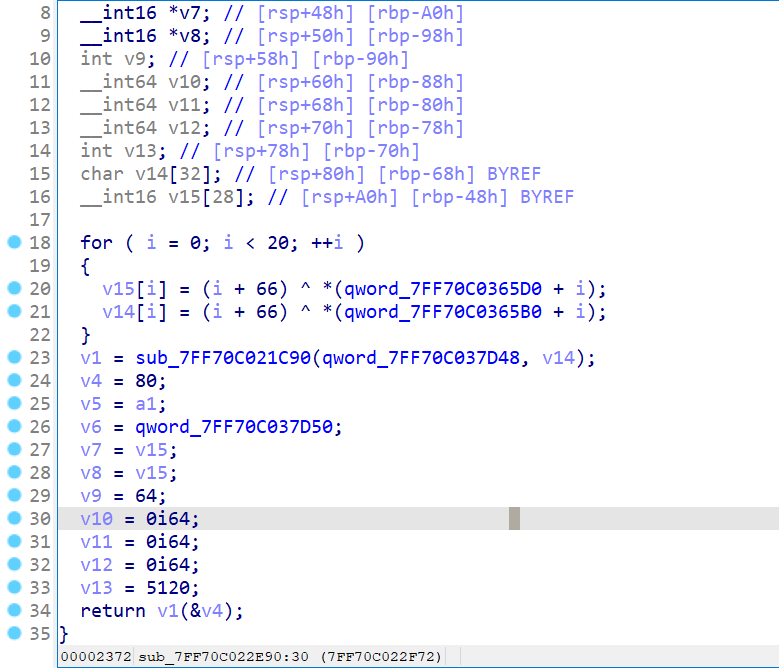
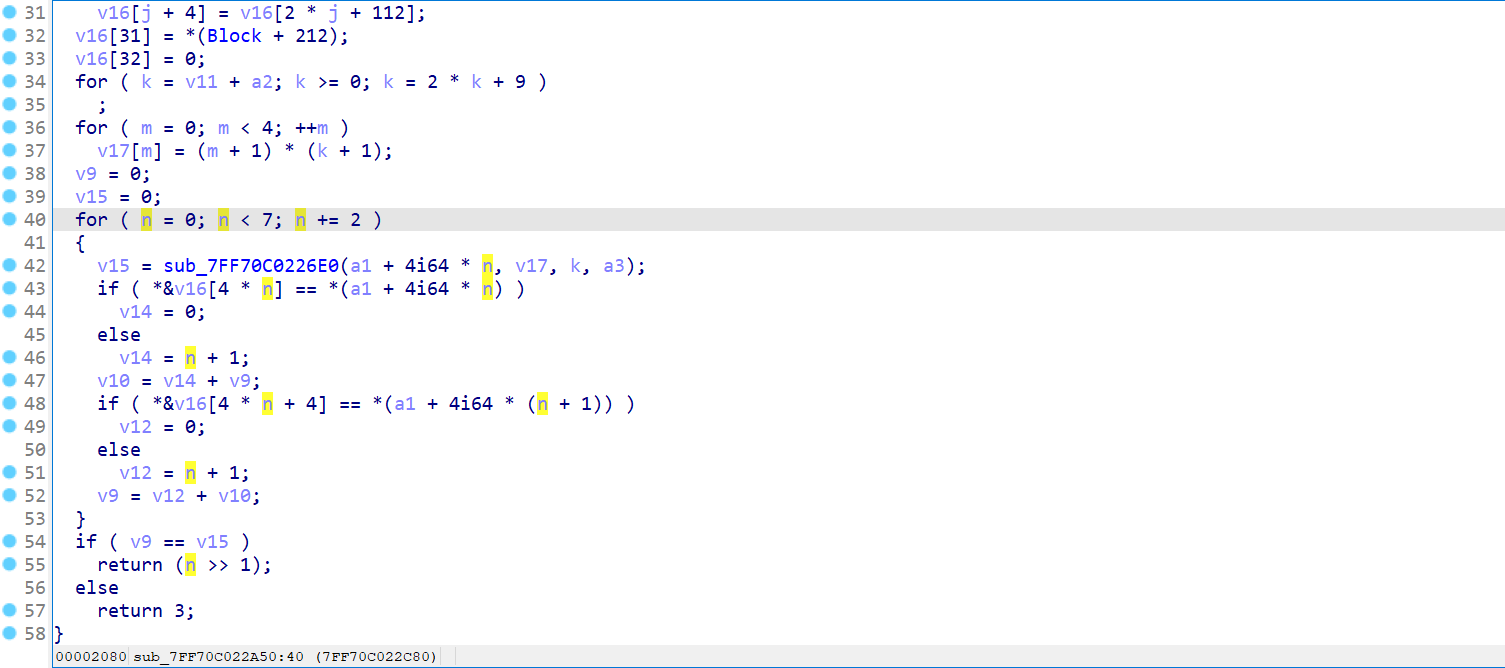
这里都有对 Block 进行操作,而 272 消息处理中有对 Block 的初始化,这里直接 dump 然后照着它的流程去输出就好了,去看看这里 Block 都是些什么值,目测应该是宽字符串。
unsigned char dworditem[] =
{
0x12, 0x00, 0x2F, 0x00, 0x21, 0x00, 0x24, 0x00, 0x35, 0x00,
0x22, 0x00, 0x68, 0x00, 0x20, 0x00, 0x24, 0x00, 0x3B, 0x00,
0x39, 0x00, 0x39, 0x00, 0x6E, 0x00, 0x2E, 0x00, 0x70, 0x00,
0x27, 0x00, 0x33, 0x00, 0x3F, 0x00, 0x3D, 0x00, 0x31, 0x00,
0x76, 0x00, 0x72, 0x00, 0x2B, 0x00, 0x77, 0x00, 0x5A, 0x00,
0x11, 0x00, 0x36, 0x00, 0x27, 0x00, 0x26, 0x00, 0x23, 0x00,
0x34, 0x00, 0x3B, 0x00, 0x68, 0x00, 0x4A, 0x00, 0x1D, 0x00,
0x7F, 0x00, 0x05, 0x00, 0x38, 0x00, 0x0C, 0x00, 0x69, 0x00,
0x17, 0x00, 0x17, 0x00, 0x73, 0x00, 0x01, 0x00, 0x30, 0x00,
0x75, 0x00, 0x7E, 0x00, 0x2A, 0x00, 0x78, 0x00, 0x5B, 0x00,
0x17, 0x00, 0x0A, 0x00, 0x00, 0x00, 0x65, 0x00, 0x27, 0x00,
0x29, 0x00, 0x2C, 0x00, 0x69, 0x00, 0x21, 0x00, 0x2E, 0x00,
0x35, 0x00, 0x4D, 0x00, 0x2B, 0x00, 0x7B, 0x00, 0x28, 0x00,
0x72, 0x00, 0x06, 0x00, 0x34, 0x00, 0x27, 0x00, 0x6C, 0x00,
0x02, 0x00, 0x65, 0x00, 0x1E, 0x00, 0x0C, 0x00, 0x58, 0x00,
0x07, 0x00, 0x31, 0x00, 0x36, 0x00, 0x2A, 0x00, 0x34, 0x00,
0x47, 0x00, 0x1B, 0x00, 0x60, 0x00, 0x7D, 0x00, 0x08, 0x00,
0x29, 0x00, 0x6B, 0x00, 0x6B, 0x00, 0x3A, 0x00, 0x69, 0x00,
0x35, 0x00, 0x27, 0x00, 0x15, 0x00, 0x06, 0x00, 0x34, 0x00,
0x20, 0x00, 0x61, 0x00, 0x2F, 0x00, 0x3F, 0x00, 0x59, 0x00,
0x24, 0x00, 0x2F, 0x00, 0x25, 0x00, 0x22, 0x00, 0x3D, 0x00,
0x47, 0x00, 0x35, 0x00, 0x49, 0x00, 0x29, 0x00, 0x1D, 0x00,
0x05, 0x00, 0x1A, 0x00, 0x7C, 0x00, 0x2E, 0x00, 0x13, 0x00,
0x17, 0x00, 0x15, 0x00, 0x07, 0x00, 0x66, 0x00, 0x27, 0x00,
0x31, 0x00, 0x72, 0x00, 0x71, 0x00, 0x1A, 0x00, 0x5E, 0x00,
0x00, 0x00, 0x00, 0x00, 0x00, 0x00, 0x30, 0x11, 0x30, 0x11,
0x03, 0x22, 0x03, 0x22, 0x6C, 0x33, 0x7B, 0x33, 0x05, 0x44,
0x14, 0x44, 0x05, 0x55, 0x0C, 0x55, 0x39, 0x66, 0x28, 0x66,
0x32, 0x77, 0x20, 0x77, 0xD7, 0x88, 0xD1, 0x88, 0xDC, 0x99,
0xD8, 0x99, 0xF8, 0xAA, 0xF5, 0xAA, 0x89, 0xBB, 0x8B, 0xBB,
0xFE, 0xCC, 0xFF, 0xCC, 0xFC, 0xDD, 0xFC, 0xDD, 0xCF, 0xEE,
0xCF, 0xEE, 0x00, 0x00, 0x00, 0x00, 0x00, 0x00, 0x00, 0x00,
0x00, 0x00, 0x00, 0x00, 0x00, 0x00, 0x00, 0x00, 0x00, 0x00,
0x00, 0x00, 0x00, 0x00, 0x00, 0x00, 0x00, 0x00, 0x00, 0x00,
0x00, 0x00, 0x00, 0x00
};
WCHAR *Block = (WCHAR *)malloc(0x2000);
WCHAR* item = (WCHAR*)dworditem;
for (int i = 0; i
这里我们主要对 +0 +50 +58 +75 这几个偏移做测试,+100 是因为后面会用到。
其实程序拿过来我们如果稍微点点就能发现,这都是 MessageBox 上面弹窗的字符。
那么这里 case1 就是 invalid UID,case 2 就是 invalid key,case 3 就是 invalid UID and Key。
再去看看 Case 4,又有个异或解密。
unsigned char s[] =
{
0x11, 0x00, 0x36, 0x00, 0x27, 0x00, 0x26, 0x00, 0x23, 0x00,
0x34, 0x00, 0x3B, 0x00, 0x68, 0x00, 0x4A, 0x00, 0x1D, 0x00,
0x7F, 0x00, 0x05, 0x00, 0x38, 0x00, 0x0C, 0x00, 0x69, 0x00,
0x17, 0x00, 0x17, 0x00, 0x73, 0x00, 0x01, 0x00, 0x30, 0x00,
0x75, 0x00, 0x7E, 0x00, 0x2A, 0x00, 0x78, 0x00, 0x5B, 0x00,
0x00, 0x00, 0x00, 0x00, 0x00, 0x00
};
wchar_t *p=(wchar_t *)s;
for(int i=0;i
那这里我们就很清楚了,我们需要到这里的 case 4
我们去刚刚那个地方,看看函数会不会返回 4。
很明显要么是返回 0,要么是返回最近一次调用的函数值,这里进去一分析其实是一个 tea 加密。
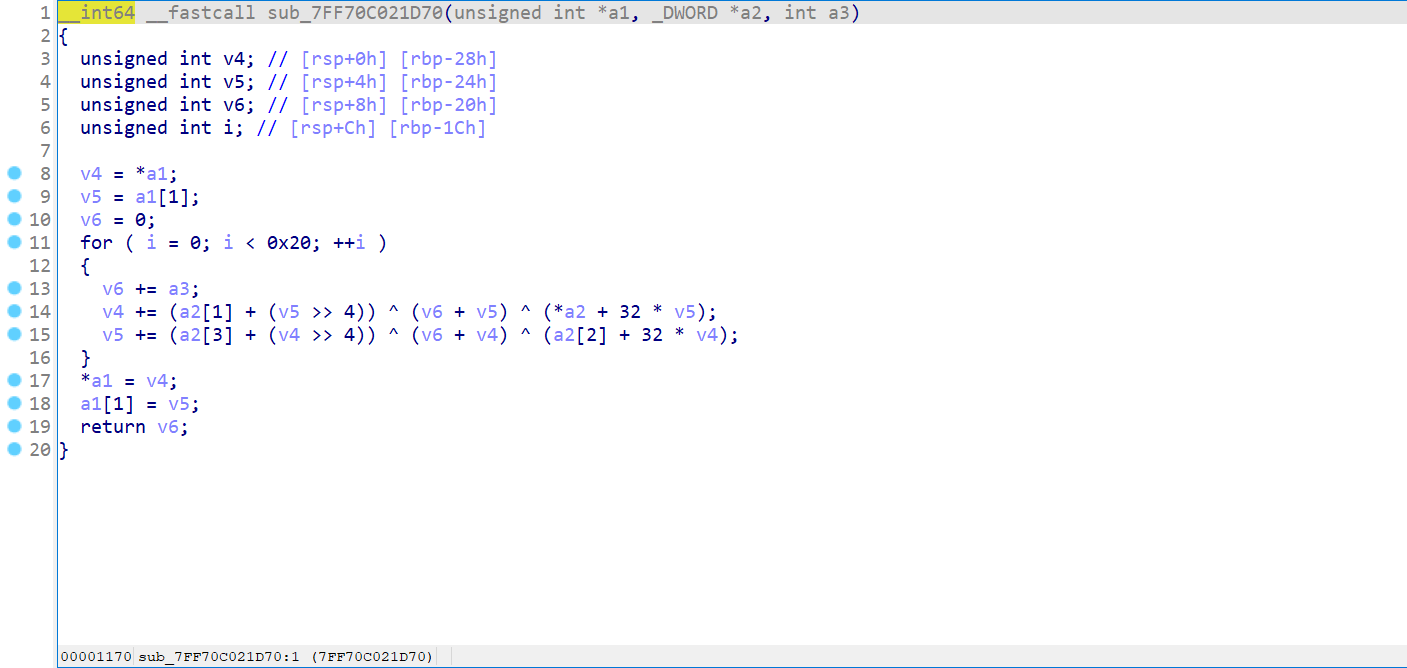
但是注意它这里对 destination 和 target 都进行了 tea 加密,所以等于没加。。但是这里一分析,如果我们让输入完全等于 target 的话,还是返回 0 不是我们要的答案。
而不一样要返回其它值的话我们具体看看 tea 加密返回值,是一个 0x20 倍的 a3。甭管 a3 是什么,你想让他返回 4 基本不可能了,可以证明的。。。
所以这里的逻辑,没必要分析,因为不管怎样过去都到 default 分支(这里结果只能是 0 或者 0x20 的倍数,一开始没仔细分析还以为会有欧皇号,结果都是众生平等哈哈哈)。
default 分支的 v6 永远返回 0,因为跟一个长度为 0 的字符串比较结果永远是相等的,所以落到 else 那边。
发现是熟悉的 GetUid 和 GetKey 的过程。
最后又发了一个 273 消息和参数 v7,那么无疑这里我们要让它返回 4 才行,那先进去看看。
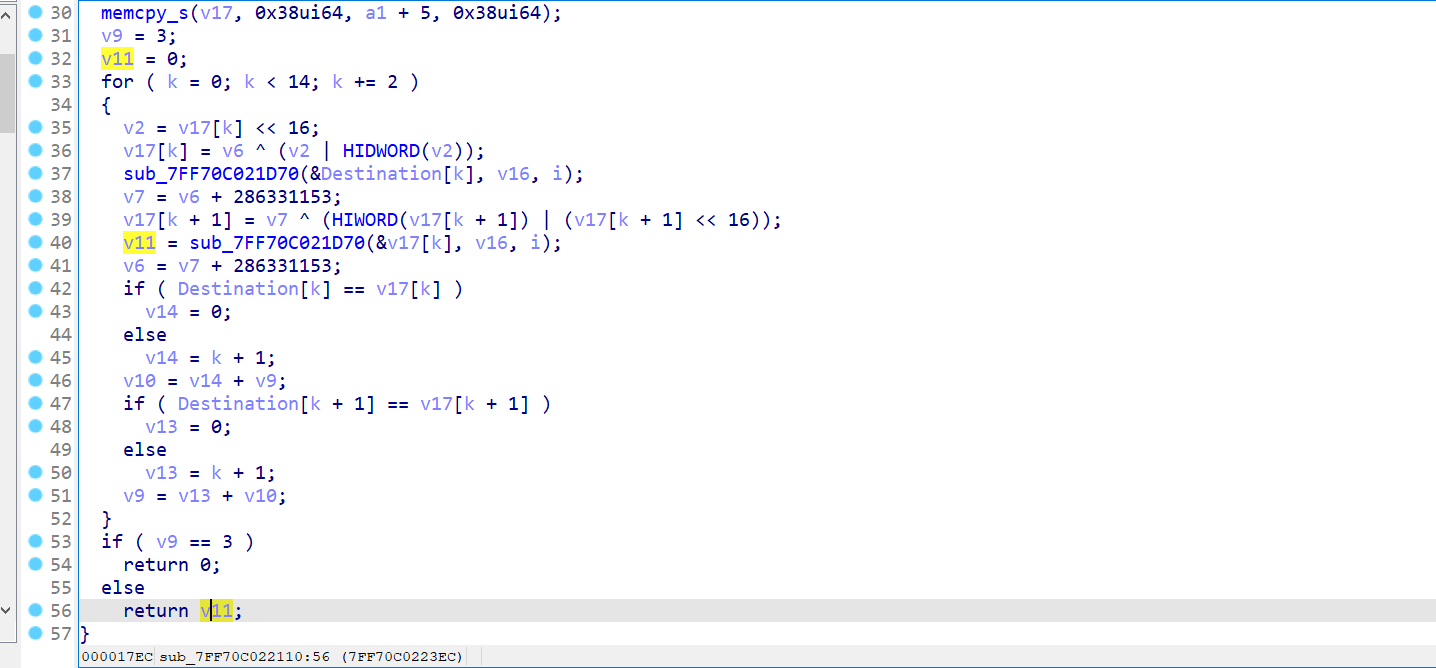
这里我们发现,我们只要让 v9==v15,他就会返回 n>>1,n 最终结果是 8 那么在最后就是返回 4,也就是我们要的答案。
进行了四轮比较,每次比较两个 int 值,都一样才能放过去。
这里有一个 target,target 会在运行到这里的时候才被解密出来,这里我们就不复刻它的流程了,直接断点打过来就行。
这里的 v16 就是我们要的最终结果

我们回过头看看它对我们的输入干了什么。
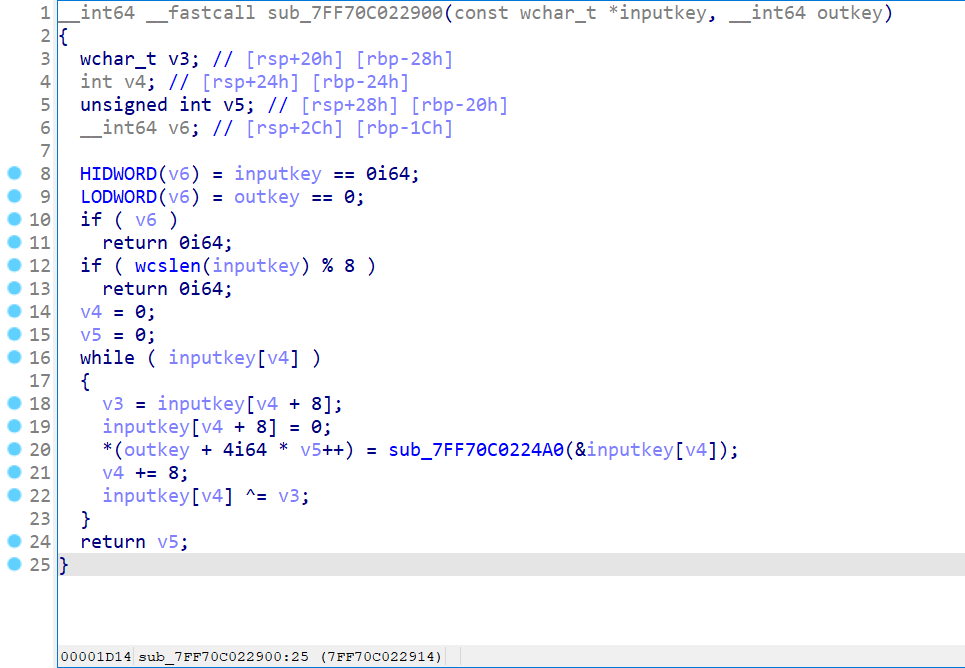
很明显,我们的 key 要满足长度为 8 的倍数。然后它每 8 个为一组进行处理。
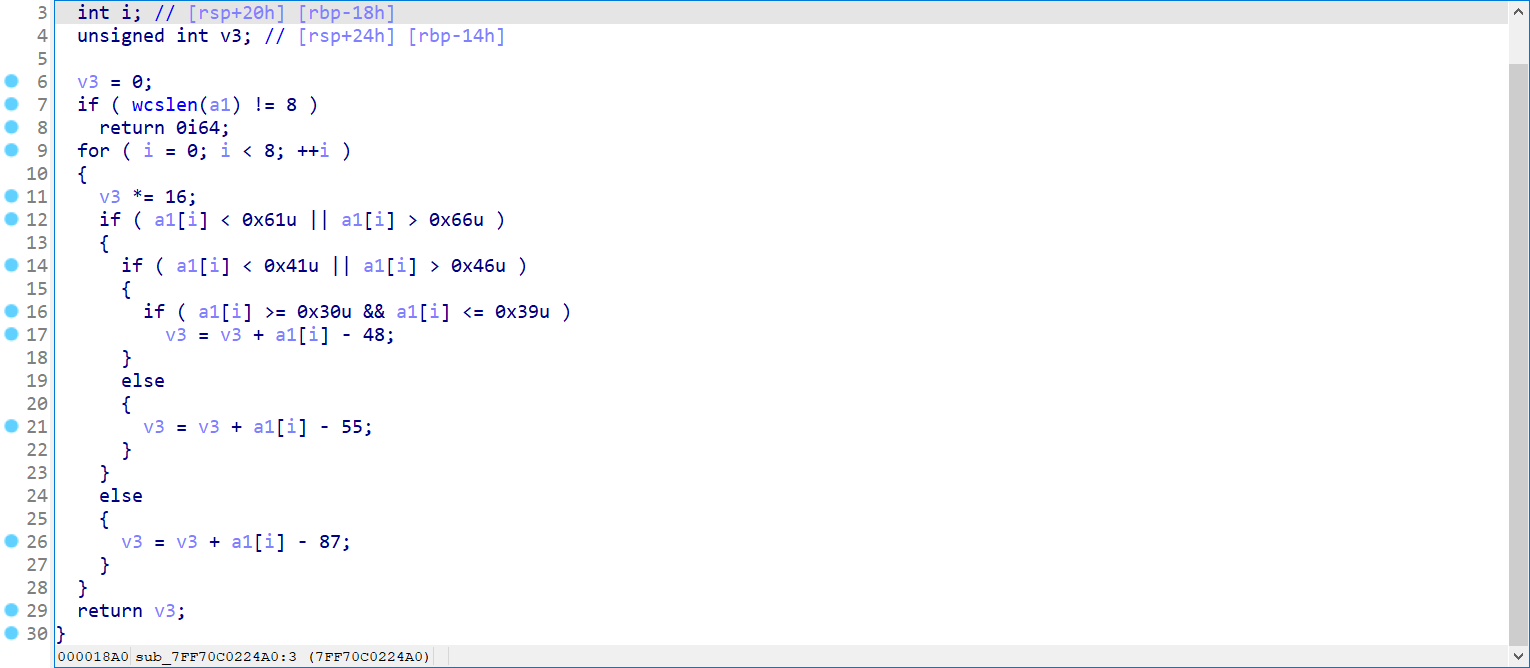
这个很明显就是普通的转 16 进制的脚本。这么说就是 8 个字符串转了一个 int。
那边比较了 4 轮,每轮两个 int,推过来就是 8 个 int,64 长度的字符串。
动态分析
因为静态起直接起不来,所以我们只能选择先运行然后附加的方式去调试。
因为关闭了 aslr,所以我们在 IDA 看到的地址和 x64dbg 的地址一模一样。
我们现在处理 key 函数的地方下一个断点,找一找它的目的地址。
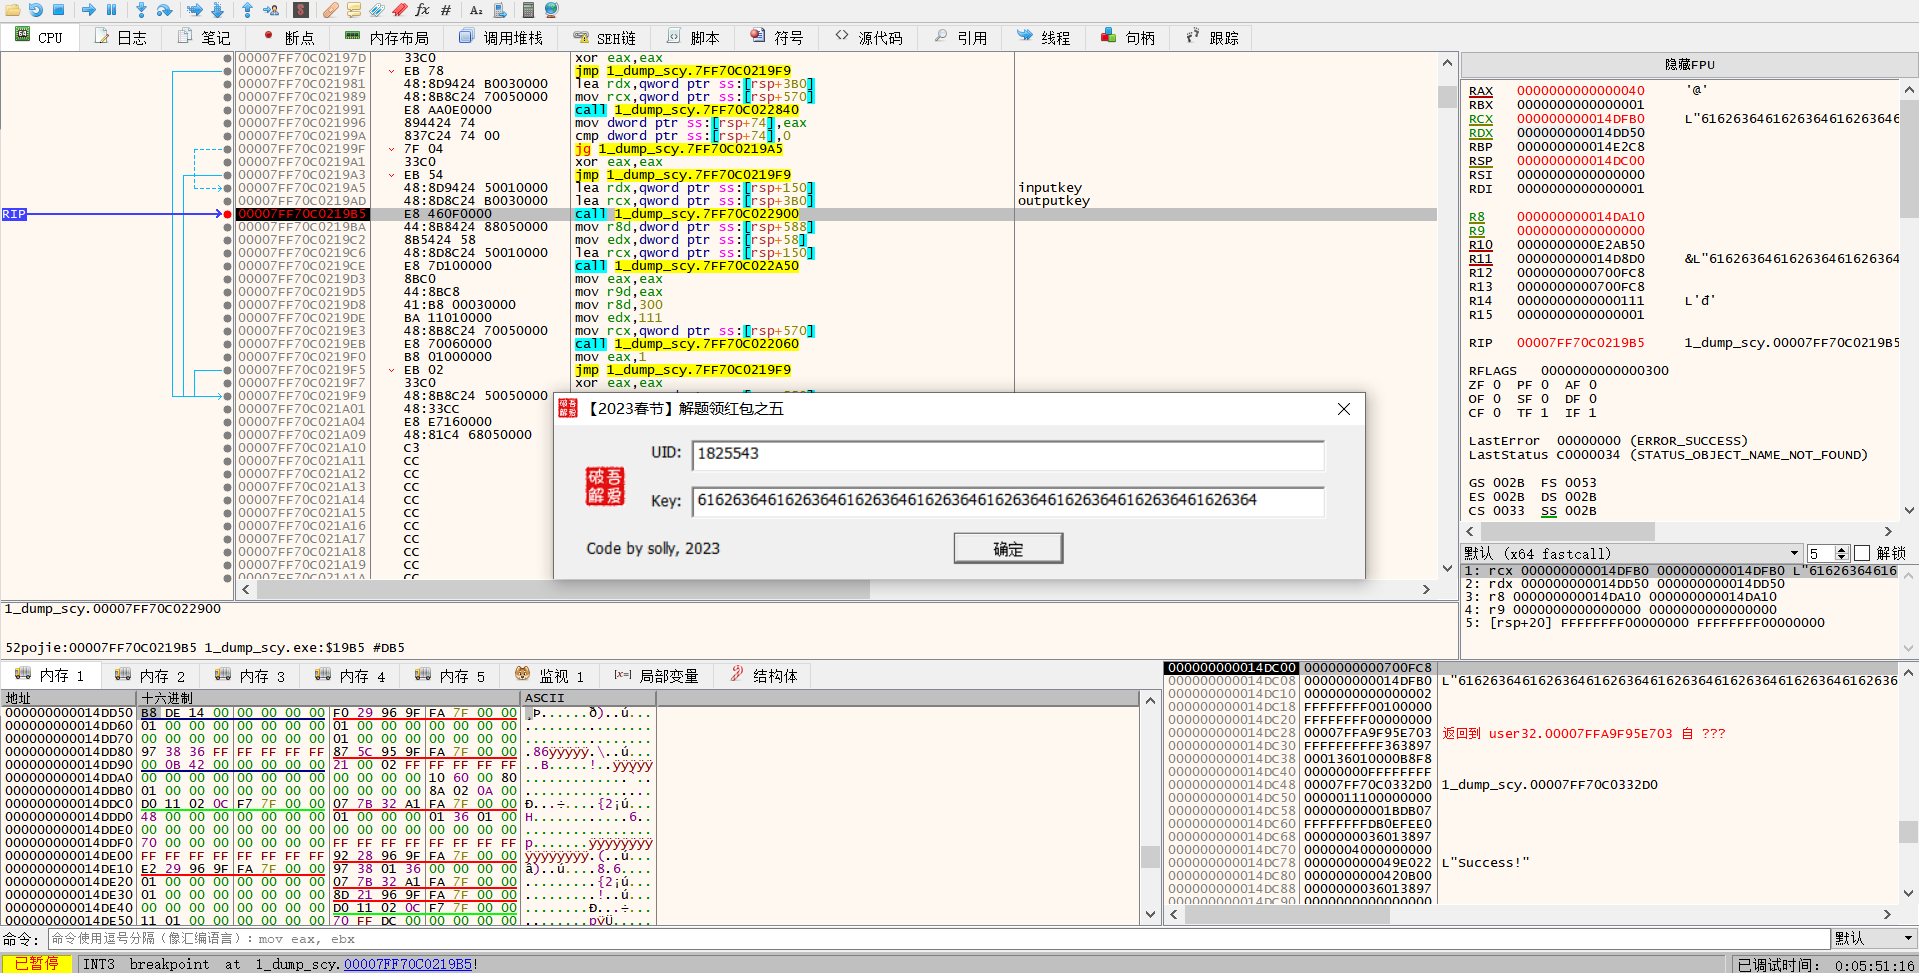
找到第二个参数转到内存位置,然后看看内存变化
可以发现,它是大端序存进去了,所以我们等会得到值出来得反一下。
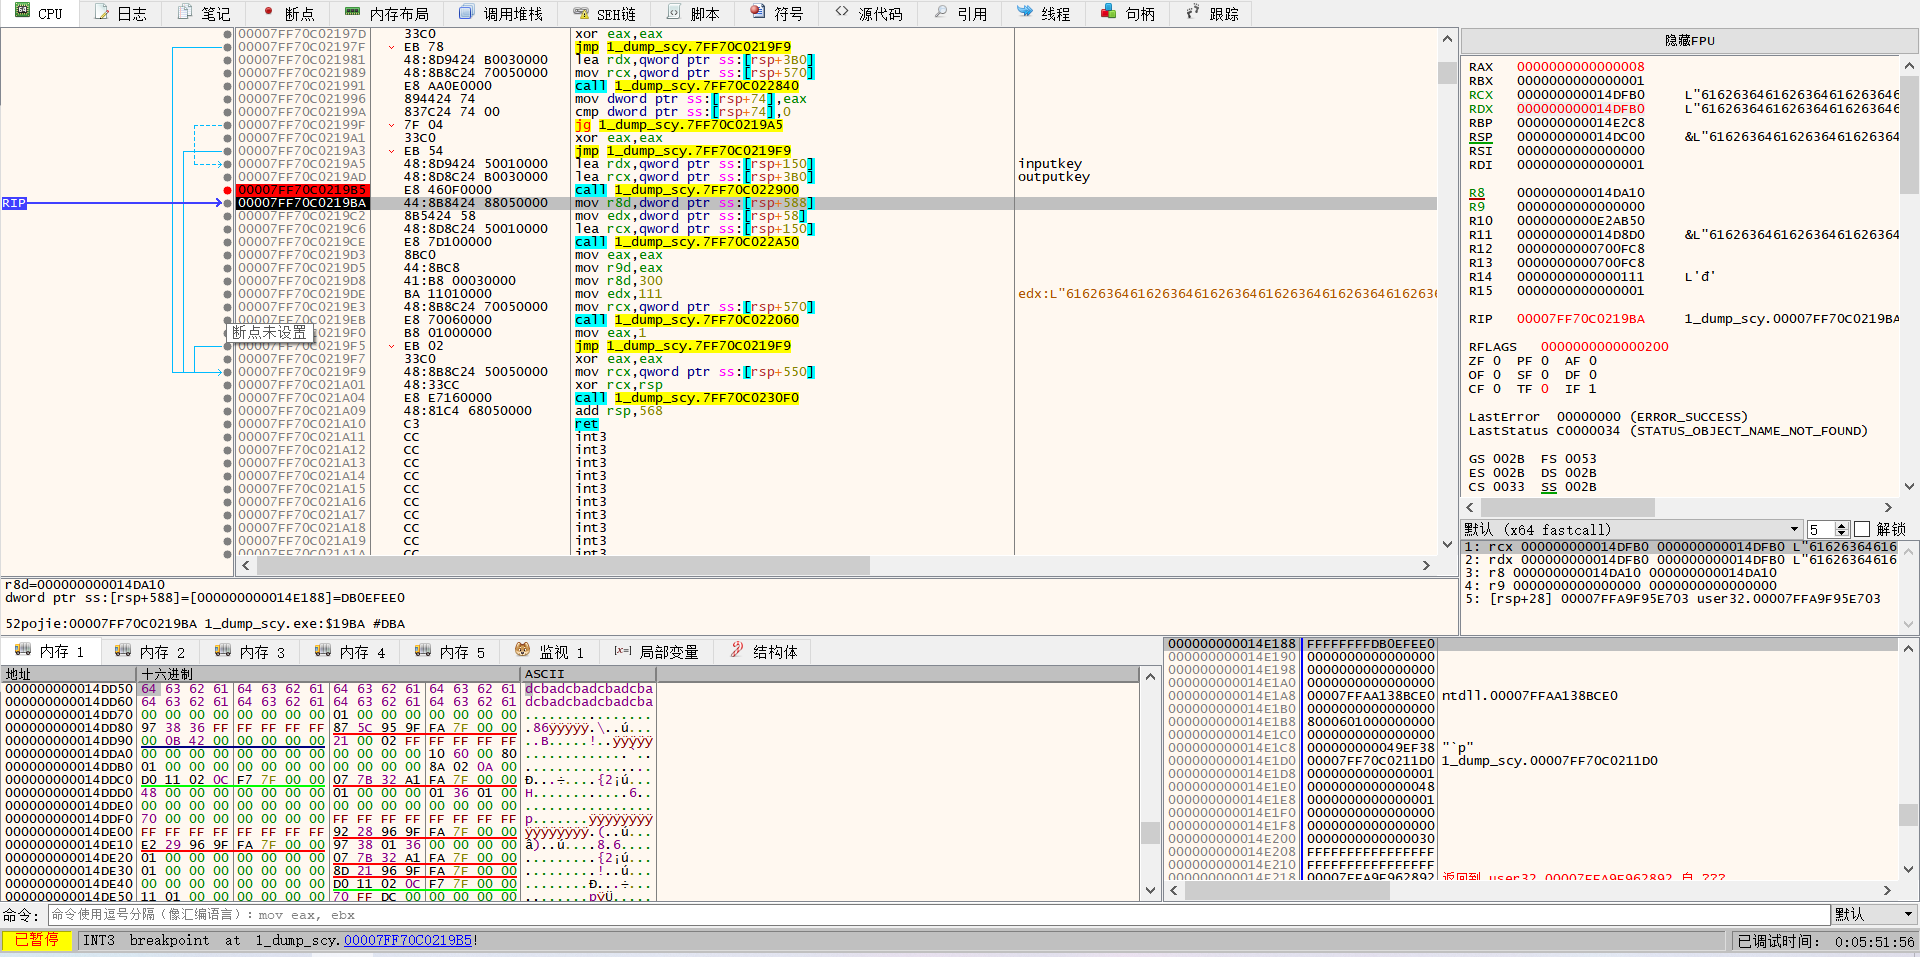
然后断点下在循环的加密函数,和两次比较当中去。
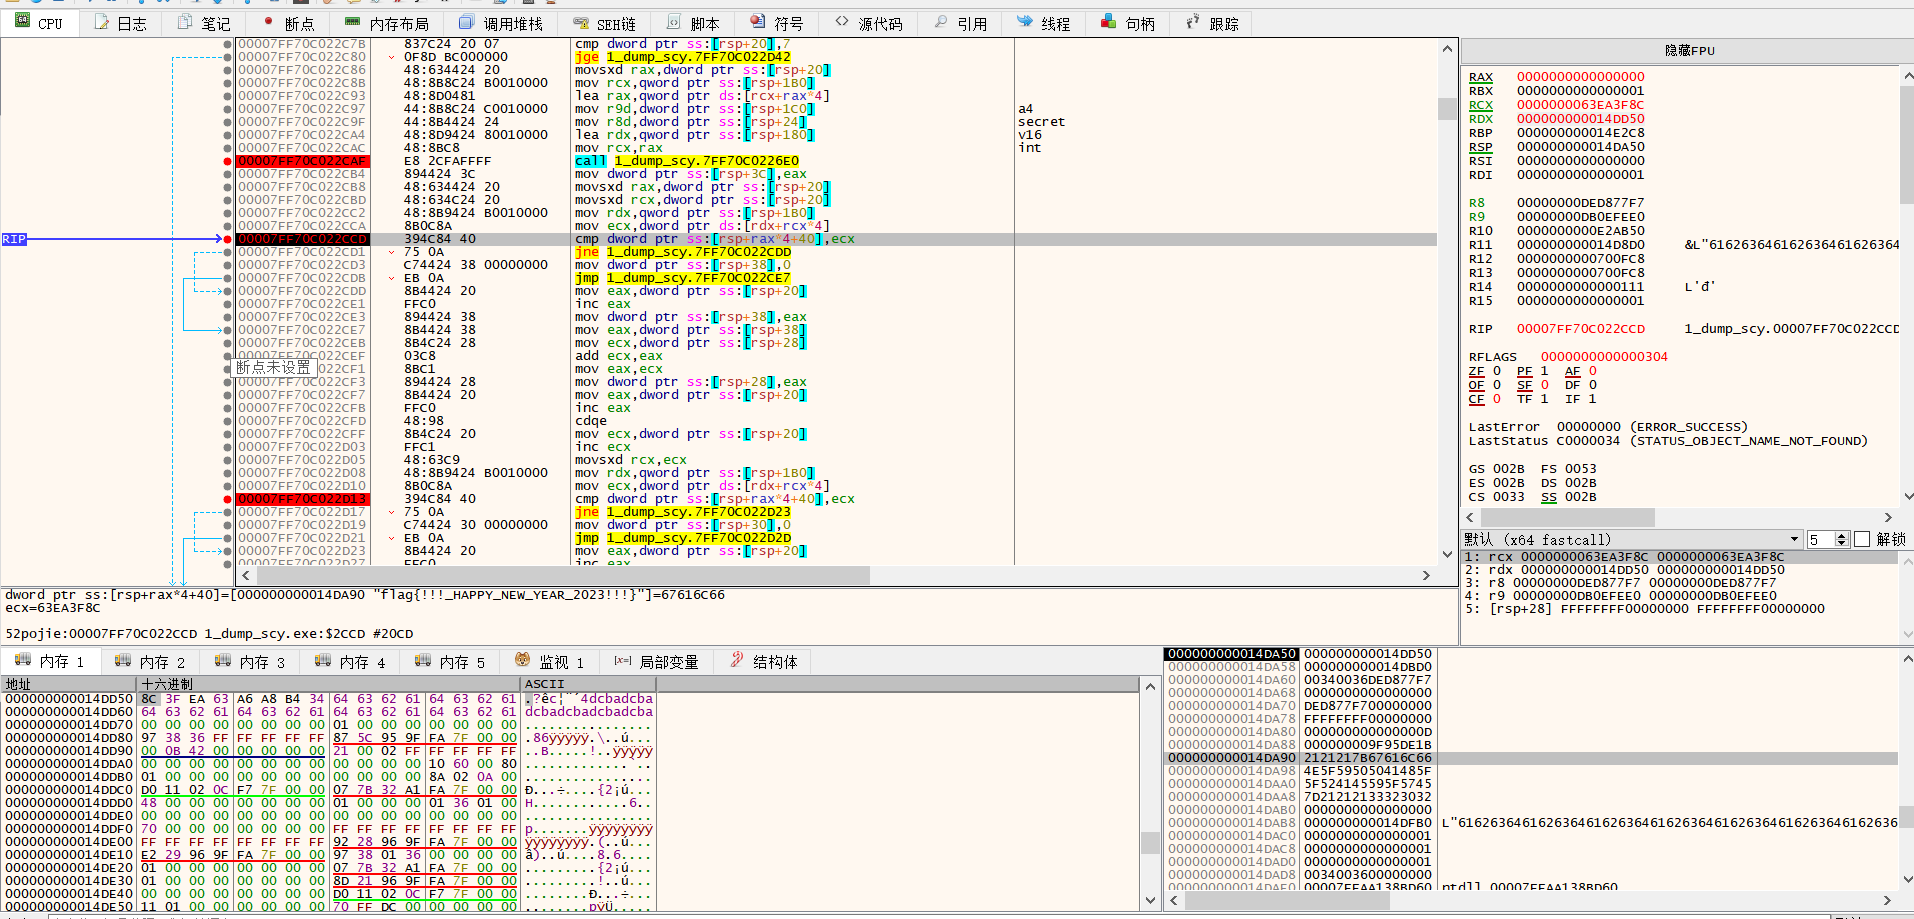
此时注意它和栈中的元素做了对比,我们看到栈这个位置,有一个类似 flag 的东西,拿到内存一看
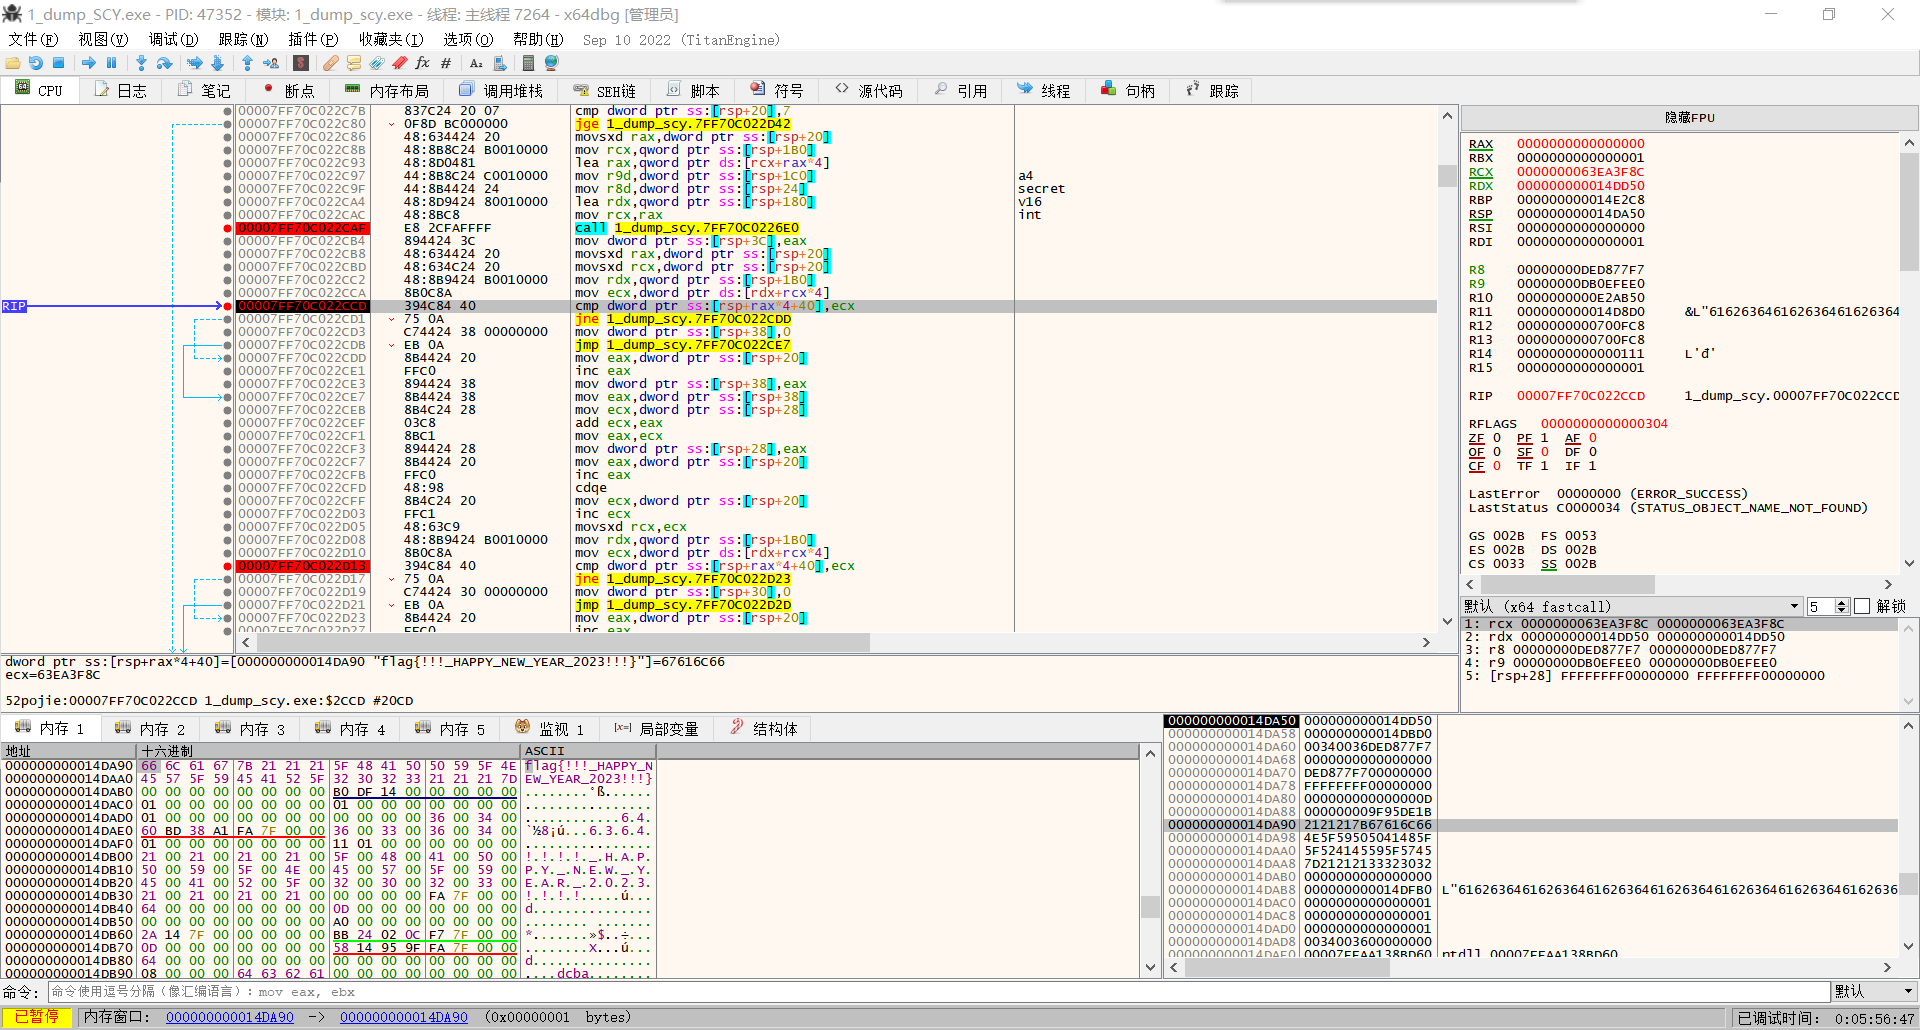
原来最终比较的结果是这样一个 flag 字符串,就是说我们的key 进去之后转 16 进制,再加密,得到的结果应该是这个 flag 字符串。
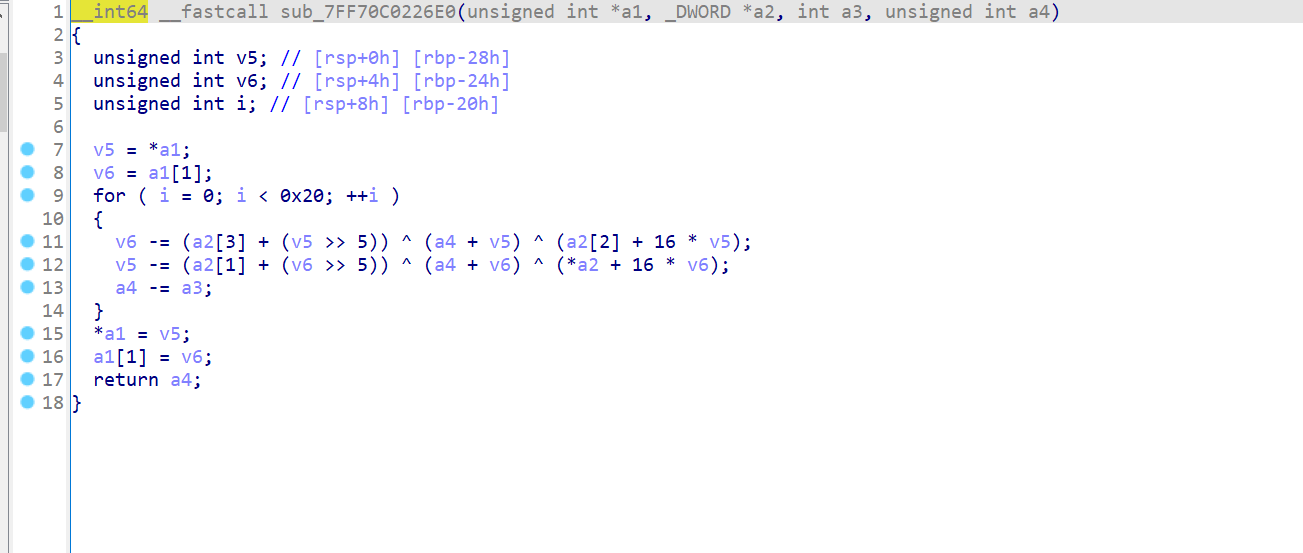
这似乎是一个 tea 解密。不过多了第四个参数,我们并不是很清楚,但是动调可以看到基本都是 0,只是不知道会不会有幸运儿的 uid 这里不是 0 的。
我们得到过程 inputkey -> 转 hex -> tea加密 -> flag
我们就直接从 flag 这边 先 tea 解密,然后 hex 编码,得到答案。
这里给出我写的注册机程序:
#include
#include
void encry(unsigned int* dest, unsigned int* v16, int secret) {
unsigned int v5; // [rsp+0h] [rbp-28h]
unsigned int v6; // [rsp+4h] [rbp-24h]
unsigned int i; // [rsp+8h] [rbp-20h]
unsigned a4 = 0;
v5 = *dest;
v6 = dest[1];
for (i = 0; i > 5)) ^ (a4 + v6) ^ (*v16 + 16 * v6);
v6 += (v16[3] + (v5 >> 5)) ^ (a4 + v5) ^ (v16[2] + 16 * v5);
}
*dest = v5;
dest[1] = v6;
return;
}
int Getuid() {
int i;
int uid = 1825543;
printf("input your uid:");
scanf("%d", &uid);
for (i = uid - 1; i >= 0; i = 2 * i + 9);
return i;
}
int main(){
int j,k;
unsigned secret = Getuid();
char* s = (char*)malloc(0x2000);
strcpy(s, "flag{!!!_HAPPY_NEW_YEAR_2023!!!}");
for (j = 0; j
小结
这题很活地应用了 windows 的消息机制,还是很有趣的,虽然我也被这玩意坑了,但是确实巧妙的。